
5 Ways Change Your Home Address in Google/Apple Map on Apple iPhone 13/iPad | Dr.fone
5 Ways:Change Your Home Address in Google/Apple Map on Apple iPhone 13/iPad
Nothing feels more convenient than identifying the direction to your home with just a few clicks. Likewise, your Apple iPhone 13 can take you home with just a few clicks on the address registered on the maps app. But what if your home address changes? How would you update your new address on your Apple iPhone 13? Read further to know the details about changing your home address on your Apple iPhone 13**!**
You can use dual maps apps on an iPhone, i.e., Google Maps and Apple Maps. Both the apps use the address registered on your contact card on your Apple iPhone 13. But the question arises of how to update the home address on iPhone. Although your phone can detect your location, it can’t set it as your home address on its own. In this article, we will discuss some of the most common ways of setting a home address on an iPhone. So, let’s get started!
You can watch the video below to change your location on Google/Apple Map
Part 1: How to Change Your Home Address in Google Maps on iPhone
You can easily set your home address in Google maps on your Apple iPhone 13. It helps easily get the correct directions to your destination from and to your home. But when you shift to a new place, you need to update your new home address on Google maps.
Follow the steps given below to know how to change your home address in Google maps on your Apple iPhone 13:
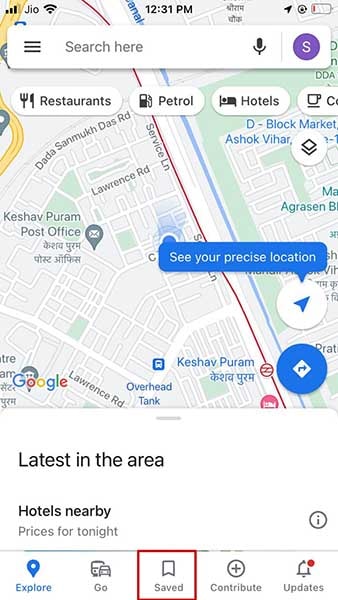
- Step1: Open Google Maps on your Apple iPhone 13 and tap on the “Saved” icon at the bottom of the home screen.
- Step2: Under this section, you will see another section named “Your Lists”.
- Step3: In this section, tap on the option named “Labelled”.
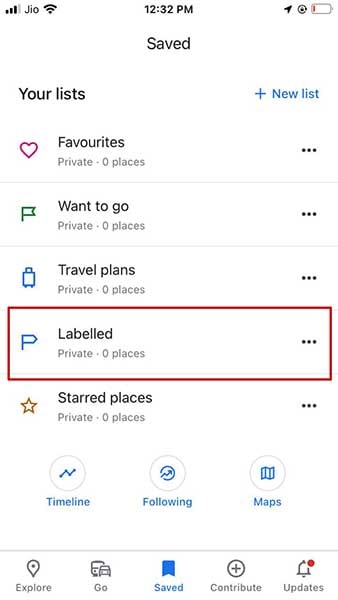
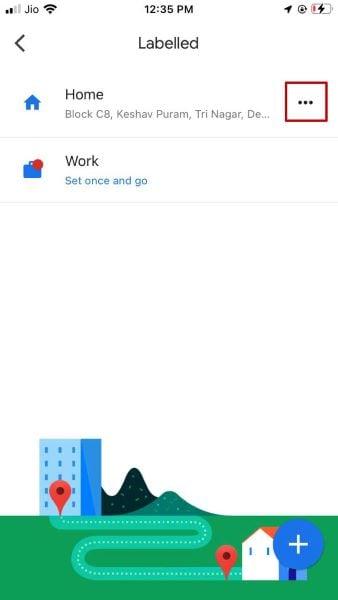
- Step4: The “Labelled” section shows the list of your labeled places such as home, office, etc.
- Step5: You will find the three dots next to each place. For example, tap on the one next to “Home”.
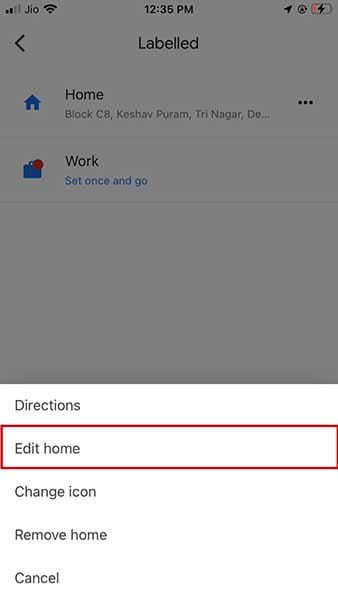
- Step6: When you click on these three dots, you will find different options. For example, select “Edit home”.
- Step7: A new screen will open. Here, you can remove your old address and type the new one. Else you can locate your current home address on the map.
- Step8: Click on the “Save” option available at the bottom of the screen to save your new address.
Part 2: How to Change Your Home Address in Apple Maps on iPhone
Unlike Google Maps, Apple Map doesn’t allow you to change the home address directly in the app, nor does it automatically detect your new home location. To update your home address, you need to change it in your contact card saved on your Apple iPhone 13.
Here’s how to update your home address in Apple Maps via contact card:
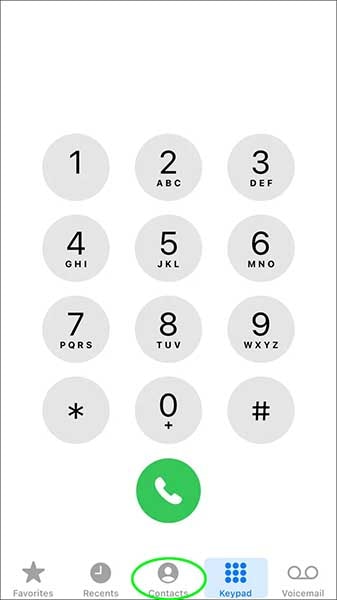
- Step1: Open the “Favorites” section in Apple maps and swipe it up.

- Step2: Tap on the “i” button available beside your home address.
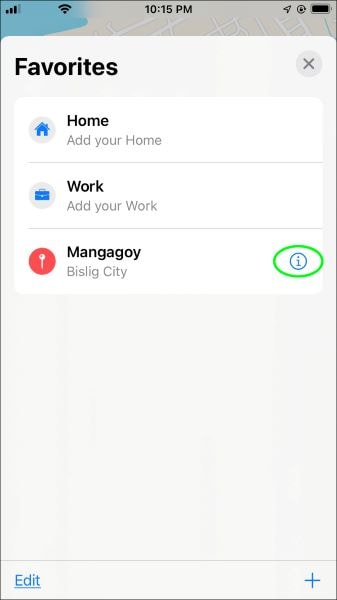
- Step3: Here, you will find an option to open your Contact Card.
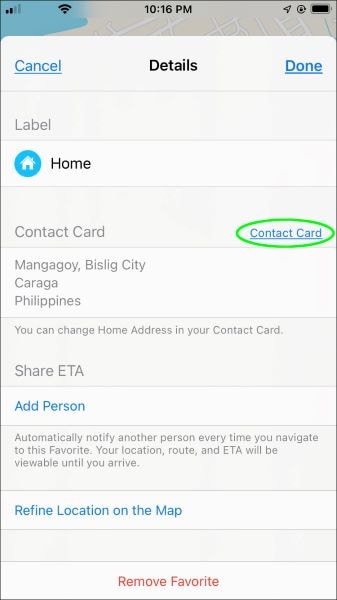
- Step4: Tap on the “Edit” option to add or remove your home address from the contact card.
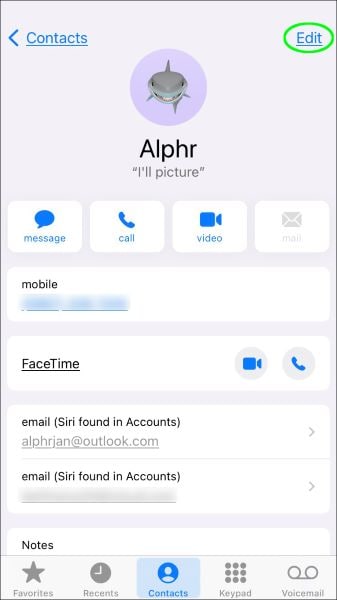
- Step5: Click on the “Done” button when you are done with the modification.
Part 3: Change iPhone Home Location by Modifying Apple ID Address
Are you moving to a new country or a new region? Do you want to update your new home location on your Apple iPhone 13? You can change your home location by modifying your Apple ID address. Following simple steps will help you to do it with a few clicks:
- Step1: Open the “Settings” of your Apple iPhone 13.
- Step2: Tap on the “iTunes and App Store”.
- Step3: After this, you need to tap on the “View Apple ID” option available on the screen.
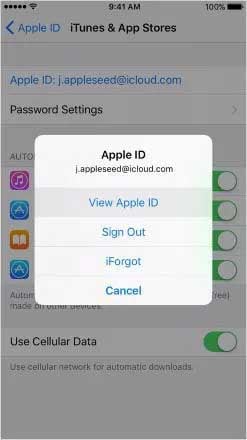

- Step4: Change your location by clicking on “Country/Region” in the “Accounts” section.
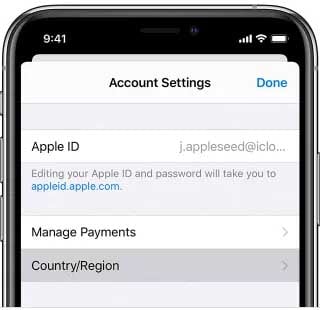
- Step5: Accept the terms and conditions before escaping the window.
Note: Make sure that all your Apple ID subscriptions are used and finished because changing the Appl ID address might make them unusable.
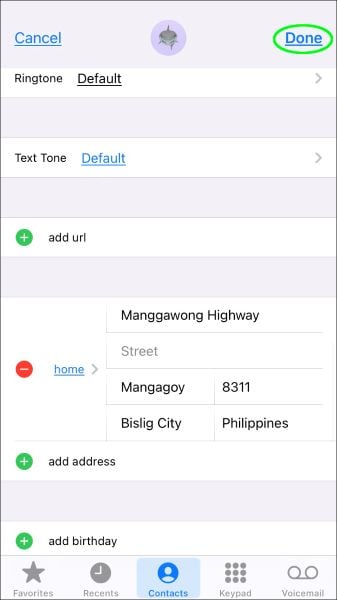
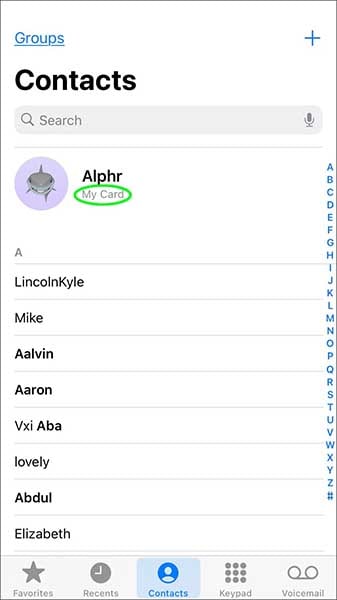
Part 4: Changing My Card to Change Home Address on iPhone
Alternatively, you can try to change “My Card” from your contact list to update your new address on your Apple iPhone 13. First, you need to follow the simple steps given below to change your home address in Apple on iPhone via contact cards:
- Step1: Open the contacts in your Apple iPhone 13 and tap on “My Card” to edit your home address.
- Step2: You will find the “Edit” option at the top-right corner of the screen. Tap on it.

- Step3: You can easily add your new address here by clicking the “add address” option and deleting the old one.
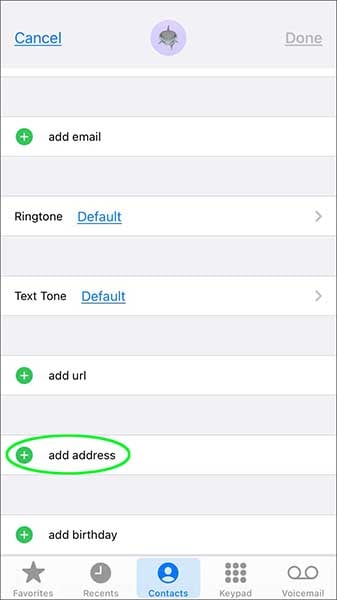
- Step4: Click on the “Done” tab after modifying the address.

Part 5: Spoof Location on iPhone to Change Home Address
Dr.Fone – Virtual Location is a fantastic application from one of the most trusted software companies – Wondershare. You can easily use Dr.Fone for simulating and teleporting the iPhone GPS location anywhere in the world with just one click. This location faker allows you to travel worldwide without even leaving your home.
Dr. Fone comes with the following benefits:
Dr.Fone - Virtual Location
1-Click Location Changer for both iOS and Android
- It works perfectly with all location-based apps, including Pokemon Go, Snapchat, Tinder, etc.
- Compatibility with iOS and Android without jailbreak.
- It is primarily known for its stability. Hence there is no risk of app crashes.
- Change or fake your location to travel worldwide in one click.
3981454 people have downloaded it
Here, we have mentioned some easy steps of location spoofing using Dr.Fone:
- Step 1: First, you need to install and launch Dr.Fone – Virtual Location on the computer. Then, select the “Virtual Location” module.

- Step 2: Connect your cell phone with your system and click on the “Get Started” option.

- Step 3: Now, you will see your current location on the screen. Activate the teleport mode by clicking on the first icon in the screen’s upper-right corner.

- Step 4: Enter the desired location on the search bar and click on the “Go” button.

- Step 5: The system will now show the entered location, and a pop-up will appear for the confirmation. Click on “Move Here”.

- Step 6: Now, your location is changed.
Note: You can go back to your default location by clicking on the “Reset Location” option.
Conclusion
Updating your home address on your Apple iPhone 13 can sometimes be tricky. Some people face issues while doing so. So, we have tried to summarize all the possible methods of changing home addresses in Google and Apple maps on iPhone. Dr.Fone is one of the best and most effective methods for either changing or spoofing location on an iPhone. We hope that you have got all the answers on how to change your home address on your Apple iPhone 13.
How to See Someone’s Location on Apple iPhone 13
Locating someone’s iPhone may sound strange, but it can serve the purpose in various situations. For instance**,** you can quickly find the location of your teenage children to check whether they are involved in an untrusted environment or not. Or, you can track the location of your husband if you have concerns regarding his affair through his iPhone.
This article will address three methods for seeing someone’s location on Apple iPhone 13 accurately and within no time. Moreover, we will also recommend a third-party tool to fake your location to prevent others from tracking you.
Part 1: How to See Someone’s Location on Apple iPhone 13 using Find My iPhone
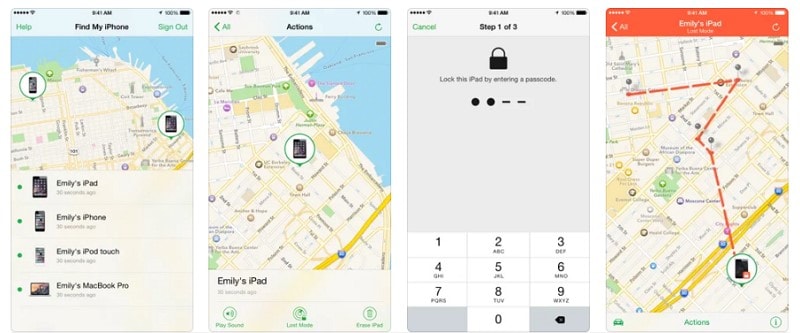
Find My iPhone is one of the popular apps to locate iPhones effectively. iPhone users utilize this app to navigate lost or stolen phones efficiently. Through this app, you can also learn how to check someone’s location on Apple iPhone 13 through their iCloud. First, make sure to activate Find My Apple iPhone 13 feature in the target’s iCloud settings. After that, you can easily see the targets’ location on your Apple iPhone 13 from your screen with a few clicks.
Steps to See Someone’s Location on Apple iPhone 13 through Find My iPhone
Step 1: Initiate activating the feature of Find My iPhone on the target’s phone. For this, navigate to the “Settings” of the target iPhone. Then find and click on the option of “iCloud,” where you will see the feature “Find My iPhone.” Next, turn on its toggle by tapping on it.
Step 2: Now, you are ready to locate the target’s iPhone location anytime you wish. To do so, access the official website of iCloud and log in to the target’s iCloud account carefully.
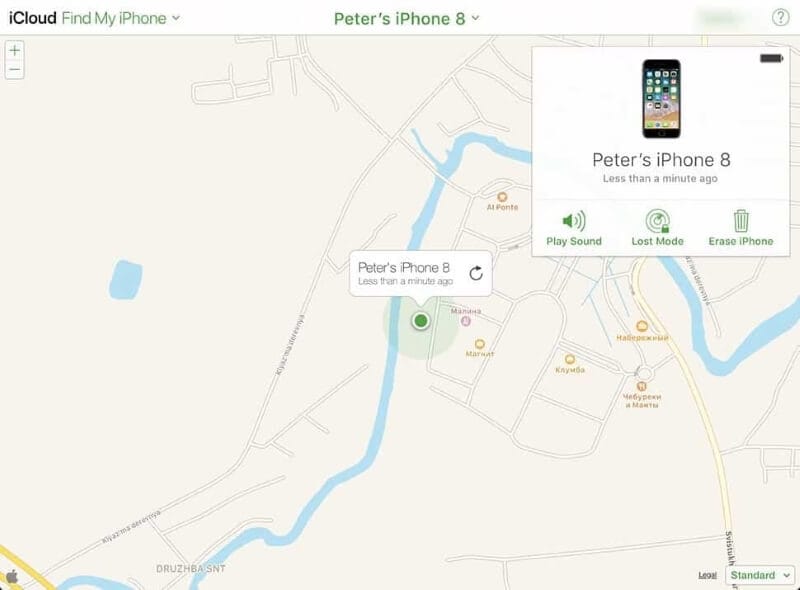
Step 3: A new window will appear on your screen from where you click on the option “Find My iPhone.” Now you can see all of the iOS devices attached to this account. Choose the Apple iPhone 13 device from the options you want to locate on the map.
Other Features
Find My iPhone offers numerous other features that can help you to find lost or stolen phones effortlessly. Through this app, you can play a sound on your lost iPhone for 2 minutes, even if the iPhone is on silent mode. You can also get easy and clear directions through this app towards the exact location of your phone. Moreover, if your Apple iPhone 13 gets stolen, you can lock your device through a passcode and can erase all the data from it with a single click.
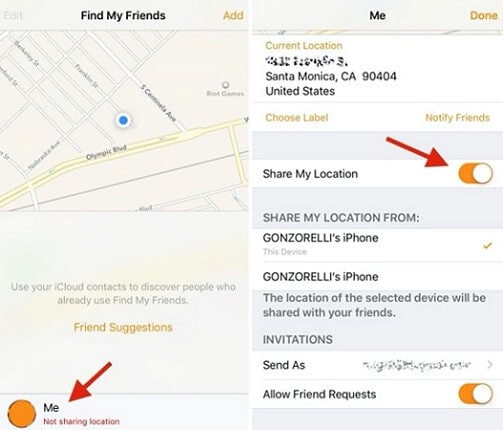
Part 2: How to Find Someone’s Location on Apple iPhone 13 via Find My Friends
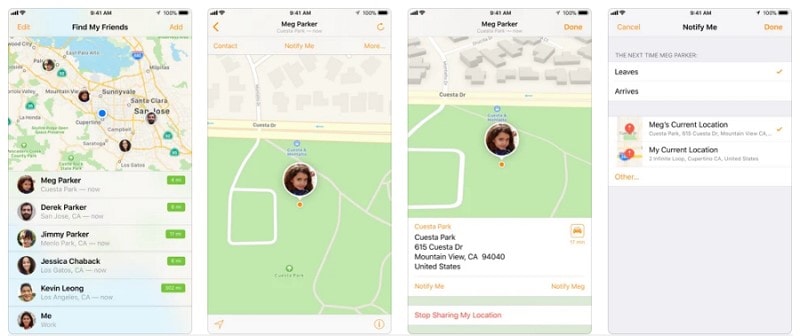
Find My Friends is another helpful app through which you can track someone’s location easily. Your friends and family members can share their location through this app, and they can also start following your location simultaneously. Moreover, you can set location-based alarms in case you have to pick up someone from the school or airport.
Through this particular app, you can also try how to find someone’s location on Apple iPhone 13 efficiently. First, however, you should be remindful of the following two factors before locating someone’s location on Apple iPhone 13 through this app:
- The suitable users for locating someone’s location on Apple iPhone 13 are those who have an evident reach to the target’s iPhone and are also included in the contact list of that particular phone.
- Through this app, you cannot observe someone’s location in an incognito mode as the target iPhone owner can easily check if someone is navigating their location once they open the Find My Friends app. Also, a notification will pop up on the target’s iPhone regarding their shared location.
Steps on How to Track Someone’s iPhone via Find My Friends
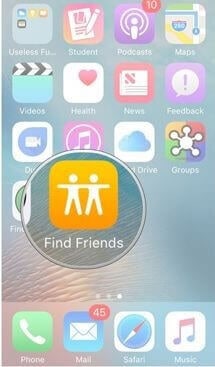
Step 1: Install the “Find My Friends” app on the target’s iPhone to start. Remember that the “Find My Friends” app is only available on iOS 12 or below. IOS 13 users need to install the “Find My” app to proceed.
Step 2: After installing the app on the target’s phone, open it and tap on the contact picture to activate the toggle called “Share My Location.”
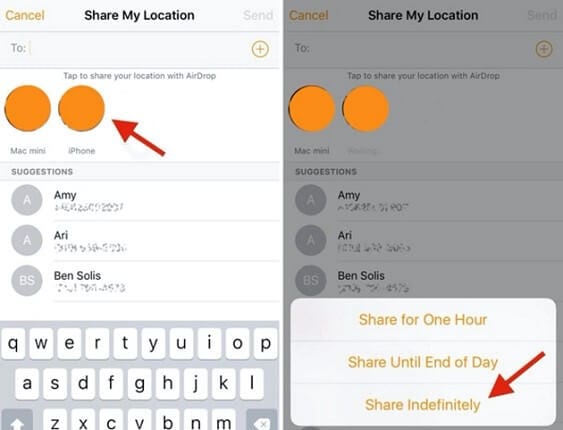
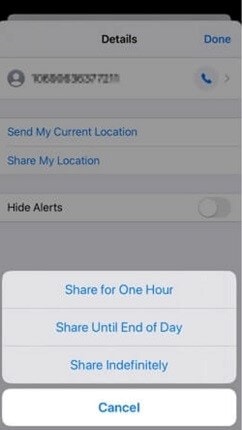
Step 3: To begin sharing the location of the target’s phone to your device, swipe up on your Apple iPhone 13 to use AirDrop and make your Apple iPhone 13 discoverable by clicking on “Everyone.” Tap “Add” on the target device and then choose the option of “Share Indefinitely.”
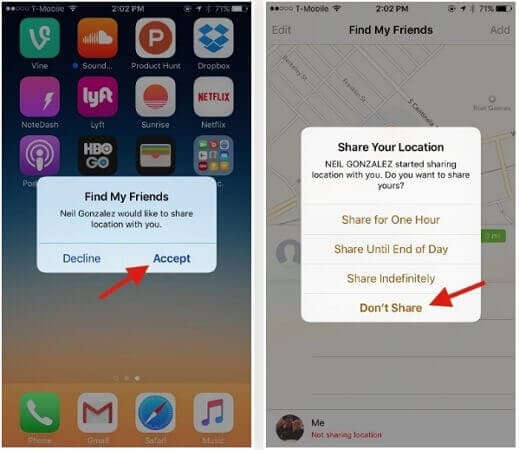
Step 4: You would receive a notification message asking for permission to accept the target’s location and share your location on your Apple iPhone 13. Tap on “Don’t share” to locate the target’s phone without sharing your location. Now on the Find My Friends app, you can easily see the location of the target’s iPhone along with its contact icon.
Part 3: How to Check Someone’s Location on Apple iPhone 13 by iMessage
Another way to track someone’s location on Apple iPhone 13 is through the iMessage app. This app enables the users to have internet-based conversations with their friends and family members and improves features. Also, all the messages are secured via end-to-end encryption for data privacy security. You can also share stickers and emojis through this special app.
iMessage has a hidden feature through which you can also know how to see someone’s location on Apple iPhone 13. Thus, by using this app, you can easily reach the location of your target’s phone.
Steps to Find Someone’s Location through iMessage
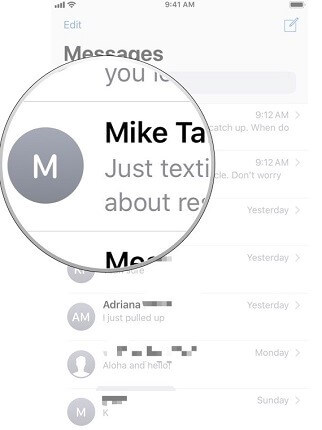
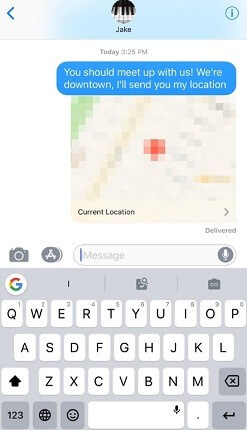
Step 1: Grab the target’s iPhone and click to open the iMessage app. Then find your contact name and start a conversation with yourself.
Step 2: Now tap on the contact icon and then click on the info icon from where you would see different options. Tap on “Share My Location” and set the time duration of location sharing. You can set the time for 1 hour, 24 hours, or indefinitely.
Step 3: On your Apple iPhone 13, join the location sharing of the target’s phone and do not permit to share your location. Thus, you can easily track the target’s location on your Apple iPhone 13 via iMessage.
Part 4: Fake Location on Apple iPhone 13 to Avoid Others from Tracking You
You can effortlessly hide your current location to prevent others from tracking your location unnecessarily. To do so, use Dr.Fone – Virtual Location, which can easily fake your location so that nobody can access your exact location. Furthermore, with a single click, you can set your phone’s GPS anywhere. Hence, you can travel across the globe without leaving your home via this excellent app.
Dr.Fone - Virtual Location
1-Click Location Changer for both iOS and Android
- Teleport from one location to another across the world from the comfort of your home.
- With just a few selections on your computer, you can make members of your circle believe you’re anywhere you want.
- Stimulate and imitate movement and set the speed and stops you take along the way.
- Compatible with both iOS and Android systems.
- Work with location-based apps, like Pokemon Go , Snapchat , Instagram , Facebook , etc.
3981454 people have downloaded it
Ultimate Steps to Use Dr.Fone – Virtual Location
Step 1: Select Virtual Location
Start with launching the Dr.Fone tool on your computer and open the tool to click on “Virtual Location” on its home page.
Step 2: Connect your Phone
Now connect your phone to the computer and tap on the option “Get Started” on the computer’s screen. You can check your current location on the map on the new page. You can also click on the icon “Center on” to instantly see your current location on the map.
Step 3: Enable Teleport Mode
Now enable the teleport mode by tapping on its icon displayed on the upper right of the screen. Afterward, type the place you want to use a location on the search box and tap on the “Go” option. A pop-up box will display where you click on “Move Here” for confirmation. Now your location has been changed with the place you have selected before so that you can fake your current location.
Conclusion
Through this detailed guide, you can quickly learn how to quickly see someone’s location on Apple iPhone 13. For diversity, we have discussed three reliable apps that can help you navigate someone’s location accurately. However, if you want to fake your location to prevent others from tracking you, we have recommended Dr.Fone – Virtual Location tool, which works precisely in this scenario.
How to Enable, Disable, and Change Safari Location on Apple iPhone 13
It is quite a common experience where everyone would have gone through “Annoying pop-ups during your serious search’. It is a natural phenomenon but it becomes a distracting one at the time of emergency works.
Simone was surfing through job opportunities in the online job portal and the unrelated pop-ups direct her to different platform displaying false information. She was completely lost and frustrated. This situation occurs due to the sharing of your data with websites you log in. You can protect your private data like location, values entered in the website, time spent on each web page etc by modifying certain settings in the Apple iPhone 13 device’s privacy portfolio.
Explore the techniques in how to change safari location on the Apple iPhone 13.
Tips: Enhance your Apple iPhone 13 privacy with Dr.Fone - Virtual Location! Change your location to protect your privacy, and prevent your Apple iPhone 13 from being tracked. Get it now!
Part 1: How to enable/disable Safari Location on Apple iPhone 13
What is the need to enable or disable the Safari location on the Apple iPhone 13?
The concept is simple if you expose the location details on the cyber world you can find out all sorts of ‘Near me’ searches accurately. For example, if you are caught in a strange place and looking for any restaurants, then immediately you will make a search by just adding keywords like ‘ restaurants near me’. The results will direct you with the hotels closer to your current location. This type of search holds good for all facilities like hospitals, theatres, malls etc. By enabling the location settings you can make the search ease and precise.
The other side of exposing your location details on the internet space is that you are under threat by strangers. When you step into any websites, the built-in programs can sense your location data and flashes pop-ups related to your location. The pop-ups are not reliable mostly it contains false information. Thereby leading you into unwanted issues and therefore it would be a better practice to disable location details on Apple iPhone 13 to overcome further problems in future.
A stepwise guide to learn how to enable /disable Safari location on Apple iPhone 13
Step 1: Reach for the ‘Privacy’ options
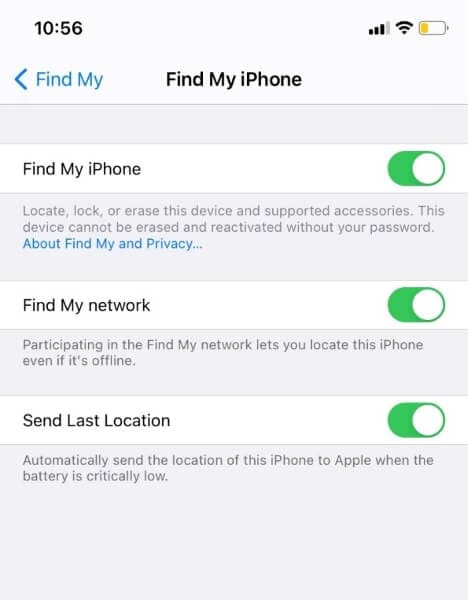
Go to the ‘Settings’ in the home screen of your Apple iPhone 13 and proceed with the ‘Privacy’ option.

Step 2: Choose Safari to modify the settings
In the ‘Privacy’ window, you have to select ‘Location Services’ option and tap ‘Safari Websites’ from the list

Step 3: Alter the Safari location services
You have to tap the ‘Safari Websites’ option to select from the expanded list. If you want to enable/disable the location services in Safari websites then you have to choose ‘While using’ option. This feature enables location service of the Safari websites when it is active and the location service becomes inactive if the Safari is not in use.

Part 2: How to prevent Safari from asking for your location on Apple iPhone 13
Why do Apple iPhone 13 users want to stop the Safari from asking the location?
The foremost reason for many Apple iPhone 13 users is that they want to manage their privacy. They do not want to risk their privacy by sharing their location details with apps and Safari websites. It is a safe practice to step into the internet platform concealing your identity to avoid cybercrimes.
Follow the below steps to stop iOS Safari Location Services
Step 1: Reach the ‘Privacy’ screen
In your Apple iPhone 13, tap ‘Settings’ then select the ‘Privacy’ option.

Step 2: Modify the options in Location Services
In the ‘Privacy’ window, choose ‘Location Services’ and tap ‘Safari Websites’ from the displayed list.

Step 3: Stop the location services
In the pop-up screen, tick the ‘Never’ option to completely stop the ‘Location Services’ for Safari. This modification will prevent Safari from requesting to share the location details of the Apple iPhone 13 device.

Part 3: How to change Safari location on Apple iPhone 13
It would be great fun with your friends when you change the Safari Location on Apple iPhone 13. You can bring jealous amidst your colleagues by registering your location details at holiday spots. By changing the location details, you can skip from unwanted false advertisements related to your real location while surfing through the internet space for your needs.
Track the steps to bring changes in the Safari Location on Apple iPhone 13 below
Step 1: Go for an eminent program
Change the location details of your Apple iPhone 13 using the incredible software Dr.Fone. Download this app at its official web address ‘https://drfone.wondershare.com/virtual-location-changer.html ’ or click the Download button below directly. Install it on your computer by following the wizard carefully. Tap the icon to explore the functionalities on the home screen.
Step 2: Establish a Virtual location
In the home page of this program, select the ‘Virtual Location’ option. In the next screen, tap the ‘Get Started’ button to trigger the procedure.
Step 3: Quick look at the map view
The next window displays the current virtual location details of the Apple iPhone 13 device.
Step 4: Enter your favourite spot
Select the ‘Teleport mode’ in the map view. You can find this icon at the top right of the screen. Choose the first image from the horizontal list of symbols. Then enter your favourite spot worldwide in the text box near the ‘Go’ button. It is high time to press the ‘Go’ button and fix your admirable spots as your default device location.
Step 5: Authenticate the changes
The next map view shifts to the new location with a pop-up message ‘Move Here’. You must authenticate the changes by tapping this ‘Move here’ button.
Step 6: Check the default location
Open the current location in your Apple iPhone 13 and verify it displays your favourite spot.

Conclusion
Thus, concealing the location details of your device protects you from unwanted cyber issues. Instead of turning on and off the iOS Safari location services, you can straightaway modify it into a fake zone. This approach would greatly help when you install any apps or enter into websites at this online platform. You can make use of the cyberspace efficiently if you make such modification in your Apple iPhone 13. Choose Dr.Fone - Virtual Location to make desired changes in your default location of your Apple iPhone 13.
Also read:
- [New] 2024 Approved Protect & Enhance Images with Top Tools
- 10 Essential Tips to Turnback a Live Twitch Session
- 4 Effective Methods Fake GPS Location on Apple iPhone 7 Plus/iPad | Dr.fone
- Does iTools virtual location not work On Apple iPhone 13 Pro Max/iPad? | Dr.fone
- Exploring the High Capacity, Efficient Energy Storage of the APC Back-UPS Pro 1500VA - Featuring Multiple Outlets and Battery Swapping Options
- How to Fix Unfortunately, Contacts Has Stopped Error on Xiaomi Civi 3 Disney 100th Anniversary Edition | Dr.fone
- In 2024, 4 Effective Methods Fake GPS Location on Apple iPhone 7 Plus/iPad | Dr.fone
- In 2024, 7 Fixes to No GPS - Showing Approximate Location on Apple iPhone XS Max Waze | Dr.fone
- In 2024, The Timeless Tale of Roguelike and Roguelite
- Sound Fidelity Preservation Computer Sounds & Dialogue
- Title: 5 Ways Change Your Home Address in Google/Apple Map on Apple iPhone 13/iPad | Dr.fone
- Author: Isabella
- Created at : 2024-10-06 17:03:02
- Updated at : 2024-10-11 20:58:23
- Link: https://iphone-location.techidaily.com/5-ways-change-your-home-address-in-googleapple-map-on-apple-iphone-13ipad-drfone-by-drfone-virtual-ios/
- License: This work is licensed under CC BY-NC-SA 4.0.