
7 Fixes to No GPS - Showing Approximate Location on Apple iPhone 6s Waze | Dr.fone
7 Fixes to ‘No GPS - Showing Approximate Location’ on Apple iPhone 6s Waze
With all the hectic days and schedule that we all have, being on time seems to be so challenging. In such demanding situations, we all make sure that to save time and do whatever it takes. When it comes to driving and reaching somewhere on time, knowing about the roads, traffic situations etc matter a lot. And Waze app is such a blessing that can surely help us with these. Not to mention, the app uses GPS services of your device. You can afford any issue with such apps, right. Therefore, in this article, we are going to point out an issue that is “no GPS showing approximate location” in Apple iPhone 6s. If you are suffering with the same, please read the article to the end and get solutions.
Part 1: Why Waze shows “No GPS - Showing approximate location” on Apple iPhone 6s
Fixing the issue can be put as secondary thing. What should matter is why such thing happens. Here are some of the causes or reasons that can lead to Apple iPhone 6s no GPS showing approximate location issue. Please read them.
- One of the vital causes may include locations settings that might be invalid. As the app depends on location, having correct locations settings carries weight.
- Apart from invalid location settings, when there is no signal as well as location isn’t updated in your device, the issue is likely to arise.
- The app might refuse to work and may show no GPS if there is an issue like building interference.
- Unarguably, firmware issues know no bounds. If the Apple iPhone 6s device is not updated, you might get this issue easily.
Part 2: Leave the place with poor signals
It is understood that the Waze app runs on GPS. Therefore, having poor signals can be the main cause of why Apple iPhone 6s says “no GPS showing approximate location”. This will not let the location services work properly and therefore arising the issues like these. And hence, as the first thing, we would like to suggest you leaving the place if there are poor or no signals at all. This will do nothing but ruin your mood and app’s performance. Do this and see if the problem goes.
Part 3: Check date & time settings
As the other solution to Waze Apple iPhone 6s 6 no GPS, you must check your date and time settings. A lot of times, the issue comes with incorrect time/location settings. And therefore, here we suggest you to do the following things.
Step 1: Go to “Settings” in the first place.
Step 2: Hit on “General” and tap on “Date & Time”.
Step 3: Toggle off the switch next to “Set Automatically”. If you also want to set 24-hour timings, you can do so by toggling the respective switch.

Step 4: Now, in the date & time settings, tap on “date”. Now, adjust the time according to you.

Step 5: To change the time zones, hit on “Time Zone” in the date and time settings.
Step 6: You can enter the city name and go ahead.


Part 4: Restart your Apple iPhone 6s
One of the most frequently used methods to troubleshoot certain iOS problems is to simply give a restart to your device. Doing this simply terminates all the running background processes and starts the phone freshly. This is what you need to do and see if Waze Apple iPhone 6s no GPS issue gets resolved.
Step 1: Restart basically implies turning your device off and on. To do this, you are supposed to lock press the “Power” or “Sleep/Wake” button.
Step 2: When you see the “Slide to power off” slider, simply drag it to the right and the Apple iPhone 6s device will turn off.
Step 3: Now, press the “Power” button again for long and power on your device.

Part 5: Reset Network and Location & Privacy Settings
If the above methods didn’t help you solving the problem, we would like to do some works with the network as well as location settings. It should be pointed out that when you reset your network settings, it will refresh and remove the entire settings related to networks like VPN, Wi-Fi etc. Also, by following the Location & Privacy settings, these settings will be restored to the default ones. However, this can be a great solution to fix Waze no GPS showing approximate location in iOS. This is what needs to be followed.
To Reset Network Settings:
Step 1: Open “Settings” and go to the “General” option.
Step 2: Once you are in it, scroll down to look for the “Reset” option.
Step 3: Here, simply tap on “Reset Network Settings”. Confirm the actions and you are good to go.

To Reset Location & Privacy Settings, the steps are identical. Just tap on “Reset” followed by “Reset Location & Privacy Settings”.

Part 6: Re-install Waze and grant location permission in settings
There are times when an app fails to work properly. And it can be possible that Waze in your device is not able to discover your location. In such cases, giving a little treatment to the apps can be helpful. So, here is the next fix. Try to install the app once again and give the permissions concerning location when Waze Apple iPhone 6s no GPS issue still arrives. Make sure to follow the steps carefully.
Step 1: On the Home screen, long tap on the Waze icon.
Step 2: It will jiggle a little and you will notice a small x icon at the corner of it.
Step 3: Now, tap on it and confirm to uninstall it.
Step 4: Go to the App Store and install the app once again.
Step 5: Now, head to the “Settings” and tap on”Privacy”.
Step 6: Head to “Location Services” and look for the app.

Step 7: Toggle the switch on to give the location permission. You can choose between “While Using the App” and “Always”.
Part 7: Toggle on and off Wi-Fi and cellular data
Along with the poor signals, poor networks can also act as a great hindrance for no GPS showing approximate location in Apple iPhone 6s problem. And therefore, doing a simple disable and enable can work wonders. This will simply refresh the GPS data and might help you fixing the issue. Follow the steps below.
Step 1: Simply go to the Control Center by swiping up the screen from the bottom.
Step 2: When in the Control Center, make sure to tap on the Wi-Fi icon to turn it off (if it is on and vice versa).
Step 3: Wait for a few seconds and turn it on again. Do the same with Cellular Data icon as well.
Alternatively, you can head to the “Settings” and go to the “Wi-Fi” option to turn off and on. For cellular data, tap “Mobile Data” and turn off and on.

Part 8: Update Apple iPhone 6s to the latest version iOS
It is an undeniable fact that Apple iPhone 6s or any other device provides glitches when not updated. Therefore, as the last resort, we suggest you to check if your iOS is updated or not. Simply follow the steps below and check if Waze no GPS showing approximate location in Apple iPhone 6s still exists.
Step 1: Open “Settings” in your iOS device and head to the “General” tab.
Step 2: Once you are in the next menu, you could see the “Software Update” at the top.
Step 3: Please tap on that and you will be able to see if the update is present or not. If yes, go ahead with the prompts and install it in your device to make things work.

Dr.Fone - Virtual Location
1-Click Location Changer for both iOS and Android
- Teleport from one location to another across the world from the comfort of your home.
- With just a few selections on your computer, you can make members of your circle believe you’re anywhere you want.
- Stimulate and imitate movement and set the speed and stops you take along the way.
- Compatible with both iOS and Android systems.
- Work with location-based apps, like Pokemon Go , Snapchat , Instagram , Facebook , etc.
3981454 people have downloaded it
Conclusion
We have introduced various ways to be followed when there is no GPS showing approximate location on Apple iPhone 6s. We hope that you are now help yourselves following the aforementioned steps. Thank you for making time to read this. Help us know your views about this article. Simply give your feedback in the comment section below.
Does iTools virtual location not work On Apple iPhone 6s/iPad?
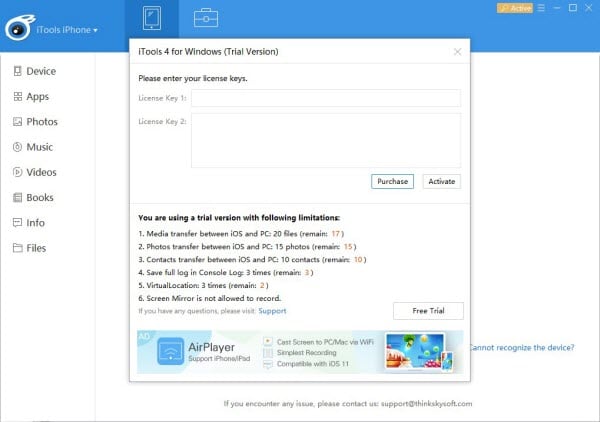
You must know that iTools virtual location is used worldwide, and it has been reported that there have been many problems. This effective iTools virtual location is a geo-spoofing tool that is mainly for iOS. With this tool, you could easily mock the GPS location, and it also works in an effective manner to access geo-restricted content.
Part 1: Why does my itools not work on Apple iPhone 6s/iPad?
There may be many reasons due to which the iTools virtual location does not work on Apple iPhone 6s/iPad. You must know that iOS 14 is the massive iOS update, but it is the amazing new features that offer a completely new look to your iOS. But iTools not working on Apple iPhone 6s/iPad could make it difficult for the user to use this tool.
With the introduction of the iTools virtual location, many people have been complaining about the issues they are facing using this tool. Some of the common issues are getting stuck in the developer mode, iTools not downloading, Map crash, iTools fail to work, location won’t move, image load failed, and much more. All these issues are making the use of iTools more difficult for the user to use.
Usually the reasons lie with bad internet, Wi-Fi or outdated version of the tool. Let us know in the following section how you can deal with various issues that lead to iTools not working on Apple iPhone 6s/iPad.
Part 2: Ways to fix the iTools not work on Apple iPhone 6s/iPad
iTools Virtual Location is the perfect tool that helps you to spoof location effectively. But there are many iTools not working problems that you may encounter in these tools some of them are like as mentioned below:
1. Stuck in developer mode
This problem is the most common issue that people mainly face with the iTools virtual Location. When you are stuck in the developer mode, you may notice that the application won’t initiate, and it also stops your navigation to the next step. This can be triggered if your iTools is not in the updated version. And hence, in order to resolve this problem, you may update the latest version of iTools on the official website.
2. iTools map not showing
Many of the people are also facing a problem like they cannot see the map while using a particular tool. This problem may be due to an unstable internet connection. Hence you must check with the internet connection to resolve the problem. Or you may also restart the tool and initiate the geo spoofing process.
There are also different ways or you can say some basic ways to go along with whenever iTools doesn’t work. You must know these basic tips when you stuck with such issue with your iOS 14. These are mentioned below:
Step 1: iTools download ios 14 must be of the latest iTools virtual location from the official website.
Step 2: Get a stable internet connection for running the geo spoofing.
Step 3: Restart the tool if you are stuck in any step or the application crash.
Step 4: Keep the tool updated for effective use.
The above mentioned are some of the steps you must follow to avoid any problem while using the iTools on Apple iPhone 6s/iPad.
Part 3: Better alternative for iTools virtual location
Dr.Fone Virtual Location (iOS) is an effective and popular tool that could be easily used to change your GPS location to any place you want to change. With this popular tool, you could set any location anywhere in the world by creating a virtual location on iOS. It is the perfect tool that helps you to fake or spoof your location. The best thing about this software is that it is free and safe to use. And with its attractive features, you would love to browse and fake your Apple iPhone 6s’s real-time location.
Key Features
Some of the key features of Dr.Fone – Virtual Location (iOS) that is making is popular all over the globe are mentioned below:
- It helps you to teleport iPhone GPS to anywhere in the world easily and quickly.
- It is the perfect solution to simulate GPS movement along real roads or paths you draw.
- With the help of the joystick, you could easily make the movement of the GPS freely.
- It is the best tool that supports five devices of location management that too in a perfect manner.
Step by Step Tutorial
If you want to know how to use the Dr.Fone – Virtual Location (iOS) to fake Location, then do not worry. Here you could get some of the simple tips to use Dr.Fone – Virtual Location (iOS) to fake your location using “Teleport” mode. With only three steps, you could easily change the GPS location on your Apple iPhone 6s. The simple steps are mentioned below:
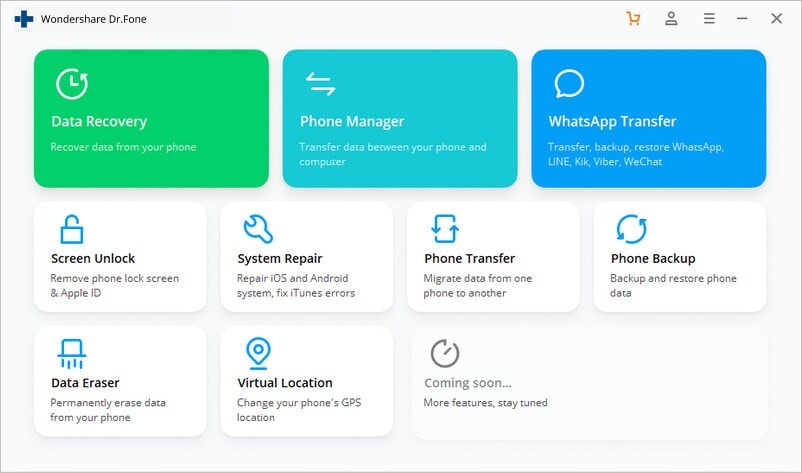
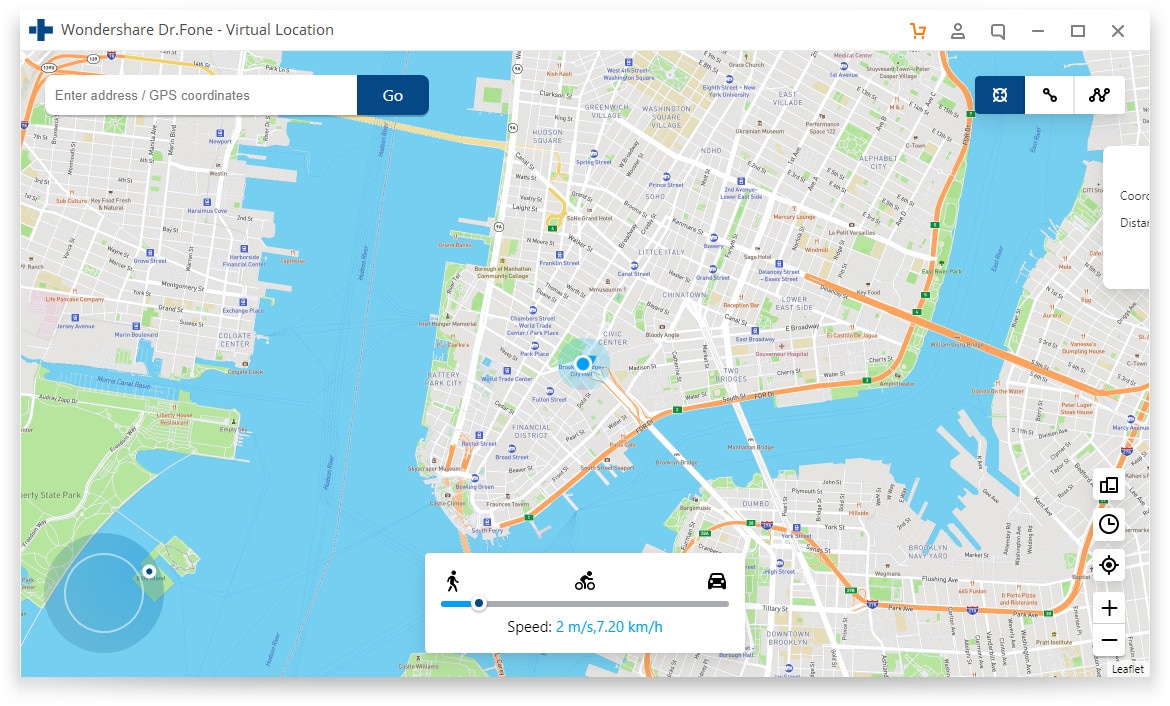
Step 1: Launch the program on your computer
The first step you need to do to use the program is to download and install it from the official website. You must click on the “Virtual Location” from all the options.
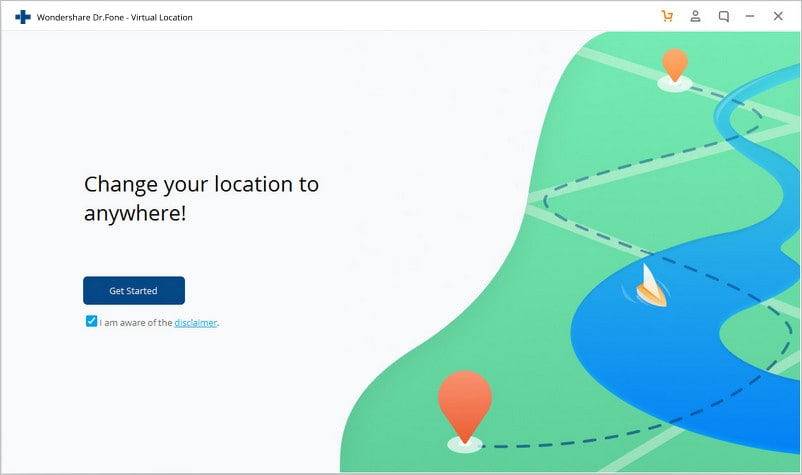
Now, have your phone connected to your computer. Then click on the “Get Started” option.
Step 2: Find your actual location on your map
In the second step, you need to find your actual location on your map in the new window. Check that the location is accurately displayed or not. If in case the location is not accurately displayed, then click the Centre On icon. You may find the Centre On icon in the lower right part to show the accurate location.
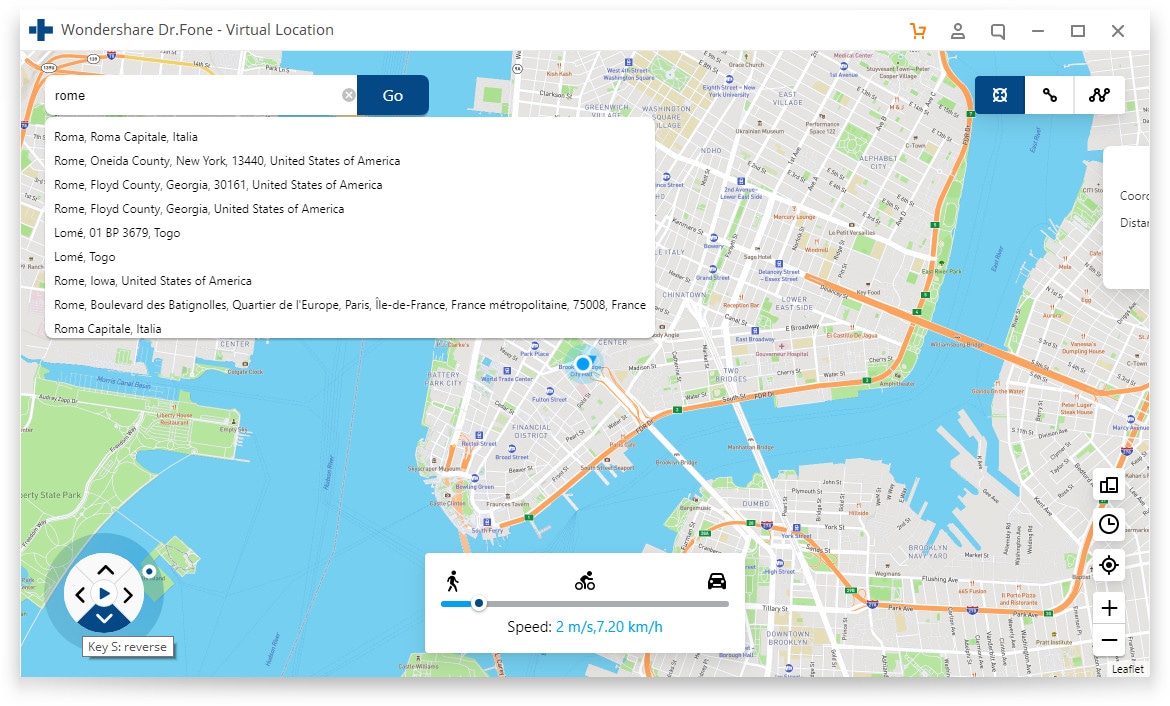
Step 3: Activate the teleport mode
Now, you need to activate the teleport mode by clicking the corresponding icon. You may find the corresponding icon in the upper right corner, and then you need to enter the place that you want to teleport in the upper left field and then click on the “Go” option.
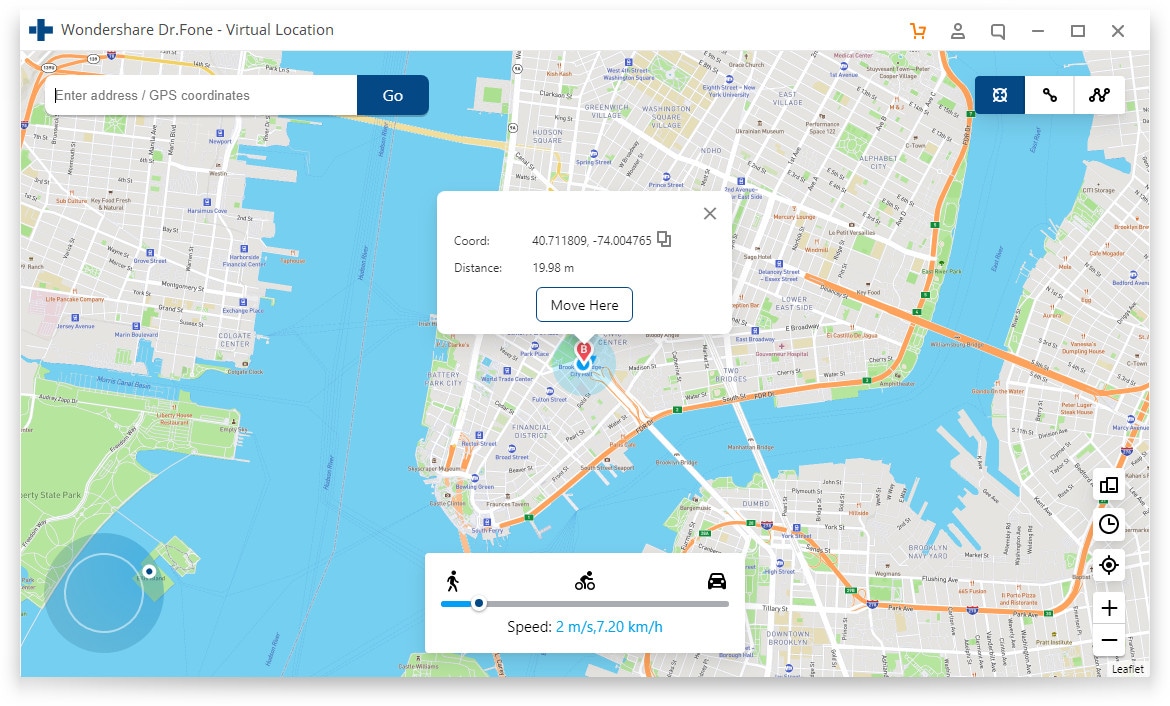
Step 4: Click on the Move Here option
Now you may notice that the system would be able to understand your desired location. Hence click on the popup box of “Move Here.”
Step 5: The location will display on the program and app
In the last step, click the Centre On option. You will find that your location changes and is displaying on the program and app.
Conclusion
iTools ios 14 is designed as a powerful file management tool for all iPhones. Also, it is a greta choice to get your location spoofed on your Apple iPhone 6s. But still, there are many virtual location issues that can break your comfort and lead you to disappointment. However, the problem can be effectively resolved with the help of Dr.Fone – Virtual Location (iOS) as it is the best alternative to iTools. Hence, use this perfect tool to resolve your iTools not work with ios 14 in the best possible manner.
How to View GPX Files: Online and Offline Solutions Of Apple iPhone 6s
Also known as GPS Exchange Format, GPX is one of the most resourceful file types that is used to store and import/export map-related data. Ideally, a lot of people use GPX files to access a particular route offline when they are off the grid. Though, there are times when users find it hard to view GPX on a map. Don’t worry, there are plenty of ways to view GPX online or offline. In this post, I will let you know how to view GPX in Google Maps and other resourceful desktop applications in detail.
Part 1: What Can you Do with GPX Files?
Before we discuss how to utilize a GPX view online or offline tool, let’s quickly consider how these files work. It stands for GPS Exchange format and stores map-related data in an XML format. Apart from XML, KML and KMZ are other common file formats to store GPX data.
From the exact coordinates of places to their routes, a GPX file would contain the following information:
- Coordinates: Also know as waypoints, a GPX file would contain details about longitude and latitude that are needed to be covered on the map.
- Routes: The main reason for using GPX files is that they store detailed routing information (the path that we need to take to reach from one point to another).
- Tracks: A track consists of various points that we are merged to form the route or the path.

Let’s suppose you have devised a route between two points that you would need later on. You can now export the GPX file from the application and even import it to the same or another application. When you use the GPX viewer, it will let you access the route offline without an active internet connection. That’s why GPX files are used to view a route offline while hiking, trekking, cycling, and do other offline activities.
Part 2: How to View GPX Files Online in Google Maps?
The good thing is that there are tons of options to view GPX online on desktop, Android, or iOS platforms. Some of these freely available solutions to view GPX on Map are Google Earth, Google Maps, Bing Maps, Garmin BaseCamp, GPX Viewer, and so on.
Out of them, Google Maps is one of the most used solutions to view GPX online on smartphones and desktops alike. As of now, you can import GPX files in the KML format or even load CSV files of exact coordinates on Google Maps. To learn how to view GPX in Google Maps, follow these steps:
Step 1: Go to Your Places in Google Maps
To view GPX on the map, you can first head to the official website of Google Maps on your computer. Now, just click on the hamburger (three-line) icon from the top-left corner to access its options.

This will display various options related to your Google Maps account. From here, you can just click on the “Your Places” feature.

Step 2: Choose to Create a New Map
As a dedicated section of “Your Places” would be launched, you can view all the saved places for your Google Maps account. Here, you can go to the “Maps” tab to view the existing saved route and spots. Since you have to view GPX in Google Maps, you can click on the “Create Map” option from the bottom to load a new map.

Step 3: Import and View the GPX File Online
This will make Google Maps load a new page that will let you create a fresh map as per your preferences. Here, you can just click on the “Import” button to load a browser window from where you can directly load a GPX file on Google Maps and make it available offline as well.

Part 3: How to View a GPX File Offline with Dr.Fone – Virtual Location?
Besides Google Maps, you can also take the assistance of Dr.Fone – Virtual Location to view GPX files on your computers offline. Since it is a desktop tool, it would let you load any GPX file without being connected to an active internet connection. Besides that, the application can also be used to spoof the location of your iOS device or simulate its movement in a route without jailbreaking it.
Therefore, if you want, you can first simulate the movement of your device and export the GPX file. Later, you can import the saved GPX file and simulate your Apple iPhone 6s movement in the same route without any trouble.
Step 1: Launch Dr.Fone – Virtual Location and connect your Apple iPhone 6s
At first, you can just connect your Apple iPhone 6s using a working lightning cable and launch the Dr.Fone – Virtual Location application. Once your device is detected, just click on the “Get Started” and agree to its terms and conditions.

Step 2: Simulate the Movement of your Apple iPhone 6s
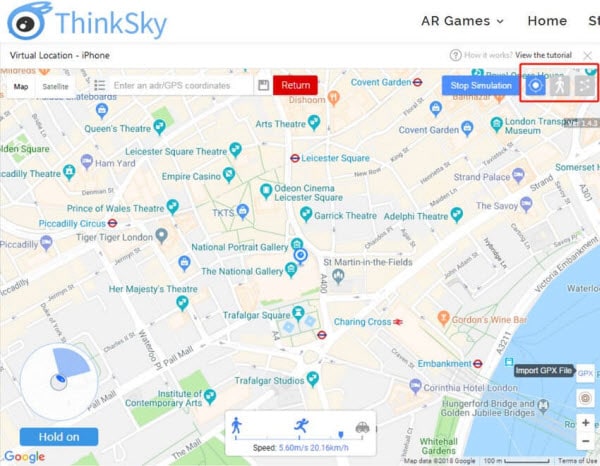
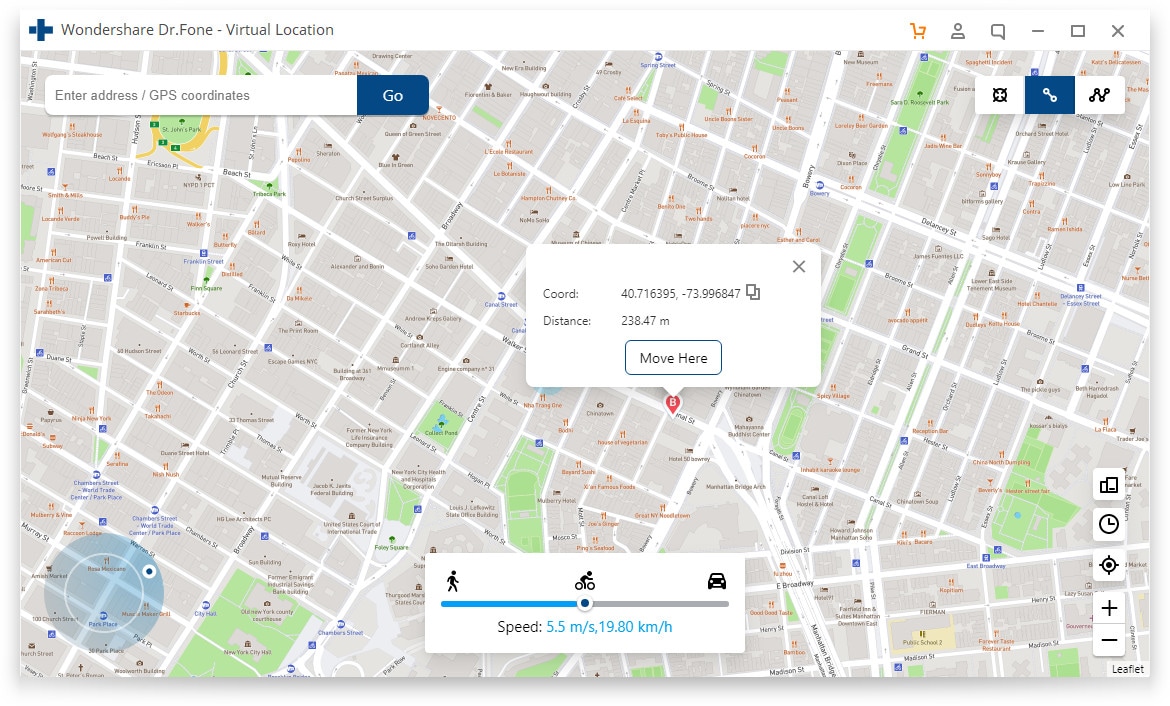
The application would automatically detect your Apple iPhone 6s on the interface with its present location. To simulate its movement, you can click on the Multi-stop or One-stop Mode icons from the top.

You can now drop the pin in a route on the map and click on the “Move Here” Button to start simulating the movement.

Subsequently, you can select the number of times you want to cover the route and click on the “March” button. The application will even let you select a preferred speed for the movement.

Step 3: Export or Import the GPX Files
Once you have loaded the map on the interface, you can easily save it offline as a GPX file. To do that, just click on the Export icon from the floating menu on the side.

Similarly, you can also import a GPX file directly to the Dr.Fone application. To do this, you just have to click on the “Import” icon from the sidebar. This will open a browser window, letting you go to a location on your computer where the GPX file is saved.

Once the GPX file is loaded, you can simply wait for a while and let the application process it without closing it in between.

As you can see, it is pretty easy to view GPX online or offline using the right tools. In this post, I have included a detailed guide on how to view GPX in Google Maps. Besides that, I have also included another solution to view GPX on a map using Dr.Fone - Virtual Location (iOS). Apart from importing/exporting GPX files, the application can also be used to spoof your Apple iPhone 6s’s location or simulate its movement virtually from anywhere you want.
Also read:
- [Updated] 2024 Approved Facebook Video Integration for PC & Android Users Explained
- [Updated] Zoom's Best Audio Fixes Clear Sounds & Hearing Improvement for 2024
- 2024 Approved Elevate Your Online Video Quality Mastery in FinalCut for YouTube
- 5 Exceptional 4K Gaming Screens
- Does PokeGo++ still work on Apple iPhone 12 Pro/iPad? | Dr.fone
- Future's Best on Display Premium Video Cameras in 2 Written by Michael A. Risley
- How to Enable, Disable, and Change Safari Location on Apple iPhone 14 Plus | Dr.fone
- How to Enable, Disable, and Change Safari Location on Apple iPhone 7 Plus | Dr.fone
- How to Stop Life360 from Tracking You On Xiaomi 13T Pro? | Dr.fone
- In 2024, 7 Fixes to No GPS - Showing Approximate Location on Apple iPhone 11 Waze | Dr.fone
- In 2024, Analyzing Aurora HDR Quality
- In 2024, How to Change Your Location on Apple iPhone X | Dr.fone
- In 2024, How to Enable, Disable, and Change Safari Location on Apple iPhone 14 Pro | Dr.fone
- In 2024, Why Does iTools Virtual Location Not Work For Apple iPhone 11 Pro/iPad? Solved | Dr.fone
- Premium Assessment of Parrot's Second-Gen Model 2.0 for 2024
- The Ultimate Guide to AMR Format Processing and Conversion
- Title: 7 Fixes to No GPS - Showing Approximate Location on Apple iPhone 6s Waze | Dr.fone
- Author: Isabella
- Created at : 2024-10-08 00:57:47
- Updated at : 2024-10-11 16:45:16
- Link: https://iphone-location.techidaily.com/7-fixes-to-no-gps-showing-approximate-location-on-apple-iphone-6s-waze-drfone-by-drfone-virtual-ios/
- License: This work is licensed under CC BY-NC-SA 4.0.