
Does PokeGo++ still work on Apple iPhone SE/iPad? | Dr.fone
Does PokeGo++ still work on Apple iPhone SE/iPad?
Pokemon Go players always look forward to cheats and hacks that can help them catch more Pokemon in the game. While the majority of cheats available on the Internet no longer work, there are a few tricks that might help you expand your collection with unique Pokemon characters.
One such cheat/hack, that has helped many iOS users collect Pokemon in the past, is PokeGo++. If you’ve been planning to use PokeGo++ to catch rare Pokemon, continue reading; this guide will provide you a deep insight into PokeGo++ and whether you can use it in 2021 or not.
Part 1: What is Pokego++?
If you’re new to the Pokemon Go world and haven’t heard about PokeGo++, here’s what you need to know. It’s basically a hacked IPA version of the original Pokemon Go that comes with a built-in joystick feature. You can use this feature to teleport your location to anywhere in the world and catch a wide variety of Pokemon without even walking a single step.

PokeGo++ was developed by the developers at Global++ to give users leverage and help them catch their favorite Pokemon characters easily. These developers reverse-engineered the original Pokemon Go code released by Niantic and designed their own version of the game, i.e., Poke Go++. With PokeGo++, you can set your smartphone’s GPS location instantly and find some of the rarest Pokemon characters to increase your XP.
It’s worth noting that PokeGo++ was released for both Android and iOS. Apple iPhone SE/iPad users could use PokeGo++ via Cydia Impactor. On the other hand, PokeGo++ Android could be installed using Fly GPS. For users who don’t know, Cydia Impactor is a dedicated iOS tool that lets users install and run sideload apps on the iDevice without having to jailbreak it.
Part 2: Where Can I get PokeGo ++
So, let’s get to the real question, i.e., does PokeGo++ still work. Unfortunately, the answer is “No”, PokeGo++ is neither available for iOS nor Android. Back in 2019, when the majority of users started switching to PokeGo++, Niantic filed a lawsuit against Global++. They claimed that the hacked version of Pokemon Go gives an unfair advantage to some users. In addition to this, Niantic also stated that PokeGo++ was developed by infringing on Niantic’s intellectual property rights.
Due to this lawsuit, Global++ had to immediately stop the release of PokeGo++ to its users, take down their official website, and delete all their discord servers as well. In fact, Niantic even secured all their future projects with this lawsuit. It was believed that Global++ was secretly working on a hacked version of Harry Potter: Wizards Unite, Niantic’s next big project. But, due to the lawsuit, they had to stop working on this as well. So, as shocking as it may sound, but you can no longer use PokeGo++ Apple iPhone SE or Android to fake GPS location and catch new Pokemon.
Part 3: Any better alternative for PokeGo ++
Even though PokeGo++ is no longer available, people still look forward to using other hacks/tricks to manipulate their GPS location to collect more Pokemon. So, if PokeGo++ doesn’t work anymore, what’s an alternative that can help you use a fake GPS location in Pokemon Go.
The answer is Dr.Fone - Virtual Location (iOS) . It’s a dedicated geo-spoofing tool for iOS that comes with a built-in “Teleport Mode” feature. Thanks to this feature, you can change your smartphone’s location to anywhere in the world with a single click.
Dr.Fone - Virtual Location also comes with a dedicated GPS Joystick. This means apart from changing your smartphone’s location, you can also fake your movement on the map and virtually collect different Pokemon. One of the best features of Virtual Location is that it lets you customize your movement speed. So, even if you are faking your location in the game, you can stay assured that Niantic won’t ban your account.
Here are a few key features of Dr.Fone - Virtual Location (iOS) that makes it the best geo spoofing tool to fake GPS location in Pokemon Go.
- Use Teleport Mode to Choose Any Location Across the Globe
- Use GPS Joystick to virtually collect all your favorite Pokemon GO characters
- Customize the movement speed using a simple slider
- Automatic marching to configure your character to move in one direction automatically
- Control GPS location for up to 5 iOS devices simultaneously
- Compatible with the latest iOS version
So, if you are also ready to use the best PokeGo++ alternative, here’s the detailed step-by-step process to use Dr.Fone - Virtual Location.
That’s it; when you’ll launch Pokemon Go, you’ll automatically notice different streets. At this point, you can enable “GPS Joystick” and easily control your movement without walking at all.
Conclusion
Despite being a pretty useful tweaked version of Pokemon Go, PokeGO++ is not available anymore. However, if you still want to catch different types of Pokemon in the game, you can use Dr.Fone - Virtual Location (iOS) to set a fake GPS location in the game. And, if you are an Android user, you can directly download any of the GPS Joystick apps on your smartphone and use it to manipulate the smartphone’s GPS location easily.
5 Ways:Change Your Home Address in Google/Apple Map on Apple iPhone SE/iPad
Nothing feels more convenient than identifying the direction to your home with just a few clicks. Likewise, your Apple iPhone SE can take you home with just a few clicks on the address registered on the maps app. But what if your home address changes? How would you update your new address on your Apple iPhone SE? Read further to know the details about changing your home address on your Apple iPhone SE**!**
You can use dual maps apps on an iPhone, i.e., Google Maps and Apple Maps. Both the apps use the address registered on your contact card on your Apple iPhone SE. But the question arises of how to update the home address on iPhone. Although your phone can detect your location, it can’t set it as your home address on its own. In this article, we will discuss some of the most common ways of setting a home address on an iPhone. So, let’s get started!
You can watch the video below to change your location on Google/Apple Map
Part 1: How to Change Your Home Address in Google Maps on iPhone
You can easily set your home address in Google maps on your Apple iPhone SE. It helps easily get the correct directions to your destination from and to your home. But when you shift to a new place, you need to update your new home address on Google maps.
Follow the steps given below to know how to change your home address in Google maps on your Apple iPhone SE:
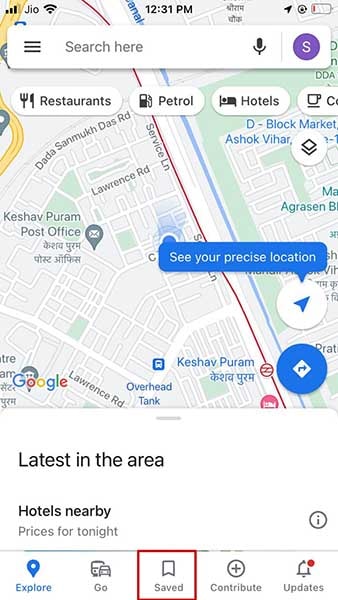
- Step1: Open Google Maps on your Apple iPhone SE and tap on the “Saved” icon at the bottom of the home screen.
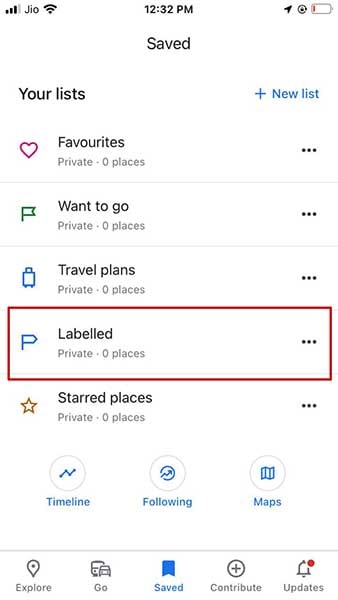
- Step2: Under this section, you will see another section named “Your Lists”.
- Step3: In this section, tap on the option named “Labelled”.
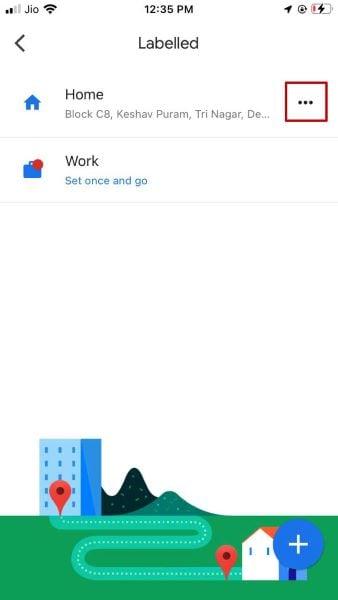
- Step4: The “Labelled” section shows the list of your labeled places such as home, office, etc.
- Step5: You will find the three dots next to each place. For example, tap on the one next to “Home”.
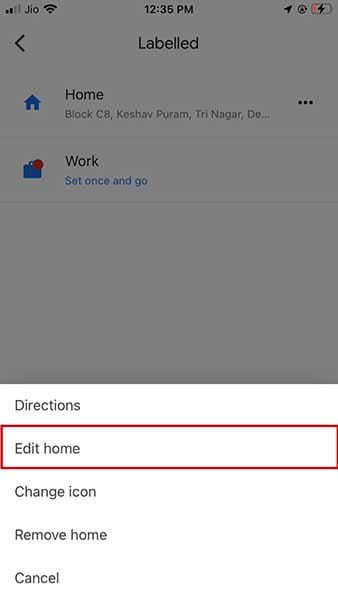
- Step6: When you click on these three dots, you will find different options. For example, select “Edit home”.
- Step7: A new screen will open. Here, you can remove your old address and type the new one. Else you can locate your current home address on the map.
- Step8: Click on the “Save” option available at the bottom of the screen to save your new address.
Part 2: How to Change Your Home Address in Apple Maps on iPhone
Unlike Google Maps, Apple Map doesn’t allow you to change the home address directly in the app, nor does it automatically detect your new home location. To update your home address, you need to change it in your contact card saved on your Apple iPhone SE.
Here’s how to update your home address in Apple Maps via contact card:
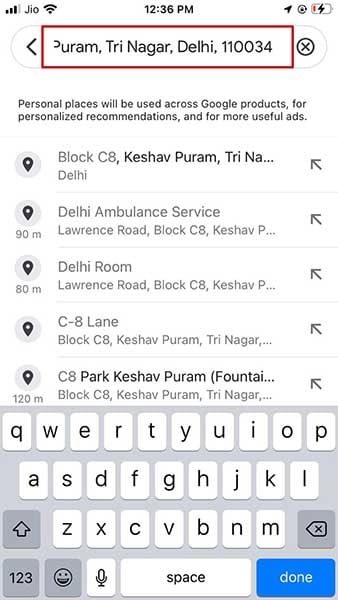
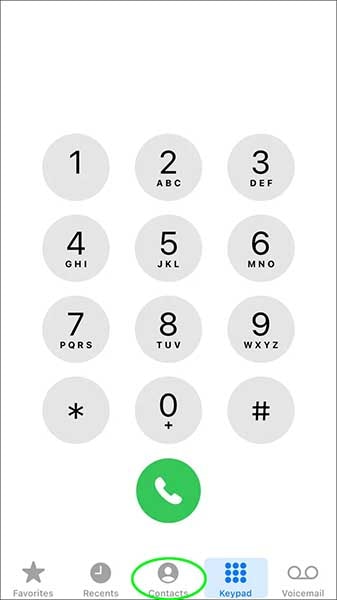
- Step1: Open the “Favorites” section in Apple maps and swipe it up.

- Step2: Tap on the “i” button available beside your home address.
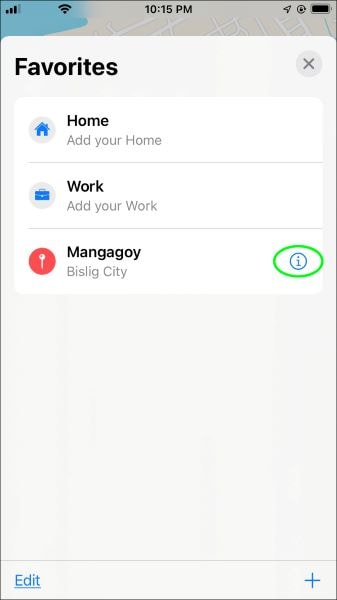
- Step3: Here, you will find an option to open your Contact Card.
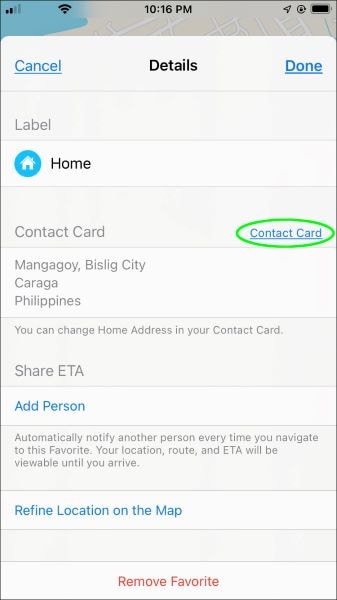
- Step4: Tap on the “Edit” option to add or remove your home address from the contact card.
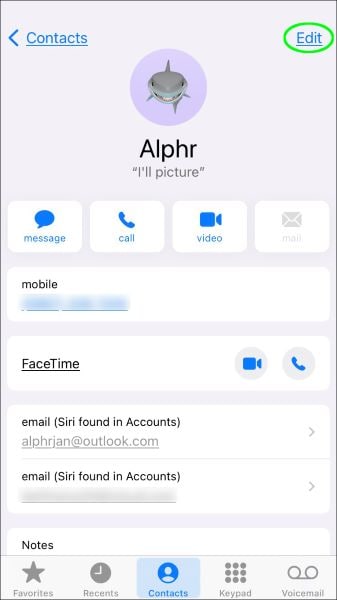
- Step5: Click on the “Done” button when you are done with the modification.
Part 3: Change iPhone Home Location by Modifying Apple ID Address
Are you moving to a new country or a new region? Do you want to update your new home location on your Apple iPhone SE? You can change your home location by modifying your Apple ID address. Following simple steps will help you to do it with a few clicks:
- Step1: Open the “Settings” of your Apple iPhone SE.
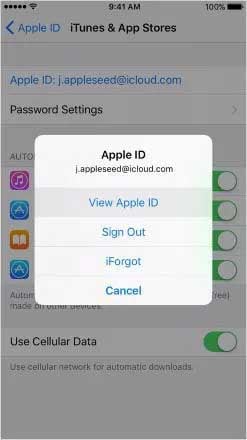
- Step2: Tap on the “iTunes and App Store”.
- Step3: After this, you need to tap on the “View Apple ID” option available on the screen.
- Step4: Change your location by clicking on “Country/Region” in the “Accounts” section.
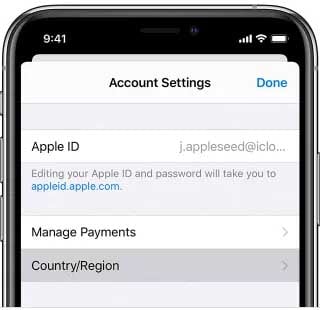
- Step5: Accept the terms and conditions before escaping the window.
Note: Make sure that all your Apple ID subscriptions are used and finished because changing the Appl ID address might make them unusable.

Part 4: Changing My Card to Change Home Address on iPhone
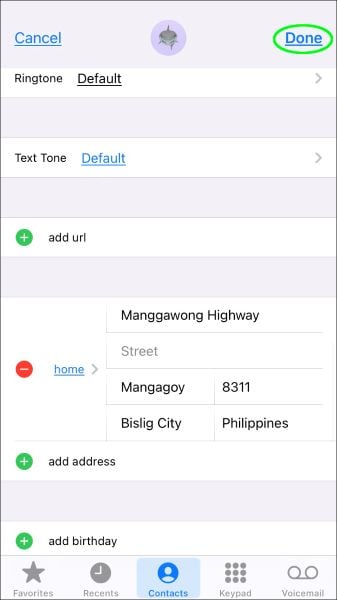
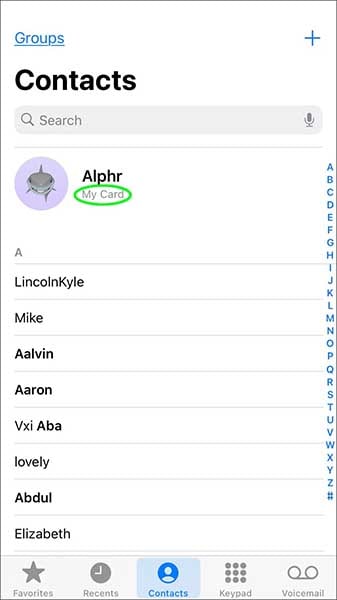
Alternatively, you can try to change “My Card” from your contact list to update your new address on your Apple iPhone SE. First, you need to follow the simple steps given below to change your home address in Apple on iPhone via contact cards:
- Step1: Open the contacts in your Apple iPhone SE and tap on “My Card” to edit your home address.
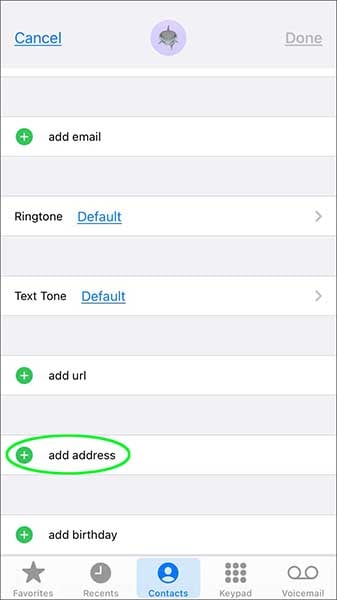
- Step2: You will find the “Edit” option at the top-right corner of the screen. Tap on it.

- Step3: You can easily add your new address here by clicking the “add address” option and deleting the old one.
- Step4: Click on the “Done” tab after modifying the address.

Part 5: Spoof Location on iPhone to Change Home Address
Dr.Fone – Virtual Location is a fantastic application from one of the most trusted software companies – Wondershare. You can easily use Dr.Fone for simulating and teleporting the iPhone GPS location anywhere in the world with just one click. This location faker allows you to travel worldwide without even leaving your home.
Dr. Fone comes with the following benefits:
Dr.Fone - Virtual Location
1-Click Location Changer for both iOS and Android
- It works perfectly with all location-based apps, including Pokemon Go, Snapchat, Tinder, etc.
- Compatibility with iOS and Android without jailbreak.
- It is primarily known for its stability. Hence there is no risk of app crashes.
- Change or fake your location to travel worldwide in one click.
3981454 people have downloaded it
Here, we have mentioned some easy steps of location spoofing using Dr.Fone:
- Step 1: First, you need to install and launch Dr.Fone – Virtual Location on the computer. Then, select the “Virtual Location” module.

- Step 2: Connect your cell phone with your system and click on the “Get Started” option.

- Step 3: Now, you will see your current location on the screen. Activate the teleport mode by clicking on the first icon in the screen’s upper-right corner.

- Step 4: Enter the desired location on the search bar and click on the “Go” button.

- Step 5: The system will now show the entered location, and a pop-up will appear for the confirmation. Click on “Move Here”.

- Step 6: Now, your location is changed.
Note: You can go back to your default location by clicking on the “Reset Location” option.
Conclusion
Updating your home address on your Apple iPhone SE can sometimes be tricky. Some people face issues while doing so. So, we have tried to summarize all the possible methods of changing home addresses in Google and Apple maps on iPhone. Dr.Fone is one of the best and most effective methods for either changing or spoofing location on an iPhone. We hope that you have got all the answers on how to change your home address on your Apple iPhone SE.
Quick Steps to Change Weather Location on Apple iPhone SE
It’s no secret that Weather is not everyone’s go-to app on a daily basis. People only open it when the atmospheric conditions around their area suddenly take an unexpected turn. More often than not, the Weather app remains untouched for a long period of time. But don’t worry. That’s completely understandable. Just remember that if you need to know the latest local forecast, Weather can certainly provide it to you.
You can be sure that the Apple iPhone SE’s Weather app is a reliable source of meteorological information. It can help you dodge weather disturbances and plan your future activities very well. However, the Weather app may sometimes dispense inaccurate reports if the location settings on your Apple iPhone SE are misconfigured. Is it a big deal? Actually, not. The internet provides tons of tutorials on how to change the weather location on Apple iPhone SE. For sure, you can easily restore your preferred location settings in no time.
In this article, we will delve into the main benefits that Apple iPhone SE’s Weather app offers to users. We will also provide some solutions on how to change weather location on Apple iPhone SE. Lastly, we will discuss how the Weather app can exactly help us in our daily routine. Continue reading below to learn more.
Part 1. Useful Features of Apple iPhone SE’s Weather App
In most basic explanation, the Weather app is a tool that helps you determine the weather conditions in certain locations. You can view from there how the weather on a particular day will unfold around the area. It is forecasted at least every hour. If there is a significant development, the report is promptly updated to ensure you receive the latest weather news. Yes. The Apple iPhone SE’s Weather app continues to serve its purpose even though most users don’t use it that often.
Apart from its well-circulated weather updates, the Apple iPhone SE’s Weather app has a lot more to offer. Check out the list provided below.
Ten-Day Forecast

Are you planning a particular activity in the coming days? If so, the Ten-Day Forecast feature of Apple iPhone SE’s Weather app can surely help you in this regard. Basically, it provides estimated predictions on atmospheric conditions, precipitations, and temperature for the next ten days.
Severe Weather Alerts

If an extreme weather disturbance is detected in your area, the Weather app will send you an alert straight away. It can be a weather advisory issued by the state meteorological bureau or a flash report from a credible source. That’s why you should ensure the location settings on your Apple iPhone SE are well-calibrated. If not, take a moment to reconfigure it. There are lots of tutorials out there on how to change weather location on Apple iPhone SE. One of them can certainly assist you.
Maps

The Apple iPhone SE’s Weather app has a map feature that exclusively displays the weather conditions in a specific location. From there, you can view certain atmospheric information, including temperature, precipitation, air quality, and wind conditions. Just make sure that your location is set properly. If you want to replace it, just follow the guide on how to change the weather location on your Apple iPhone SE.
Air Quality

If information regarding air quality is widely available in your country, it will also show up on the Apple iPhone SE’s Weather app. You can view from there the recorded air quality index in your area together with a rating if it is good or not. At present, we cannot deny that being aware of the air quality around us is indeed essential. It somehow helps us lessen our exposure to harmful pollutants in the atmosphere. That’s why you should take advantage of this feature. Read the tutorial on how to change the weather location on your Apple iPhone SE and configure your settings. This way, you’ll stay updated on the air quality of the places you will visit going forward.
Part 2. How to Change Weather Location on Apple iPhone SE?
We have previously learned that location services play a key role in the accuracy and precision of Apple iPhone SE’s weather reports. That’s why you need to ensure the location settings on your Apple iPhone SE are well-configured. Don’t worry. In case it needs a few adjustments, there are lots of techniques on how to change weather location on Apple iPhone SE. Just choose the best one that perfectly suits your situation. Do you want to try it now? Check out the list of methods provided below.
Method 1: Enter the location into the Weather app’s search bar
Let’s say you just need to check the weather conditions in another location. Can you do it without actually going there? The short answer is yes. The Apple iPhone SE’s Weather app lets you view meteorological updates from various places by simply searching the location on the platform. Here’s how to do it in easy steps.
- Step 1: Launch the Weather app on your Apple iPhone SE. If you cannot find the application on your Apple iPhone SE, try to update your iOS first to the latest version.
- Step 2: Click the Menu icon at the top-left corner of your screen.

- Step 3: Enter your preferred location into the search bar. Find and click it from the suggested results.

- Step 4: Then, click Add. The new location will be then added to the list. If you wish to reorder the list based on your preference, just click the More icon at the top-right corner of the left-side panel screen and then click Edit List. From there, drag the locations up and down to reorganize them to your desired order.

Method 2: Change the Weather app’s primary location on the widget
Do you have a Weather widget on your Apple iPhone SE’s home screen? If so, you can directly modify the location settings from there. Don’t worry. It’s as easy as shooting fish in a barrel. Here’s how to change the weather location on Apple iPhone SE from the home screen widget.
- Step 1: Find the weather widget on the home screen of your Apple iPhone SE. Touch and hold it for a few seconds until the hidden menus appear.
- Step 2: Click Edit Weather.

- Step 3: Click Location. From there, enter your desired location into the search bar and choose one from the suggested results.

- Step 4: The location will be then changed immediately on the widget. If the Edit Weather option is unavailable on your end, try to update your iOS first. The Weather app has just been released recently on Apple iPhone SE. Therefore, Apple is making changes from time to time.
Method 3: Change weather location on Apple iPhone SE with Wondershare Dr.Fone.
Is there any other way in case the first two techniques do not bring positive results? Luckily, there is. Wondershare Dr.Fone can absolutely help you with that. It has a potent Virtual Location feature capable of modifying your whereabouts without going outdoors and visiting the actual location. Do you want to try it now? That’s great. Here’s a short guide on how to change weather location on Apple iPhone SE with the aid of Wondershare Dr.Fone.
- Step 1: Download Wondershare Dr.Fone from its official website. Afterwards, install it on your computer.
- Step 2: Launch the newly installed software on your desktop. Once it fully loads up, connect your Apple iPhone SE using a data cable. Follow the on-screen instructions to grant the necessary access and ensure the connection between the two devices is stable and reliable.
- Step 3: After that, navigate to the left-side panel and then click Toolbox. Head over to the main dashboard and then click Virtual Location. If it’s your first time using this feature, let Wondeshare Dr.Fone download the additional resources first. Don’t worry. It will not take a long time to complete. Just wait as patiently as you can.
- Step 4: Once the downloading process has concluded, Wondershare Dr.Fone - Virtual Location will immediately open on a separate window. From there, go to the top-right menu bar and then click Teleport Mode. It’s the first icon in the row.
- Step 5: Enter your desired location into the search bar and choose one from the list of suggestions. Right after, click the Enter icon to proceed.
- Step 6: The details pertaining to your selected location will be displayed on the screen. Check them very carefully and confirm that it is the exact location you’re looking for. Once you’re done verifying the details, click the Move Here button below to continue.
- Step 7: In no time, the current location registered on your Apple iPhone SE will be changed along with your weather location. See? It’s just as simple as that. Therefore, it’s best to use Wondershare Dr.Fone if you wish to change the weather location on your Apple iPhone SE.
NOTE: If you wish to restore the original location settings of your Apple iPhone SE, simply disconnect it from the computer and restart it.
Part 3. Is the Weather App on Apple iPhone SE Really Helpful?
It’s fair to say that Weather is not a primary iOS application. You can continue with your usual routine even without it. However, we cannot deny the fact that it’s there for a reason. All we know for now is that the Weather app helps us stay updated with the latest meteorological forecast. But we don’t know what’s waiting ahead. Maybe the Weather app would soon become a paramount component of an upcoming iOS feature. Is it possible to happen in the future? We’re not sure yet. But one way or another, it’s best to keep Weather up and running on our Apple iPhone SE.

It doesn’t take much to follow the tutorials above on how to change weather location on Apple iPhone SE. Most of them can instantly be conducted and finished with just the snap of a finger. That’s why you should regularly calibrate its location settings and make sure that it’s showing appropriate weather reports. Who knows? Keeping tabs on the atmospheric conditions around your local area can help you in a specific way you don’t actually expect. For instance, severe weather alerts are definitely capable of preventing you from running or driving toward a bad storm. Another thing is that the Weather’s Ten-Day Forecast feature can help you organize your weekly schedules accordingly. For sure, Weather has a lot more to offer. Thus, try to explore it once in a while and take advantage of the benefits.
Conclusion
By default, the Apple iPhone SE’s Weather app uses your current location for updates and reports. You don’t have to do anything if your location settings are configured properly. But just in case you need to change your location for various reasons, you can do it very easily. The tutorials above on how to change weather location on Apple iPhone SE can surely help you with that. Follow the steps indicated and finish the instructions accordingly. For a more convenient and extremely effective approach, try to download Wondershare Dr.Fone. It offers a powerful Virtual Location feature capable of modifying your whereabouts and simulating GPS movements. Don’t worry. It’s very easy to use. You just have to connect your Apple iPhone SE to the computer and calibrate the location settings from there. In a minute or two, the location on your device will be then changed according to your choice.
Also read:
- [New] Expert Picks 15 Innovative Mounts to Elevate Your GoPro for 2024
- [New] Facebook Verification How to Verify Facebook Page Easily for 2024
- [Updated] Amplifying Your Impact Voice Customization in Instagram Media for 2024
- [Updated] In 2024, The Art of Choosing Between Independent or MNC Status
- Dramatically Discounted: Asus ROG Zephyrus G1 6 with Ace Performance Features, $250 Off the List Price
- Effortless Guide to Resolving Sekiro Abrupt End Errors
- Hide location on Apple iPhone 6s and Android without others knowing | Dr.fone
- In 2024, Double Location Dongle All to Know About Apple iPhone 13/iPad GPS Spoofing | Dr.fone
- In 2024, How to Change Your Location on Apple iPhone 14 Pro Max | Dr.fone
- In 2024, Quick Steps to Change Weather Location on Apple iPhone 7 Plus | Dr.fone
- Why Does iTools Virtual Location Not Work For Apple iPhone 8 Plus/iPad? Solved | Dr.fone
- Title: Does PokeGo++ still work on Apple iPhone SE/iPad? | Dr.fone
- Author: Isabella
- Created at : 2024-10-03 05:37:12
- Updated at : 2024-10-05 19:04:55
- Link: https://iphone-location.techidaily.com/does-pokegoplusplus-still-work-on-apple-iphone-seipad-drfone-by-drfone-virtual-ios/
- License: This work is licensed under CC BY-NC-SA 4.0.