
Double Location Dongle All to Know About Apple iPhone 15 Plus/iPad GPS Spoofing | Dr.fone
Double Location Dongle: All to Know About Apple iPhone 15 Plus/iPad GPS Spoofing
If you want to prank your friends or hide your location from your apps, there are applications and GPS spoof dongles out there in the market that can help you. Double Location Dongle is one such miraculous creation that is capable of locking your location in a place you’ve never been to before. Now combined with iTeleporter, it works well for a wide range of locations, dating and gaming apps. Let’s go on and see the Double Location Dongle review.
Part1. About Double Location Dongle
Not many of us are aware of Spoofing Dongles. These are very useful hardware pieces that look small but hold huge value. These are inserted into your laptop or phone’s charging port and then help you to fake your location. Double location Dongle does this job perfectly. It is conveniently compatible with the Apple devices from iOS9 to the latest iOS 13.
iTeleporter Pro 2.0 is a similar dongle that was very efficient in spoofing an individual’s location. It is now combined with Double Location and both together created three Double Location masterpieces. Apart from the obvious spoofing benefits, these have other benefits too –
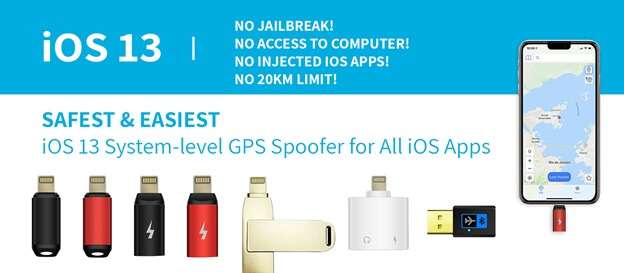
1.1 Double Location BT 2.0
You don’t have to keep your Apple iPhone 15 Plus’s charging port occupied anymore. You can connect this Dongle to your phone by Bluetooth wirelessly. It is easy to charge this dongle too. It comes with a decent USB plug that you can insert into your Personal computer, Laptop or Desktop for easy charging.
1.2 Double Location Mini 2.0
This dongle provides 2 in 1 benefits. On one side, it has the USB plug that will help you connect the dongle to your PC or laptop. While on the other side, you have the lightning port. If you have access to a lightning cable, it is easy to charge the iPhone and iPad with this one.
1.3 Double Location Pro 2.0
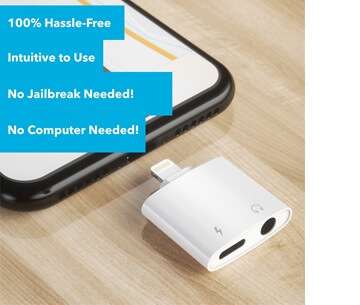
This square white beauty does a terrific job in hiding your actual location. Also, it is having 3-in-1 benefits where you can connect it to iPhone, iPad and Apple adapters as well. It has a 3.5mm headphone jack and a lightning charge port.
Part2. Why choose Double Location Dongle?
Choosing Double Location Dongle will be a profit both because of its high functionality and long durability. Moreover, the hardware piece also provides additional benefits apart from the spoofing of location.
2.1 iOS System-level location change
It provides iOS system level GPS manipulation that changes your location in all apps and even the ones with Apple protection cannot detect where you are actually seated.
2.2 Safety as Priority
This dongle is completely safe and blocks any external interferences that try to capture your data illegally. It shields the bans from the Manufacturer’s (Apple) side. Your data and you are absolutely safe.
2.3 No Jailbreak
Often, you might receive restrictions from the manufacturer during the GPS simulation. In that case, you have to consider jailbreak to get the job done. But Double Location doesn’t require jailbreak and smoothly gets your work done.
2.4 No need of PC
You don’t need a computer for the Dongle to work. It is easy to attach it to your Apple iPhone 15 Plus or iPad’s charging port and then launch it into action. You can carry it wherever you go.
2.5 Works for diverse Apps
You can spoof your location on a wide range of apps like Google Maps, Find My iPhone, Zenly, Pokémon Go, Tinder, Snapchat, Instagram, and Facebook among more.
Part3. Why should you not choose Double Location Dongle?
While you’ve already seen one side of the coin, it is time to see the other one. Yes, there are good benefits to Double Location but I have to mention the cons as well in this double location dongle review.

3.1 Costly on Comparison
Double Location dongle devices are costly. Because of their high efficiency, the sellers decided to tag them with high prices that might bring a frown on your face.
3.2 Slow Delivery
The delivery time is excruciatingly long. It will take a lot of time for them to deliver your piece and if you are expecting it on a particular day, you will certainly be disappointed.
3.3 Website Design
The website layout is a bit confusing. After iTeleporter has combined with Double Location, they made a few modifications to the site. Now it is a tiny bit confusing to navigate through the pages and get to where you want. It could be a little simpler to make life easier.
3.4 Helpline Replies
The helpline center’s response is so slow that I sometimes wonder if there is a helpline team. They have their pages on Facebook and Twitter. You can chat with executives on their official websites as well. Though they promise a response within 1 hour, it is not the case most of the time. They do reply but not when you most need it.
Part4. How to use Double Location Dongle for Apple iPhone 15 Plus/iPad GPS spoofing
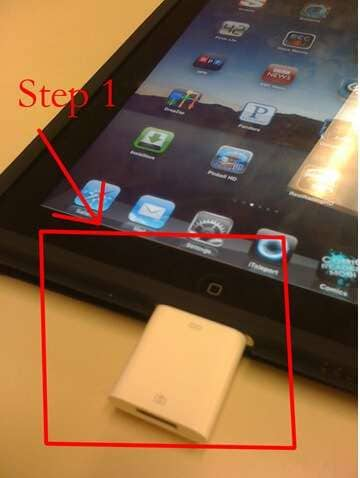
Step 1. Connect the Dongle to your desired device
Step 2. Enter the iOS Companion app to activate the benefits. When you purchase your dongle, the sellers will give you access to this link too. This one is required for availing of all benefits.
Benefit 1: Using coordinates or specific location, lock your spoof location.
Benefit 2: Create a virtual illusion like you are riding a bike or driving a car in your new location.

Benefit 3: Gives access to in-game controls where you can tilt your phone and move your game character.
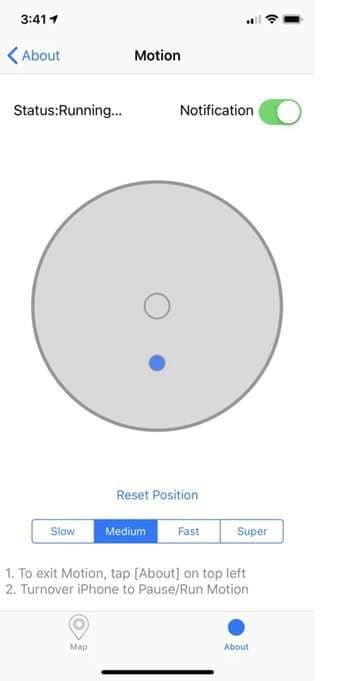
Benefit 4: Use another android or iPhone device as a joystick to control your character in the game.


You need to select your location before you enter the game and not after it.
Part5. Any PC program if Double Location Dongle fails to work?
In case you have no access to Double Location Dongle or it is not working, you can go for other computer spoofing experts like dr. fone and iSpoofer.
iSpoofer is system software that helps in hiding your locations in the games or office devices. You can purchase it as a quarterly plan for household use or as a Monthly plan for an organization with many computer devices. With the motto of ‘Work hard, play smart’, this one keeps you covered for a while.
Dr. fone is similar software that spoofs your location. This is an economical purchase that lets you take the monthly, quarterly and annual plans. All of them cost less than $10!
Dr.Fone - Virtual Location
1-Click Location Changer for both iOS and Android
- Teleport from one location to another across the world from the comfort of your home.
- With just a few selections on your computer, you can make members of your circle believe you’re anywhere you want.
- Stimulate and imitate movement and set the speed and stops you take along the way.
- Compatible with both iOS and Android systems.
- Work with location-based apps, like Pokemon Go , Snapchat , Instagram , Facebook , etc.
3981454 people have downloaded it
How does it work?
6 Methods to Protect Yourself from Location Tracking on Apple iPhone 15 Plus
With the advent of digitalization in everything, GPS is one feature that has taken world by the storm. There are abundance of apps and websites that demand location for better exposure and services according to the current location. Apple always does the best for keeping the privacy and security features and allows users to have control over location permissions.
Many of the iOS users wonder about “how do I stop someone from tracking my Apple iPhone 15 Plus”. Though the saved locations are not sent to the Apple servers, but for some, privacy is everything. If you are one of those who chooses privacy over anything and doesn’t wish to share location with anyone else, this article deals with the same. We will help you know how to stop tracking on Apple iPhone 15 Plus in different ways.
Importance of Keeping Location Data Private
Considering why keeping privacy is never a bad idea. And of course you have contemplated upon this thing. That is why you felt the need of stopping tracking on Apple iPhone 15 Plus and you are here. Well! In this section, we feel the need to explain more about why you should keep the location privacy in your bucket list. So, before we proceed towards the different ways to stop someone tracking your Apple iPhone 15 Plus, we suggest you to read this part.
- It is all known to us that apps like Find My Friends lets use sharing the location where we are. This means, anyone in our contact list can know the exact location. They can know easily where we are going and when. And a lot of times, we are not comfortable telling or sharing our visits to a particular place. However we can’t stop others habit of asking the questions about our visits.
- Moreover, we can never presume anyone’s intention. We don’t know what one thinks about us. And if there is any person in our contact having any inappropriate objective might take advantage of our location sharing. And the whole purpose of the location-sharing app can go to a wrong level.
- Thirdly, we have a plenty of websites and applications available on the internet that uses our location. As we have already mentioned above that Apple assures us that the data is kept encrypted and not used for any wrong means. But we can’t always trust technology and take it for granted, right!
- Also, when apps use location and later provide us notifications and information based on our location might be a thing we never want. This can be a little annoying.
Thus, to avoid such bothersome situations, keeping the location data private becomes essential. And now that you know the importance, let us understand how to stop tracking on Apple iPhone 15 Plus
Method 1: Switch to a Virtual Location to Stop Someone from Tracking your Apple iPhone 15 Plus
When you want to stop someone tracking your Apple iPhone 15 Plus, why just turning off the tracking option. Why not you try to misguide people and have fun? With the assistance of a tool namely Dr.Fone – Virtual Location (iOS) that aims on keeping privacy, you can surely do that. The tool can help you changing your location and you can teleport anywhere you want. Using this, you can easily mock location in just 1 click. Here is how to use this tool to serve the purpose.
Step 1: Get the Tool and Run it
To start the process, you are required to get the Dr.Fone – Virtual Location (iOS) downloaded in your PC. Install it eventually and then launch it. Once it is launched successfully, click on the “Virtual Location” tab given in the main interface.

Step 2: Connect the Apple iPhone 15 Plus device
Take help of your lightening cable and connect the Apple iPhone 15 Plus to the computer. Upon successful connection, hit on the “Get Started” button.

Step 3: Find your Location
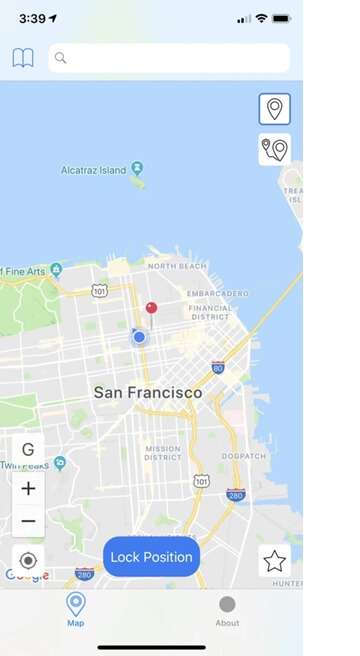
From the following window, you will be able to notice the actual location of yours on the map. In case you aren’t able to, you can go for the “Center On” icon which can be found in the lower right of the screen. This will help you show the appropriate location.

Step 4: Activate Teleport Mode
To do this, simply go to the third icon in the upper right corner of the screen. This “Teleport Mode” icon will let you teleport anywhere you want. Now, you just have to input the name of the place in the filed given and click “Go”.

Step 5: Change Location
You can now easily stop tracking on Apple iPhone 15 Plus by deceiving your location as the program will understand your desired location. You can click on the “Move Here” option from the pop-up. It will change the location and now, any of the location based app in your Apple iPhone 15 Plus will show the selected location.

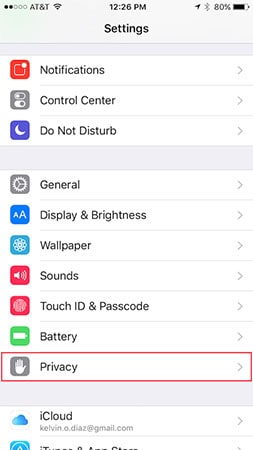
Method 2: Disable location tracking of Apple iPhone 15 Plus completely
If the above method didn’t suit you, this is how you can turn off tracking on Apple iPhone 15 Plus. Using this method, you will end up deactivating the location services of Apple iPhone 15 Plus completely. The steps are no rocket science and with just one toggling, you can reach to what you want. By doing this, any app in the Apple iPhone 15 Plus that uses your location will be of no use. For instance, the maps, Find My Friends and Find My Apple iPhone 15 Plus apps will not be able to track your location. Also, you will stop anyone from tracking you this way. Here are the steps on how to stop tracking on Apple iPhone 15 Plus completely:
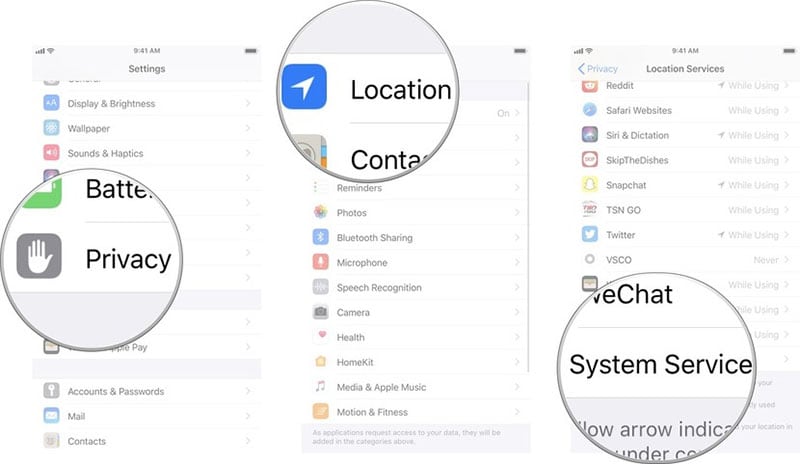
Step 1: Go to the “Settings” in your Apple iPhone 15 Plus as the initial step. Now, look for “Privacy” option and tap on it.
Step 2: Now, go for the “Location Services” and tap on it.
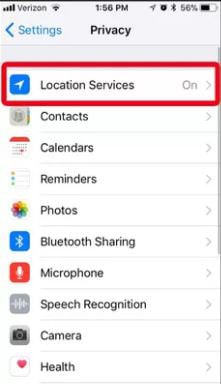
Step 3: Slide the switch next to “Location Services” to turn the locations off.

Method 3: Disable location tracking of specific apps
In the above section, you have stopped tracking on Apple iPhone 15 Plus entirely which means any of the location based app or service won’t be able to locate you. Nevertheless, completely turning it off can sometimes be useless as there are some apps that need the tracking of your location so as to give you better experience. As a solution for this, you can follow the steps below and can turn off location for specific apps only. Here is how to stop tracking on Apple iPhone 15 Plus for specific apps.
Step 1: Open “Settings” as usual firstly and go to “Privacy”.
Step 2: Go to “Location Services” and don’t toggle it off. Instead, you will find apps listed under the option.
Step 3: Select the apps and make adjustments according to your preferences. You can choose among “Never”, “While Using the App” and “Always”.
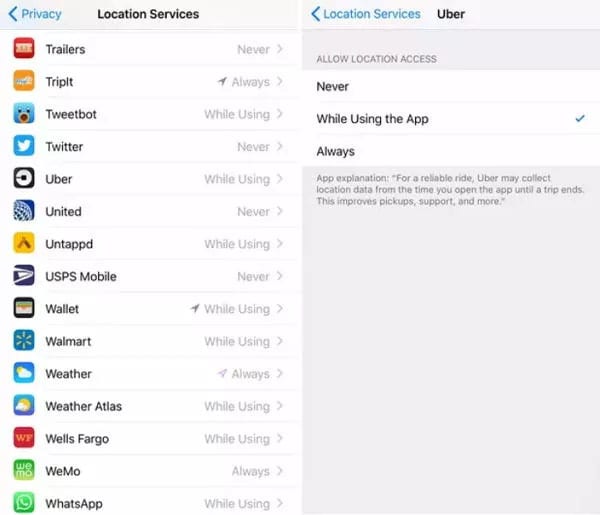
The first option will never send your location to the apps. Second option will use your location only when you use the particular app. And as it suggests itself, by choosing the “Always” option will always track your location.
Method 4: Disable Significant Locations on Apple iPhone 15 Plus
Apart from the apps, Apple iPhone 15 Plus itself keeps record of where you travel the most. These frequently visited locations are referred to as significant locations. The purpose of such tracking is to help you providing location concerned suggestions, especially when you employ Siri or other features. If you want to turn off such tracking on Apple iPhone 15 Plus, we can help you. These are the steps that you should follow in this case.
Step 1: From your Apple iPhone 15 Plus’s Home screen, go to the “Settings” app.
Step 2: Select the “Privacy” option now and head to the “Location Services” located at the top of the screen.
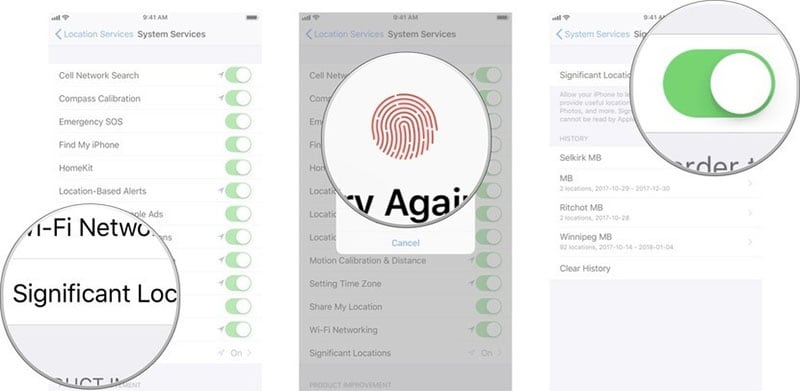
Step 3: After this, click on the “System Services” from the bottom.
Step 4: Look for “Significant Locations”. You will be prompted to use your password or touch ID to access the feature. Do it right away.
Step 5: Toggle off the green slider near “Significant Locations”. This is it!
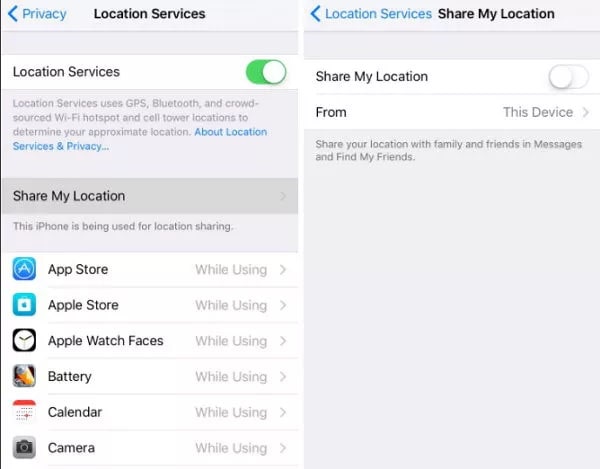
Method 5: Disable Share My Location service
The feature “Share My Locations” enables you to share your locations with your family and friends. They can get to know your current location through apps like Find My Friends if this feature is turned on. So, if your concern is “how to stop my parents from tracking my Apple iPhone 15 Plus”, you can turn this off. The steps are mentioned below. Follow them and stop worrying if someone is tracking you or not.
Step 1: Open “Settings” in your Apple iPhone 15 Plus and go to “Privacy” option.
Step 2: Look for the “Share My Location” and toggle it off.
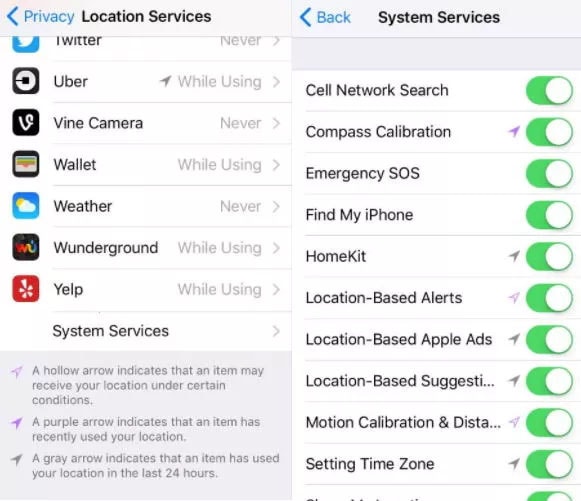
Method 6: Disable location-based notifications or alerts
iPhone provides three kinds of location based services. These include the services regarding alerts, Apple ads and suggestions. If this feature is turned on, you may get the notifications, suggestions or iAds according to what is best for your location. If this bothers you and you don’t want this to happen, you can turn it off by following steps below. This is how to turn off tracking on Apple iPhone 15 Plus in terms of location-based alerts and notifications:
Step 1: Launch “Settings” firstly on your device and scroll for “Privacy”.
Step 2: Head to the “Location Services” followed by “System Services”.
Step 3: Subsequently, you can disable the location based services or alerts as you want.
Final Words
We are concluding the topic here with a great hope that you now are well informed about how to stop someone from tracking your Apple iPhone 15 Plus. We have provided different ways for different situations. Hope you liked our efforts. If you have any doubts or questions, please leave a comment below. Also, if your friend or near one who is in trouble and want to stop someone tracking their Apple iPhone 15 Plus, don’t hesitate sharing this. Tell us how you feel about today’s topic and stay tuned for more interesting updates.
7 Fixes to ‘No GPS - Showing Approximate Location’ on Apple iPhone 15 Plus Waze
With all the hectic days and schedule that we all have, being on time seems to be so challenging. In such demanding situations, we all make sure that to save time and do whatever it takes. When it comes to driving and reaching somewhere on time, knowing about the roads, traffic situations etc matter a lot. And Waze app is such a blessing that can surely help us with these. Not to mention, the app uses GPS services of your device. You can afford any issue with such apps, right. Therefore, in this article, we are going to point out an issue that is “no GPS showing approximate location” in Apple iPhone 15 Plus. If you are suffering with the same, please read the article to the end and get solutions.
Part 1: Why Waze shows “No GPS - Showing approximate location” on Apple iPhone 15 Plus
Fixing the issue can be put as secondary thing. What should matter is why such thing happens. Here are some of the causes or reasons that can lead to Apple iPhone 15 Plus no GPS showing approximate location issue. Please read them.
- One of the vital causes may include locations settings that might be invalid. As the app depends on location, having correct locations settings carries weight.
- Apart from invalid location settings, when there is no signal as well as location isn’t updated in your device, the issue is likely to arise.
- The app might refuse to work and may show no GPS if there is an issue like building interference.
- Unarguably, firmware issues know no bounds. If the Apple iPhone 15 Plus device is not updated, you might get this issue easily.
Part 2: Leave the place with poor signals
It is understood that the Waze app runs on GPS. Therefore, having poor signals can be the main cause of why Apple iPhone 15 Plus says “no GPS showing approximate location”. This will not let the location services work properly and therefore arising the issues like these. And hence, as the first thing, we would like to suggest you leaving the place if there are poor or no signals at all. This will do nothing but ruin your mood and app’s performance. Do this and see if the problem goes.
Part 3: Check date & time settings
As the other solution to Waze Apple iPhone 15 Plus 6 no GPS, you must check your date and time settings. A lot of times, the issue comes with incorrect time/location settings. And therefore, here we suggest you to do the following things.
Step 1: Go to “Settings” in the first place.
Step 2: Hit on “General” and tap on “Date & Time”.
Step 3: Toggle off the switch next to “Set Automatically”. If you also want to set 24-hour timings, you can do so by toggling the respective switch.

Step 4: Now, in the date & time settings, tap on “date”. Now, adjust the time according to you.

Step 5: To change the time zones, hit on “Time Zone” in the date and time settings.
Step 6: You can enter the city name and go ahead.

Part 4: Restart your Apple iPhone 15 Plus
One of the most frequently used methods to troubleshoot certain iOS problems is to simply give a restart to your device. Doing this simply terminates all the running background processes and starts the phone freshly. This is what you need to do and see if Waze Apple iPhone 15 Plus no GPS issue gets resolved.
Step 1: Restart basically implies turning your device off and on. To do this, you are supposed to lock press the “Power” or “Sleep/Wake” button.
Step 2: When you see the “Slide to power off” slider, simply drag it to the right and the Apple iPhone 15 Plus device will turn off.
Step 3: Now, press the “Power” button again for long and power on your device.

Part 5: Reset Network and Location & Privacy Settings
If the above methods didn’t help you solving the problem, we would like to do some works with the network as well as location settings. It should be pointed out that when you reset your network settings, it will refresh and remove the entire settings related to networks like VPN, Wi-Fi etc. Also, by following the Location & Privacy settings, these settings will be restored to the default ones. However, this can be a great solution to fix Waze no GPS showing approximate location in iOS. This is what needs to be followed.
To Reset Network Settings:
Step 1: Open “Settings” and go to the “General” option.
Step 2: Once you are in it, scroll down to look for the “Reset” option.
Step 3: Here, simply tap on “Reset Network Settings”. Confirm the actions and you are good to go.

To Reset Location & Privacy Settings, the steps are identical. Just tap on “Reset” followed by “Reset Location & Privacy Settings”.

Part 6: Re-install Waze and grant location permission in settings
There are times when an app fails to work properly. And it can be possible that Waze in your device is not able to discover your location. In such cases, giving a little treatment to the apps can be helpful. So, here is the next fix. Try to install the app once again and give the permissions concerning location when Waze Apple iPhone 15 Plus no GPS issue still arrives. Make sure to follow the steps carefully.
Step 1: On the Home screen, long tap on the Waze icon.
Step 2: It will jiggle a little and you will notice a small x icon at the corner of it.
Step 3: Now, tap on it and confirm to uninstall it.
Step 4: Go to the App Store and install the app once again.
Step 5: Now, head to the “Settings” and tap on”Privacy”.
Step 6: Head to “Location Services” and look for the app.

Step 7: Toggle the switch on to give the location permission. You can choose between “While Using the App” and “Always”.
Part 7: Toggle on and off Wi-Fi and cellular data
Along with the poor signals, poor networks can also act as a great hindrance for no GPS showing approximate location in Apple iPhone 15 Plus problem. And therefore, doing a simple disable and enable can work wonders. This will simply refresh the GPS data and might help you fixing the issue. Follow the steps below.
Step 1: Simply go to the Control Center by swiping up the screen from the bottom.
Step 2: When in the Control Center, make sure to tap on the Wi-Fi icon to turn it off (if it is on and vice versa).
Step 3: Wait for a few seconds and turn it on again. Do the same with Cellular Data icon as well.
Alternatively, you can head to the “Settings” and go to the “Wi-Fi” option to turn off and on. For cellular data, tap “Mobile Data” and turn off and on.

Part 8: Update Apple iPhone 15 Plus to the latest version iOS
It is an undeniable fact that Apple iPhone 15 Plus or any other device provides glitches when not updated. Therefore, as the last resort, we suggest you to check if your iOS is updated or not. Simply follow the steps below and check if Waze no GPS showing approximate location in Apple iPhone 15 Plus still exists.
Step 1: Open “Settings” in your iOS device and head to the “General” tab.
Step 2: Once you are in the next menu, you could see the “Software Update” at the top.
Step 3: Please tap on that and you will be able to see if the update is present or not. If yes, go ahead with the prompts and install it in your device to make things work.

Dr.Fone - Virtual Location
1-Click Location Changer for both iOS and Android
- Teleport from one location to another across the world from the comfort of your home.
- With just a few selections on your computer, you can make members of your circle believe you’re anywhere you want.
- Stimulate and imitate movement and set the speed and stops you take along the way.
- Compatible with both iOS and Android systems.
- Work with location-based apps, like Pokemon Go , Snapchat , Instagram , Facebook , etc.
3981454 people have downloaded it
Conclusion
We have introduced various ways to be followed when there is no GPS showing approximate location on Apple iPhone 15 Plus. We hope that you are now help yourselves following the aforementioned steps. Thank you for making time to read this. Help us know your views about this article. Simply give your feedback in the comment section below.
Also read:
- [New] 2024 Approved Enhancing Engagement with Dynamic Text on Instagram
- [New] In 2024, Standout TikTok PFP Designs That Set You Apart
- Does PokeGo++ still work on Apple iPhone 7 Plus/iPad? | Dr.fone
- Double Location Dongle All to Know About Apple iPhone 13/iPad GPS Spoofing | Dr.fone
- Double Location Dongle All to Know About Apple iPhone 8 Plus/iPad GPS Spoofing | Dr.fone
- Double Location Dongle All to Know About Apple iPhone XS Max/iPad GPS Spoofing | Dr.fone
- Find My App Troubleshooting No Location Found vs. Location Not Available & How to Fix Them On Apple iPhone 12 mini | Dr.fone
- How Oppo K11x Mirror Screen to PC? | Dr.fone
- In 2024, A Full Review for iTools Virtual Location and Top 5 Alternatives For Apple iPhone 11 Pro Max/iPad | Dr.fone
- In 2024, How to Change/Fake Your Apple iPhone 11 Pro Max Location on Viber | Dr.fone
- In 2024, How to Fix the Apple iPhone 14 Pro GPS not Working Issue | Dr.fone
- In 2024, Optimizing Views Understanding the Key Rankers for YouTubers
- In 2024, Quick Steps to Change Weather Location on Apple iPhone SE | Dr.fone
- Les 10 Outils Gratuits Les Plus Performants Pour Automatiser Le Complétion De Formulaires PDF Sous Windows & macOS
- Noctua Enhances SFF Computing: Introducing the NH-L12Sx77 Low-Profile CPU Cooler for Optimal Ram Placement & Superior VRM Temperature Control
- The Seamless Art of Game Recording on Sony's PlayStation 4 for 2024
- Updated Free and Easy The Best Online Tone Generator Sites for 2024
- Title: Double Location Dongle All to Know About Apple iPhone 15 Plus/iPad GPS Spoofing | Dr.fone
- Author: Isabella
- Created at : 2024-10-02 21:27:34
- Updated at : 2024-10-06 07:31:14
- Link: https://iphone-location.techidaily.com/double-location-dongle-all-to-know-about-apple-iphone-15-plusipad-gps-spoofing-drfone-by-drfone-virtual-ios/
- License: This work is licensed under CC BY-NC-SA 4.0.