
:max_bytes(150000):strip_icc():format(webp)/GettyImages-1135364530-dec5678c0c2c427ba18ae21452ff6326.jpg)
Find My App Troubleshooting No Location Found vs. Location Not Available & How to Fix Them On Apple iPhone 8 Plus | Dr.fone
Find My App Troubleshooting: ‘No Location Found’ vs. ‘Location Not Available’ & How to Fix Them On Apple iPhone 8 Plus
“What does it mean when someone’s location on Apple iPhone 8 Plus suddenly shows “Location Not Available”? Why does it say no location found on Find My Apple iPhone 8 Plus?”
On Quora, there are many similar questions as above. Do you have the same question?
The Find My app on Apple iPhone 8 Plus has become a powerful tool for locating lost or misplaced devices and tracking the location of family and friends. While using the app, encountering messages like “No Location Found” or “Location Not Available” could be quite challenging. Understanding the distinctions between these messages within the Find My app is crucial for effectively managing and understanding location information.
In this article, we will explore the differences between “No Location Found” and “Location Not Available” within the Find My app on Apple iPhone 8 Plus and will potentially address solutions to these problems.
Part 1: What Does “Location Not Available” Mean in Find My App?
If you are an Apple iPhone 8 Plus user and frequently use the Find My app to track the location of your devices or loved ones, you may have come across the frustrating message that says “Location Not Available.” This error can leave you puzzled and wondering why you are unable to see the real-time location of the Apple iPhone 8 Plus device you are tracking.
1.1 Understanding the “Location Not Available” Error
iPhone returning with the error “Location Not Available” involves issues caused by the Apple iPhone 8 Plus device’s GPS. “Location Not Available” in the Find My app typically means that the Apple iPhone 8 Plus device you are trying to locate is either turned off, not connected to the internet, or has disabled location services.
When a device is turned off or not connected to the internet, it cannot send its location information to the Find My app, thus resulting in the “Location Not Available” message. Similarly, if the Apple iPhone 8 Plus device has disabled location services, it will not be able to provide its location to the app. It’s important to note that this message does not necessarily mean that the Apple iPhone 8 Plus device is lost or stolen, but rather that it is unable to be tracked at that moment.
1.2 Why Does My Apple iPhone 8 Plus Say, “Location Not Available”?
The “Location Not Available” message can appear on the Find My app for various reasons. Here are some possible explanations:
- 1. Location Services Disabled
One common reason for this error is that the Apple iPhone 8 Plus device you are trying to locate has its location services turned off. Location services are essential for apps like Find My to accurately determine the Apple iPhone 8 Plus device’s location. To resolve this issue, the Apple iPhone 8 Plus device owner needs to enable location services in their device settings.
- 2. Poor or No Internet Connection
The Find My app relies on a stable internet connection to transmit location data. If the Apple iPhone 8 Plus device you are tracking is in an area with weak or no internet connectivity, the app may not be able to retrieve the location information. Encourage the Apple iPhone 8 Plus device owner to check their internet connection and try again later. In another case, it might be possible that your phone’s Airplane Mode is turned on, with the Wi-Fi services and cellular data turned off for the Apple iPhone 8 Plus.
- 3. Incorrect Date and Time Settings
The “Date & Time Settings” of the Apple iPhone 8 Plus are not set properly. You may have tried to manually set the date, time, and the appropriate zone that the Apple iPhone 8 Plus has to follow. Technical anomalies across the settings will cause issues with the Apple iPhone 8 Plus device’s location settings.
- 4. Privacy Settings
Apple prioritizes user privacy, and as a result, users have control over sharing their location information. If the person you are trying to locate has set their privacy settings to restrict location sharing, you will receive a “Location Not Available” message. In this case, the Apple iPhone 8 Plus device owner needs to adjust their privacy settings to allow location sharing with the Find My app.
- 5. Device Turned Off or Battery Depleted
If the Apple iPhone 8 Plus device you are tracking is turned off or its battery has completely drained, the Find My app will not be able to provide the location information. This is a common occurrence when trying to locate a lost or stolen device. In such cases, you may need to wait until the Apple iPhone 8 Plus device is turned on or charged to retrieve its location.
- 6. Problems with Application or Device
Occasionally, technical glitches or temporary server issues can cause the “Location Not Available” error, which will require a restart of the Apple iPhone 8 Plus device. System issues can also cause glitches in functions like the location settings of the Apple iPhone 8 Plus, which need to be restarted. If the error persists for an extended period, it may be worth contacting Apple support for further assistance.
In conclusion, the “Location Not Available” error in the Find My app can be caused by a variety of factors, including disabled location services, poor internet connection, privacy settings, device status, or technical glitches. By understanding these possible reasons, you can troubleshoot the issue more effectively and ensure a seamless tracking experience.
Part 2: What Does “No Location Found” Mean in Find My App?
The Find My app is a useful tool that allows you to locate your Apple iPhone 8 Plus, iPad, or other Apple devices. It uses a combination of GPS, Wi-Fi, and cellular data to pinpoint the exact location of your device. However, there are instances where the app fails to provide a location, leaving users confused and concerned.
2.1 Understanding the “No Location Found” Error
The “No Location Found” error message on your Find My app indicates that your Apple iPhone 8 Plus is unable to determine its current location. Conveniently speaking, this error displays the unavailability of a location for an Apple iPhone 8 Plus, which is why it shows such an error. This can be frustrating, especially if you’re trying to locate a lost or stolen device. However, there are several reasons why this error may occur, and understanding them will help you troubleshoot the issue effectively.

2.2 Why Does My Apple iPhone 8 Plus Say, “No Location Found”?
There are a few common reasons why your Apple iPhone 8 Plus may display the “No Location Found” error message. In this section, we will explore these reasons and provide solutions to help you resolve the issue.
- 1. Location Services Disabled
One possible reason for the “No Location Found” error is that your Location Services are disabled. To check if this is the case, go to your Apple iPhone 8 Plus’s Settings, tap on Privacy, and select Location Services. Ensure that the toggle switch is turned on for both the Find My app and any other apps that require location access.
- 2. Location Not Being Shared
If you cannot find the location of your friend across the Find My App, there is a possibility that they’ve stopped sharing the location at any time. When this happens, you won’t be able to check out their live location coordinates, as the other user has voluntarily abstained from the option of showing their location to someone else.
- 3. Device Ran Out of Battery
iPhones are Apple iPhone 8 Plus] and other smartphones that can run out of battery. While the Apple iPhone 8 Plus needs to be activated to communicate properly, having the Apple iPhone 8 Plus run out of battery leaves with this error when their location is searched. The Find My app would duly fail to access the Apple iPhone 8 Plus device when it runs out of battery.
- 4. iCloud Removed from Device
Your iCloud account plays a crucial role in the Find My app’s functionality. Apple iPhone 8 Plus provides the “Share My Location” option for Find My users who have connected their iCloud account with their device.
If somehow they remove the iCloud account from their phone, all connections with the Apple iPhone 8 Plus are deleted. This also includes the Find My service, which eliminates the location services from the Apple iPhone 8 Plus device. You would now be unable to observe any location coordinates of the Apple iPhone 8 Plus device. Sign out of your iCloud account, restart your device, and sign back in to refresh the connection. Additionally, ensure that you have enabled Find My Apple iPhone 8 Plus in your iCloud settings.
- 5. Poor GPS Signal or No Internet Connection
Another reason for the error message could be a weak GPS signal or lack of internet connectivity. Your Apple iPhone 8 Plus relies on GPS and internet connection to accurately determine its location. If you’re in an area with poor GPS signal or have no internet connection, your device may struggle to find its location. Try moving to an open space or connecting to a stable internet network to see if the issue resolves.
- 6. Outdated iOS Version
Sometimes, an outdated iOS version can cause issues with location services. Ensure that your Apple iPhone 8 Plus is running on the latest iOS version by going to Settings, selecting General, and tapping on Software Update. If an update is available, download and install it to potentially fix any bugs or glitches affecting the Find My app’s location tracking.
- 7. Find My Not Working Properly
Glitches in the Find My service can also cause the problem of the “No Location Found” error with the Apple iPhone 8 Plus. You won’t get any location results if the primary source has issues that cannot be quickly resolved. At times, this directs back to the server, which might take some time to correct.
Encountering the “No Location Found” error on your Apple iPhone 8 Plus’s Find My app can be frustrating, but with the information provided in this part, you now have a better understanding of why it occurs and how to troubleshoot it.
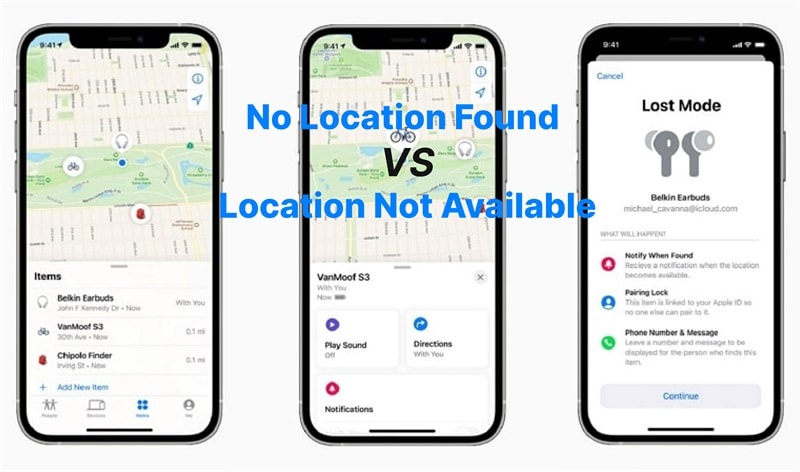
Part 3: “No Location Found” vs. “Location Not Available” in Find My App
The “No Location Found” and “Location Not Available” errors have a very thin line of difference among them. While both errors involve the inaccessibility of the location services, some causes also display similarities among them. However, there still is a difference in the errors, which is marked by the following table. With the presented distinctions, you can specify the difference between “No Location Found” and “Location Not Available.”
Fake GPS Location on iOS and Android in One Click!
What is the Difference Between Location Unavailable and No Location Found?
| No Location Found | Location Not Available / Location Unavailable |
|---|---|
| Occurs when Apple iPhone 8 Plus is turned off or is offline | The Find My App is turned on but is failing to update the user’s current location. |
| The device will be blank in color. | The device will have a color and will not be generic. |
| Location Services across the Apple iPhone 8 Plus might not be turned on. | The “Location Services” and “Share My Location” features on Apple iPhone 8 Plus are active and running. |
| It does not update the location of the person in seconds. | The location is updated within seconds once the service is resumed. |
In summary, “Location not available” typically refers to the temporary unavailability of location data from a device, while “No location found” indicates the inability to locate a specific device or individual at the given time.
Part 4: How to Fix “No Location Found” or “Location Not Available” in Find My App?
We shall now start with an overview of the fixes that can be utilized to resolve the location errors in the Find My App. While the provided solutions are pretty comprehensive, different solutions can be appropriate for both problems. Thus, keep a check on the fixes and select the best option that suits your nature.
Fix 1: Checking the Apple’s System Status Page
The first thing you can do to check the location problems across the Apple iPhone 8 Plus is to look into the status of Find My across Apple servers through Apple’s System Status page. Before you lead to perform any other action across your Apple iPhone 8 Plus, it is highly possible that the problem lies across the Apple Servers. If the service is not operational, you will find a red or yellow dot across it. Find My can be down, which is why all location errors occur across your Apple iPhone 8 Plus. For that, you have to wait for a while before the service starts running again.

Fix 2: Change the Network Connections to Refreshing Network Settings
It is not vital to go for complicated procedures from the very start to resolve the problems of “No Location Found Apple iPhone 8 Plus”. You can seek the resolution of this problem across the network settings of your Apple iPhone 8 Plus. First, if you’ve connected your Apple iPhone 8 Plus to a Wi-Fi network, you can shift to the cellular data network or another Wi-Fi network. Try turning off and on the services to resolve the problems across them. Changing the network settings would be effective in fixing location errors if they occur due to network inefficiencies.

Tips: Fortunately, there is a reliable solution to fix this issue and get your Find My App back on track. Dr.Fone - System Repair (iOS) is a powerful tool specifically designed to troubleshoot and repair various iOS system issues, including problems with the Find My App. With just a few simple steps, you can quickly resolve the “location not available” or “no location found” error and regain full functionality of the app. Let’s explore how Dr.Fone - System Repair (iOS) can help you overcome this frustrating problem .
Fix 3: Turn Off the Airplane Mode across Your Apple iPhone 8 Plus
‘Does “No Location Found” mean their phone died’ is the question one might have if they face location errors while looking for their exact location. This might not be the case, as it is possible that one might have left their Airplane Mode on. Thus, the only best way to avoid this is to turn off the Airplane mode across the Apple iPhone 8 Plus. To execute this flawlessly, you need to look ahead to these simple steps:
Step 1: Access the “Settings” of your Apple iPhone 8 Plus to open the list of options available. Lead through them to find “Airplane Mode” in the list.

Step 2: You have to turn off the toggle adjacent to the “Airplane Mode” option for turning it off.

Fix 4: Set the Appropriate Date and Time of the Phone
The date and time settings are essential in defining the Apple iPhone 8 Plus’s location. Having the correct date and time settings is vital in avoiding issues like “Location Not Available” on your Apple iPhone 8 Plus. To prevent this from happening, you have to set the date and time of your Apple iPhone 8 Plus, which can be done as follows:
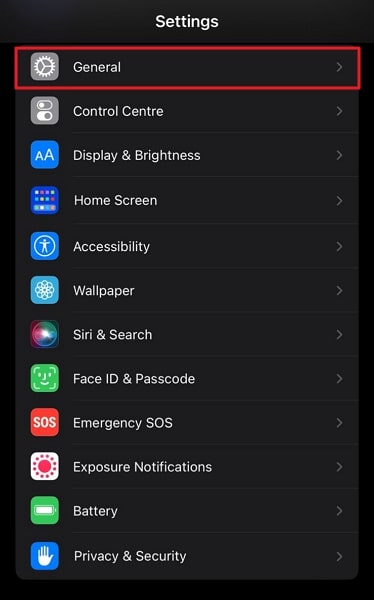
Step 1: Open the “Settings” of your Apple iPhone 8 Plus and look for “General” settings in the list of options.
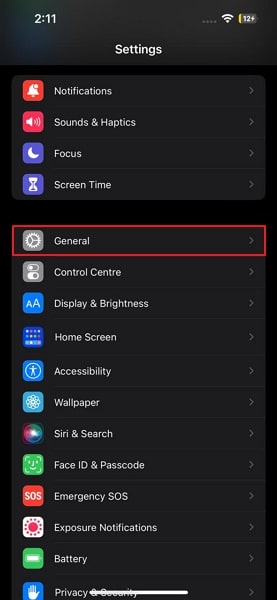
Step 2: As you lead next, find the “Date & Time” settings in the options to access your Apple iPhone 8 Plus’s date and time settings.

Step 3: You must turn off the toggle adjacent to the “Set Automatically” option. Next, proceed to the “Time Zone” option and find the name of your city to specify the time correctly.

Fix 5: Try Restarting Your Apple iPhone 8 Plus
If the location errors are not resolving under any defined solution, you might have to restart your Apple iPhone 8 Plus. This fixes all the prevailing glitches within the Apple iPhone 8 Plus device, and it would be best to restart your device. However, the steps for restarting the Apple iPhone 8 Plus differ depending on your model. Let’s look into the instructions to understand the prevailing differences:
For Apple iPhone 8 Plus with Home Button
Step 1: To turn off an Apple iPhone 8 Plus with the Home button, you have to hold the “Power” button on the side.
Step 2: This opens a new screen where you have to turn off the Apple iPhone 8 Plus with the slider. As it turns off, use the Power button to start the Apple iPhone 8 Plus again.

For Apple iPhone 8 Plus without Home Button
Step 1: Apple iPhone 8 Pluss without the Home button can be turned off using any “Volume” button and the “Power” button. You have to hold both buttons simultaneously until the slider screen appears.

Step 2: Once you turn off the Apple iPhone 8 Plus, you need to wait a few seconds and start the Apple iPhone 8 Plus by holding the Power button for a few seconds.
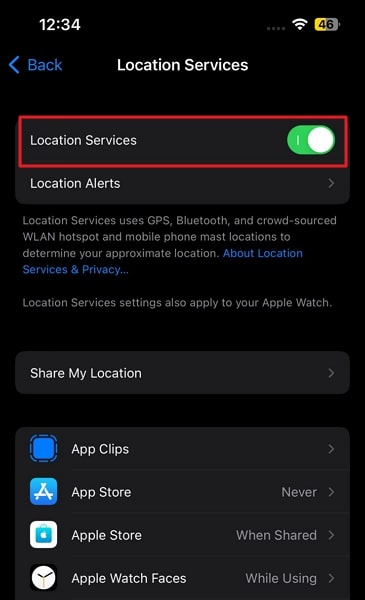
Fix 6: Enable Location Services From Apple iPhone 8 Plus Settings
‘Does “No Location Found” mean they stopped sharing’ might be the question you would seek when you constantly are facing issues with finding a location across the Find My app. This is quite possible as the Location Services across the Apple iPhone 8 Plus might be turned off for no particular reason. To resolve this problem, you have to follow the resolution to this problem with the following steps:
Step 1: Launch the “Settings” application on the Apple iPhone 8 Plus and proceed into the “Privacy & Security” settings available in the list.

Step 2: As you lead into the next screen, find “Location Services” among the options. On accessing the “Location Services” settings, ensure that the toggle adjacent to the “Location Services” option is turned on.

Fix 7: Turning On Precise Location on Apple iPhone 8 Plus
As location issues across the Apple iPhone 8 Plus involve the location settings, you can also look into the “Precise Location” option for resolving the prevailing problems of the Apple iPhone 8 Plus. To execute this properly and avoid all pertinent issues that are preventing you from getting a proper location across Find My, you must follow the steps to turn on Precise Location on your Apple iPhone 8 Plus:
Step 1: You must open the “Settings” of your Apple iPhone 8 Plus and search for the “Privacy & Security” option within the menu. Next, redirect to the “Location Services” section and turn it on with the available toggle.

Step 2: Following this, you need to scroll down in the same section and look for “Find My” in the options. As you proceed next, you must confirm that the blue tick is across the “Ask Time or When I Share” or “While Using the App” option. Next, ensure that the toggle of “Precise Location” is turned on.

Fix 8: Quickly Fix Find My App Location Not Available or No Location Found Error
Considering there is no particular solution that resolves the problems of location settings across your Apple iPhone 8 Plus, you need to have a contingency plan prepared for it. Rather than taking some extreme measures, you can have the option of fixing this issue with the help of Dr.Fone - System Repair (iOS) . This tool is designed to provide users with an all-in-one repair facility that fixes all Apple iPhone 8 Plus problems without hindrance.
Dr.Fone - System Repair (iOS) provides the facility of keeping the Apple iPhone 8 Plus device’s data intact while resolving all the issues that are stopping it from functioning efficiently. You can consider using this tool to solve location issues and errors across Find My.
Step 1: Download Launch “System Repair” Tool on your computer > Choose “iPhone” and “iOS Repair”.

Step 2: Select Standard Mode and proceed to put the Apple iPhone 8 Plus device in Recovery Mode to start downloading iOS firmware.

Step 3: Click “Repair Now” to start the recovery process and let the iOS firmware install on the Apple iPhone 8 Plus. Once done, tap “Done” to conclude fixing the Apple iPhone 8 Plus.

Part 5: Frequently Asked Questions about Find My App on Apple iPhone 8 Plus
Are you having trouble understanding how the Find My App works on your Apple iPhone 8 Plus? Do you have questions about certain error messages or how to share your location with others? In this part, we will answer some frequently asked questions about the Find My App on Apple iPhone 8 Plus to help you navigate through its features and functions. Whether you’re experiencing issues with “Location Not Available” or want to know how to prevent your phone from being tracked, we’ve got you covered. Read on to find the answers to your burning questions about the Find My App.
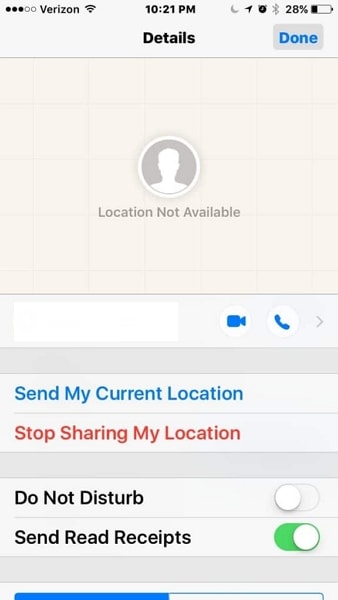
1. Does “Location Not Available” Mean They Turned It Off?
Yes, if you are facing the problem of “Location Not Available” while using the Find My service, it might be related to the Apple iPhone 8 Plus device being turned off. However, this is not the only case, as other issues might lead to such an error, such as networking errors and software glitches.
2. Does “No Location Found” Mean They Stopped Sharing?
Yes, if you are facing the problem of “No Location Found” while searching for a location, it might mean that the user has stopped sharing it. However, there can be other anomalies, such as the unnecessary closure of some functions or other software problems that lead to such location errors.
3. How to Freeze Location on Find My Apple iPhone 8 Plus?
If you wish to freeze the location on Find My app, you will have to open the “Privacy & Security” settings on your Apple iPhone 8 Plus and close down the Location Services to freeze the location.
4. How to Prevent Your Apple iPhone 8 Plus from Being Tracked?
To prevent getting tracked, you can use the Dr.Fone - Virtual Location tool to spoof your Apple iPhone 8 Plus location anywhere in the world. This is how you can prevent other users from tracking your location.
Tips: With Dr.Fone - Virtual Location (iOS/Android) you can freely change your GPS location to anywhere without jailbreak! Also, it enables you to simulate GPS movement with the joystick, customized speeds, and imported GPX route files.
5. How to Share Your Location with Someone in Find My App?
To share your location with someone in Find My app, follow these steps:
- Step 1. Open the Find My app on your device. This app is available on Apple iPhone 8 Plus, iPad, and Mac.
- Step 2. Tap on the “People” tab at the bottom of the screen.
- Step 3. Tap on the “Share My Location” button.
- Step 4. Select the contact you want to share your location with from your contacts list. If the person you want to share your location with is not in your contacts, you can manually enter their phone number or email address.
- Step 5. Choose the duration for which you want to share your location. You can choose to share your location indefinitely or for a specific period of time.
- Step 6. Tap on “Send” to share your location with the selected contact.
The person you shared your location with will receive a notification and will be able to see your location in the Find My app. They can also choose to share their location with you, allowing both of you to easily track each other’s whereabouts.
It’s important to note that you have control over who can see your location and for how long. You can stop sharing your location at any time by going back to the “People” tab and tapping on “Stop Sharing My Location” for the specific contact.
6. How Do You Know When Someone Stops Sharing Their Location on Apple iPhone 8 Plus?
To know when someone stops sharing their location on Apple iPhone 8 Plus, you can follow these steps:
- Step 1. Open the Find My app on your Apple iPhone 8 Plus.
- Step 2. Tap on the “People” tab at the bottom of the screen.
- Step 3. Look for the person whose location you want to track. If their location is being shared with you, their name should appear in the list.
- Step 4. If the person has stopped sharing their location, their name will no longer appear in the list or their location will be shown as “Location Not Available.”
Alternatively, you can also try sending them a message or giving them a call to confirm if they have stopped sharing their location intentionally or if there might be any technical issues. It’s important to respect their privacy and not make any assumptions without proper communication.
Proven Hacks: How to Spoof Your Location on Find My App? Unlock the Secrets
Now you know the causes and the solutions on how to fix the “No Location Found” and “Location Not Available” messages on your phone. And have you ever wanted to keep your current location a secret or play a prank on your friends by sending them a fake location ?
In today’s digital age, privacy is a major concern for many individuals. Whether it’s for security reasons or simply for fun, being able to fake your location on the Find My app can be a useful tool. However, finding a reliable method to do so can be challenging.
Introducing “Dr. Fone - Virtual Location “, an app that allows you to share a fake location with your friends and family. Whether you want to keep your location private or play a harmless prank, this app provides a solution to spoof your location on the Find My app without anyone knowing.
Dr.Fone - Virtual Location
1-Click Location Changer for both iOS and Android
- Teleport from one location to another across the world from the comfort of your home.
- With just a few selections on your computer, you can make members of your circle believe you’re anywhere you want.
- Stimulate and imitate movement and set the speed and stops you take along the way.
- Compatible with both iOS and Android systems.
- Work with location-based apps, like Pokemon Go , Snapchat , Instagram , Facebook , etc.
3981454 people have downloaded it
You can use this application by following the steps below:
Step 1: Download the Wondershare Dr.Fone and choose “Virtual Location”. As you open it, click “Get Started**”** on the window to proceed.

Step 2: Turn on the “Teleport Mode” by clicking on the first icon and typing the location that you want, then clicking on the “Go” icon.

Step 3: Click on “Move Here” and your current location will show up as the location that you typed on Your Apple iPhone 8 Plus.

Conclusion
We have provided you with a detailed overview of what does no location found mean and what does location not available mean. As you face the error of “No Location Found” or “Location Not Available” across your Apple iPhone 8 Plus, there are different cases and scenarios you might look into. This is what the article provides in the complete guide. If you are still facing location errors, you can consider using Dr.Fone - System Repair (iOS) to repair the problems with your Apple iPhone 8 Plus.
How to View GPX Files: Online and Offline Solutions Of Apple iPhone 8 Plus
Also known as GPS Exchange Format, GPX is one of the most resourceful file types that is used to store and import/export map-related data. Ideally, a lot of people use GPX files to access a particular route offline when they are off the grid. Though, there are times when users find it hard to view GPX on a map. Don’t worry, there are plenty of ways to view GPX online or offline. In this post, I will let you know how to view GPX in Google Maps and other resourceful desktop applications in detail.
Part 1: What Can you Do with GPX Files?
Before we discuss how to utilize a GPX view online or offline tool, let’s quickly consider how these files work. It stands for GPS Exchange format and stores map-related data in an XML format. Apart from XML, KML and KMZ are other common file formats to store GPX data.
From the exact coordinates of places to their routes, a GPX file would contain the following information:
- Coordinates: Also know as waypoints, a GPX file would contain details about longitude and latitude that are needed to be covered on the map.
- Routes: The main reason for using GPX files is that they store detailed routing information (the path that we need to take to reach from one point to another).
- Tracks: A track consists of various points that we are merged to form the route or the path.

Let’s suppose you have devised a route between two points that you would need later on. You can now export the GPX file from the application and even import it to the same or another application. When you use the GPX viewer, it will let you access the route offline without an active internet connection. That’s why GPX files are used to view a route offline while hiking, trekking, cycling, and do other offline activities.
Part 2: How to View GPX Files Online in Google Maps?
The good thing is that there are tons of options to view GPX online on desktop, Android, or iOS platforms. Some of these freely available solutions to view GPX on Map are Google Earth, Google Maps, Bing Maps, Garmin BaseCamp, GPX Viewer, and so on.
Out of them, Google Maps is one of the most used solutions to view GPX online on smartphones and desktops alike. As of now, you can import GPX files in the KML format or even load CSV files of exact coordinates on Google Maps. To learn how to view GPX in Google Maps, follow these steps:
Step 1: Go to Your Places in Google Maps
To view GPX on the map, you can first head to the official website of Google Maps on your computer. Now, just click on the hamburger (three-line) icon from the top-left corner to access its options.

This will display various options related to your Google Maps account. From here, you can just click on the “Your Places” feature.

Step 2: Choose to Create a New Map
As a dedicated section of “Your Places” would be launched, you can view all the saved places for your Google Maps account. Here, you can go to the “Maps” tab to view the existing saved route and spots. Since you have to view GPX in Google Maps, you can click on the “Create Map” option from the bottom to load a new map.

Step 3: Import and View the GPX File Online
This will make Google Maps load a new page that will let you create a fresh map as per your preferences. Here, you can just click on the “Import” button to load a browser window from where you can directly load a GPX file on Google Maps and make it available offline as well.

Part 3: How to View a GPX File Offline with Dr.Fone – Virtual Location?
Besides Google Maps, you can also take the assistance of Dr.Fone – Virtual Location to view GPX files on your computers offline. Since it is a desktop tool, it would let you load any GPX file without being connected to an active internet connection. Besides that, the application can also be used to spoof the location of your iOS device or simulate its movement in a route without jailbreaking it.
Therefore, if you want, you can first simulate the movement of your device and export the GPX file. Later, you can import the saved GPX file and simulate your Apple iPhone 8 Plus movement in the same route without any trouble.
Step 1: Launch Dr.Fone – Virtual Location and connect your Apple iPhone 8 Plus
At first, you can just connect your Apple iPhone 8 Plus using a working lightning cable and launch the Dr.Fone – Virtual Location application. Once your device is detected, just click on the “Get Started” and agree to its terms and conditions.
Step 2: Simulate the Movement of your Apple iPhone 8 Plus
The application would automatically detect your Apple iPhone 8 Plus on the interface with its present location. To simulate its movement, you can click on the Multi-stop or One-stop Mode icons from the top.

You can now drop the pin in a route on the map and click on the “Move Here” Button to start simulating the movement.

Subsequently, you can select the number of times you want to cover the route and click on the “March” button. The application will even let you select a preferred speed for the movement.

Step 3: Export or Import the GPX Files
Once you have loaded the map on the interface, you can easily save it offline as a GPX file. To do that, just click on the Export icon from the floating menu on the side.

Similarly, you can also import a GPX file directly to the Dr.Fone application. To do this, you just have to click on the “Import” icon from the sidebar. This will open a browser window, letting you go to a location on your computer where the GPX file is saved.

Once the GPX file is loaded, you can simply wait for a while and let the application process it without closing it in between.

As you can see, it is pretty easy to view GPX online or offline using the right tools. In this post, I have included a detailed guide on how to view GPX in Google Maps. Besides that, I have also included another solution to view GPX on a map using Dr.Fone - Virtual Location (iOS). Apart from importing/exporting GPX files, the application can also be used to spoof your Apple iPhone 8 Plus’s location or simulate its movement virtually from anywhere you want.
How to Fix the Apple iPhone 8 Plus GPS not Working Issue
GPS (Global Positioning System) is an important utility in this modern age. After all, it tracks an individual’s or object’s live location, making route navigation easier. Henceforth, this feature is incorporated in all modern smartphones. However, most Apple iPhone 8 Plus users these days complain about the Apple iPhone 8 Plus GPS problem.
As a user with daily traveling, you want to avoid such issues. This article will make things easier because you will find ways and solutions to overcome this issue.
Part 1: What Happens If Your Apple iPhone 8 Plus GPS Does Not Work on Apple iPhone 8 Plus?
Apple iPhone 8 Plus is among the most popular gadget devices in current times. Meanwhile, its GPS function allows users to stay active on the real-time map technology. However, GPS not working on Apple iPhone 8 Pluss is a common problem. When this happens, you cannot track pinpoint locations.
This means you will find difficulty in locating your destination. Moreover, you will not be able to use those applications that rely on GPS technology. For example, a fitness app needs to track your distance and route. Not to forget, a malfunctioning GPS may also drain more battery.
Part 2: What Are the Potential Reasons for Apple iPhone 8 Plus GPS Not Working?
With GPS, you can track the live locations of your destination in seconds. In fact, you can also track any human depending on their live location. But as an iOS user, it’s normal to face Apple iPhone 8 Plus GPS not working. Why does this happen? Here are the following reasons behind this error:
- Glitches and Bugs: A most common reason for GPS not working is due to glitches and bugs. Hence, this may happen because of underlying iOS or GPS app issues. Either there was a bug in the version update, or the app is facing malfunctions.
- Airplane Mode: When airplane mode is enabled on your Apple iPhone 8 Plus, this may cause a GPS issue. You may have forgotten to turn off your airplane mode after air travel. Not to forget, turning off GPS is necessary during flight as per regulations.
- Incorrect Settings: It’s possible that GPS settings are not properly configured on your Apple iPhone 8 Plus. Like, you may have accidentally turned off location services. While using your Apple iPhone 8 Plus, turning on and off certain features is common.
- Hardware Issue: If your phone is exposed to water or physical damage, this may affect GPS. There may be a hardware issue caused due to this situation. Thus, the GPS antenna or chip may have been damaged.
Part 3: How To Fix Apple iPhone 8 Plus GPS Not Working?
Having an erroneous Apple iPhone 8 Plus GPS is not a new thing. But it does bring many inconveniences for the users. After all, you are deprived of live location tracking and positioning. To fix such Apple iPhone 8 Plus GPS not working issues, these ways are ideal solutions:
Way 1: Make Sure GPS Service is Enabled on Apple iPhone 8 Plus
A majority of people forget to turn on GPS services on their respective Apple iPhone 8 Pluss. Thus, most times, users don’t know how to turn on GPS back. Henceforth, GPS not working issues become evident. To enable GPS service on Apple iPhone 8 Plus, follow these steps:
- Step 1: Launch your Apple iPhone 8 Plus Settings, scroll down, and find “Privacy & Security” from the menu.
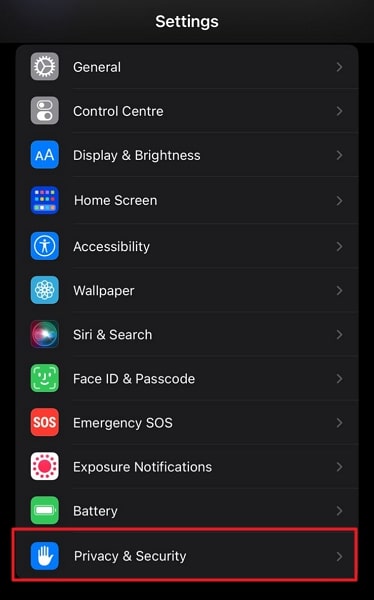
- Step 2: Press “Privacy & Security” and turn on “Location Services” to enable GPS. You can also enable location for other apps from the same settings.
Way 2: Simple Restart Apple iPhone 8 Plus
Restarting an Apple iPhone 8 Plus is the ultimate way to rectify underlying problems. Sometimes GPS is not working because of cache or network problems, and restarting Apple iPhone 8 Plus can help. For restarting an Apple iPhone 8 Plus, these steps will help you:
- Step 1: From the Apple iPhone 8 Plus settings, move into the “General” category, scroll down, and press “Shut Down.” Now slide right to power off your Apple iPhone 8 Plus.
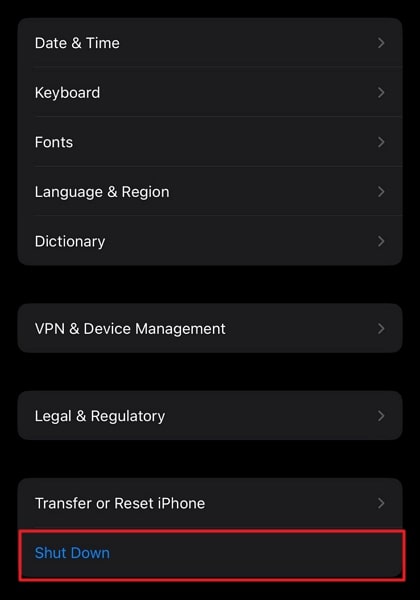
- Step 2: Wait for some time till your device gets powered off. After this, hold the “Power” button until the Apple logo appears to restart your device.
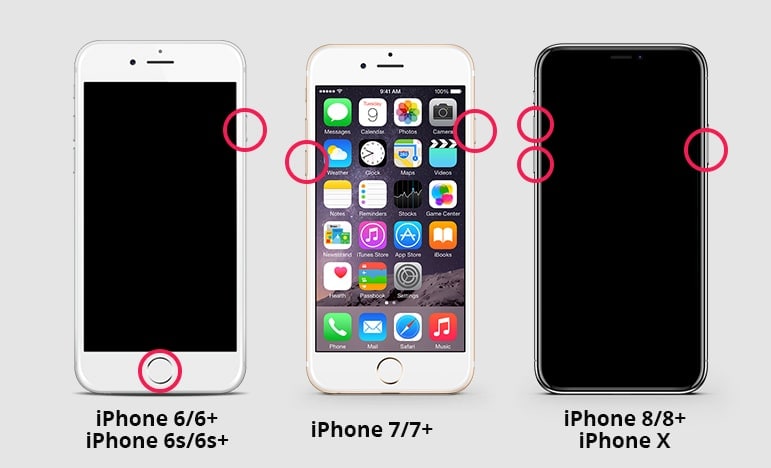
Way 3: Force Restart Apple iPhone 8 Plus
Sometimes your Apple iPhone 8 Plus may get hung up due to an underlying issue. So, when your device is not responding, you cannot restart it from settings. In this scenario, you need to force restart Apple iPhone 8 Plus. To do this, perform these simple instructions:
- Apple iPhone 8 Plus 6, 6S Plus, and Older: Simultaneously press and hold the “Home” and “Sleep/Wake” buttons. Make sure to keep holding both buttons until you see the Apple logo. Finally, release the buttons when the logo appears.
- Apple iPhone 8 Plus 7 or 7 Plus: Start by holding the “Sleep/Wake” button and “Volume Down” button at the same time. Afterward, stop holding the buttons and release them when you see the Apple logo.
- Apple iPhone 8 Plus 8 and Later: Initially, quickly press and release the “Volume Up” button, then perform the same with the “Volume Down” button. After this, press and hold the “Sleep/Wake” button, and release the button once the Apple logo appears.
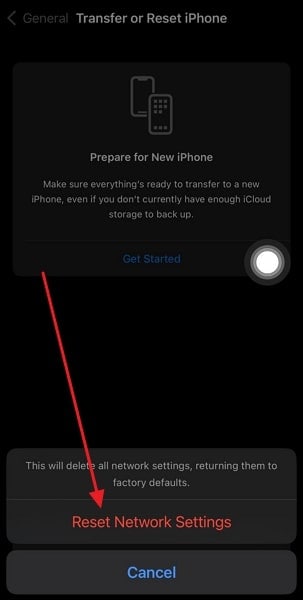
Way 4: Reset Network Settings
A network connection error is also the reason for Apple iPhone 8 Plus GPS not working. This happens when your Apple iPhone 8 Plus isn’t connected to a Wi-Fi network or facing problems in connection. For resetting the network settings, these steps are your trusted solution.
- Step 1: From your Apple iPhone 8 Plus, launch “Settings,” scroll down, and move into “General” from the settings menu.

- Step 2: Access the “Transfer or Reset Apple iPhone 8 Plus” options, tap the “Reset” option, and select “Reset Network Settings.” Now reset your Apple iPhone 8 Plus network settings to default by tapping “Reset Network Settings.”
Way 5: Reset Location and Privacy Settings
In most scenarios, your location is used on many apps that risk GPS optimal functioning. For this purpose, you need to reset the location to the default factory settings. Thinking about how to do it? Get along with these steps:
- Step 1: Move into the settings of your Apple iPhone 8 Plus, scroll down, and tap “General” from the available options.
- Step 2: Now press the “Transfer or Reset Apple iPhone 8 Plus” option from General. From the next screen, choose the “Reset” option, and select “Reset Location & Privacy.” After pressing “Reset Settings,” your device location settings will reset to default.

Way 6: Use Wondershare Dr.Fone to Fix Apple iPhone 8 Plus GPS Problems
Fixing persistent GPS problems on iOS is now easier with Wondershare Dr.Fone. This system repair tool has solutions to repair issues in over 50+ iOS systems. Interestingly, you can update or downgrade the iOS version without jailbreaking with Wondershare Dr.Fone.
So, if you have consistent problems with your Apple iPhone 8 Plus GPS system, this tool can rectify the iOS version. Moreover, you don’t need special expertise or knowledge to use Wondershare Dr.Fone to fix your Apple iPhone 8 Plus. Meanwhile, you enter or exit DFU/Recovery mode with a single click.
Dr.Fone - Virtual Location
1-Click Location Changer for both iOS and Android
- Teleport from one location to another across the world from the comfort of your home.
- With just a few selections on your computer, you can make members of your circle believe you’re anywhere you want.
- Stimulate and imitate movement and set the speed and stops you take along the way.
- Compatible with both iOS and Android systems.
- Work with location-based apps, like Pokemon Go , Snapchat , Instagram , Facebook , etc.
3981454 people have downloaded it
Key Features of Wondershare Dr.Fone
- Efficiently solves issues like black screen or white screen of death from Apple iPhone 8 Plus. So if you are facing such an issue, Wondershare Dr.Fone can help.
- In most scenarios, Wondershare Dr.Fone will repair your Apple iPhone 8 Plus without damaging or losing data. Meanwhile, the recovery will be completed in a few minutes.
- With Wondershare Dr.Fone, you can upgrade your iOS version to the latest beta version. This way, you can enjoy new features for free.
Step-by-Step Instructions for Wondershare Dr.Fone To Fix Apple iPhone 8 Plus GPS Problems
Wondershare Dr.Fone is the most reliable tool for fixing Apple iPhone 8 Plus GPS not working problems. Are you also looking to use this amazing platform? These straightforward instructions will help you move forward:
- Step 1: Connect Apple iPhone 8 Plus with Computer
Download and launch Wondershare Dr.Fone’s latest version on your computer. Next, select “System Repair” from the “Toolbox” tab and connect your Apple iPhone 8 Plus using a USB cable. Select your device type as Apple iPhone 8 Plus to proceed further.

- Step 2: Choose Desired Repair Mode
Here choose “iOS Repair,” and on the next screen, select the desired repair mode. Proceed with the “Standard Repair,” as it will not affect your data. Now follow the on-screen instructions to activate Recovery Mode.

- Step 3: Repair the GPS Issue
After recovery mode is enabled, the platform will automatically detect the Apple iPhone 8 Plus device and provide firmware accordingly. Press “Download” against the required firmware to start downloading it. Once the firmware is downloaded, click “Repair Now” to repair GPS not working issue on Apple iPhone 8 Plus.

Conclusion
GPS is an important feature to have in this modern world. After all, it keeps a person’s or object’s location active in live mapping technology. This way, tracking people in an emergency or finding destinations is easier. Meanwhile, the Apple iPhone 8 Plus GPS problem is a common issue in most devices. Thus, users have to face a lot of difficulties while navigating GPS locations.
Apparently, this article provides step-by-step procedures to solve Apple iPhone 8 Plus GPS issues in different ways. Among the different ways shared, Wondershare Dr.Fone is the most trusted solution for your device. So, if you don’t get reliable solutions from other ways, Wondershare Dr.Fone is available. If you want to explore further solutions, such as fake GPS location , Dr.Fone Virtual Location is also available now.
Also read:
- In 2024, How to See Someones Location on Apple iPhone 11 Pro Max | Dr.fone
- In 2024, How to View GPX Files Online and Offline Solutions Of Apple iPhone 11 | Dr.fone
- In 2024, How to Fix the Apple iPhone 13 GPS not Working Issue | Dr.fone
- In 2024, Quick Steps to Change Weather Location on Apple iPhone SE (2020) | Dr.fone
- A Full Review for iTools Virtual Location and Top 5 Alternatives For Apple iPhone SE (2022)/iPad | Dr.fone
- Find My App Troubleshooting No Location Found vs. Location Not Available & How to Fix Them On Apple iPhone 12 mini | Dr.fone
- 5 Ways Change Your Home Address in Google/Apple Map on Apple iPhone 15/iPad | Dr.fone
- In 2024, Quick Steps to Change Weather Location on Apple iPhone 8 Plus | Dr.fone
- In 2024, How to Fix the Apple iPhone 11 Pro GPS not Working Issue | Dr.fone
- Hide location on Apple iPhone X and Android without others knowing | Dr.fone
- Double Location Dongle All to Know About Apple iPhone 7/iPad GPS Spoofing | Dr.fone
- In 2024, 4 Effective Methods Fake GPS Location on Apple iPhone 6 Plus/iPad | Dr.fone
- How to Change Your Location on Apple iPhone X | Dr.fone
- How to View GPX Files Online and Offline Solutions Of Apple iPhone 13 Pro | Dr.fone
- In 2024, 5 Ways Change Your Home Address in Google/Apple Map on Apple iPhone 14 Pro/iPad | Dr.fone
- In 2024, 7 Fixes to No GPS - Showing Approximate Location on Apple iPhone 6s Plus Waze | Dr.fone
- In 2024, How to See Someones Location on Apple iPhone 6s Plus | Dr.fone
- How to View GPX Files Online and Offline Solutions Of Apple iPhone SE (2022) | Dr.fone
- Does iTools virtual location not work On Apple iPhone 6 Plus/iPad? | Dr.fone
- In 2024, Why Does iTools Virtual Location Not Work For Apple iPhone 13 Pro Max/iPad? Solved | Dr.fone
- Find My App Troubleshooting No Location Found vs. Location Not Available & How to Fix Them On Apple iPhone 11 Pro Max | Dr.fone
- In 2024, How to Change Your Location on Apple iPhone 8 Plus | Dr.fone
- In 2024, Double Location Dongle All to Know About Apple iPhone 13 mini/iPad GPS Spoofing | Dr.fone
- How to Enable, Disable, and Change Safari Location on Apple iPhone 6 | Dr.fone
- In 2024, Hide location on Apple iPhone 11 Pro Max and Android without others knowing | Dr.fone
- In 2024, 6 Methods to Protect Yourself from Location Tracking on Apple iPhone 14 Pro Max | Dr.fone
- How to View GPX Files Online and Offline Solutions Of Apple iPhone 15 | Dr.fone
- In 2024, Hide location on Apple iPhone 14 Pro and Android without others knowing | Dr.fone
- 4 Effective Methods Fake GPS Location on Apple iPhone 15/iPad | Dr.fone
- In 2024, 4 Effective Methods Fake GPS Location on Apple iPhone 6s/iPad | Dr.fone
- A Full Review for iTools Virtual Location and Top 5 Alternatives For Apple iPhone SE/iPad | Dr.fone
- In 2024, 5 Ways Change Your Home Address in Google/Apple Map on Apple iPhone SE (2022)/iPad | Dr.fone
- In 2024, 7 Fixes to No GPS - Showing Approximate Location on Apple iPhone 14 Pro Max Waze | Dr.fone
- In 2024, 5 Ways Change Your Home Address in Google/Apple Map on Apple iPhone 15 Plus/iPad | Dr.fone
- How to View GPX Files Online and Offline Solutions Of Apple iPhone SE (2020) | Dr.fone
- In 2024, 5 Ways Change Your Home Address in Google/Apple Map on Apple iPhone 14 Pro Max/iPad | Dr.fone
- 4 Effective Methods Fake GPS Location on Apple iPhone 6/iPad | Dr.fone
- 6 Methods to Protect Yourself from Location Tracking on Apple iPhone 11 Pro | Dr.fone
- 7 Fixes to No GPS - Showing Approximate Location on Apple iPhone 14 Waze | Dr.fone
- In 2024, How to View GPX Files Online and Offline Solutions Of Apple iPhone 13 Pro Max | Dr.fone
- 7 Fixes to No GPS - Showing Approximate Location on Apple iPhone 14 Plus Waze | Dr.fone
- In 2024, How to See Someones Location on Apple iPhone 14 Pro Max | Dr.fone
- 6 Methods to Protect Yourself from Location Tracking on Apple iPhone 8 Plus | Dr.fone
- In 2024, How to Enable, Disable, and Change Safari Location on Apple iPhone 7 | Dr.fone
- In 2024, iPogo will be the new iSpoofer On Oppo A78 5G? | Dr.fone
- What is Fake GPS Location Pro and Is It Good On Apple iPhone SE? | Dr.fone
- 4 Ways to Transfer Music from Apple iPhone SE (2020) to iPod touch | Dr.fone
- How To Update or Downgrade Apple iPhone 8 Without Losing Data? | Dr.fone
- In 2024, How Can You Transfer Files From Oppo A1x 5G To iPhone 15/14/13? | Dr.fone
- Prevent Cross-Site Tracking on Lava Blaze Curve 5G and Browser | Dr.fone
- In 2024, Latest way to get Shiny Meltan Box in Pokémon Go Mystery Box On Sony Xperia 1 V | Dr.fone
- Useful ways that can help to effectively recover deleted files from S18 Pro
- How To Install the Latest iOS/iPadOS Beta Version on iPhone 6 Plus? | Dr.fone
- 9 Solutions to Fix Xiaomi Redmi 13C 5G System Crash Issue | Dr.fone
- 3 Facts You Need to Know about Screen Mirroring Samsung Galaxy F04 | Dr.fone
- In 2024, A Step-by-Step Guide on Using ADB and Fastboot to Remove FRP Lock from your Xiaomi 14 Ultra
- Realme 12 Pro 5G Screen Unresponsive? Heres How to Fix It | Dr.fone
- How to Restore Deleted Nokia Contacts An Easy Method Explained.
- How to Rescue Lost Music from Honor 90 GT
- In 2024, How to Transfer Contacts from ZTE Nubia Flip 5G To Phone | Dr.fone
- In 2024, How to Unlock Vivo Y17s Phone with Broken Screen
- How To Get the Apple ID Verification Code From Apple iPhone 11 Pro in the Best Ways
- In 2024, Where Is the Best Place to Catch Dratini On Poco F5 5G | Dr.fone
- In 2024, 7 Ways to Lock Apps on Apple iPhone XR and iPad Securely | Dr.fone
- In 2024, Android Unlock Code Sim Unlock Your Vivo G2 Phone and Remove Locked Screen
- Title: Find My App Troubleshooting No Location Found vs. Location Not Available & How to Fix Them On Apple iPhone 8 Plus | Dr.fone
- Author: Isabella
- Created at : 2024-05-19 02:40:09
- Updated at : 2024-05-20 02:40:09
- Link: https://iphone-location.techidaily.com/find-my-app-troubleshooting-no-location-found-vs-location-not-available-and-how-to-fix-them-on-apple-iphone-8-plus-drfone-by-drfone-virtual-ios/
- License: This work is licensed under CC BY-NC-SA 4.0.
