
How to Change Your Location on Apple iPhone 7 Plus | Dr.fone
How to Change Your Location on Apple iPhone 7 Plus
There are several situations when you might have to change the location on your Apple iPhone 7 Plus. Perhaps you are moving to another region, so you have to make changes with your Apple ID to get App Store access. Or it could be the case that you want to change your region to access a certain application. Whatever your reason is to change your location on the Apple iPhone 7 Plus, you have come to the right place. In this post, we have discussed everything you should know about to spoof location on Apple iPhone 7 Plus.
Tips: Experience the freedom to teleport anywhere with Dr.Fone - Virtual Location! The Fake GPS feature for Apple iPhone 7 Plus allows you to break geo limitations and explore the world from your device. Try it now!
Part 1: Do you know how does these locations work?
While both terms may sound to you similar, there are certain differences between them. Your smartphone, be it iPhone, Apple iPhone 7 Plus or Android is a GPS device. Almost every smartphone comes with a GPS chip. If your device’s location services are enabled, it will interact with the GPS satellites, enabling you and others as well to detect your location to a considerably accurate degree.
When your device connects to the internet, your internet service provider assigns an IP address to the Apple iPhone 7 Plus device. The IP address is a collection of numbers that determine who the internet service provider is and where you’re connecting from. This location accuracy depends on how that specific provider assigns an IP address, but it’s probably to be somewhere between the city and the street you’re in. For instance, search engines and streaming services check where you are from (your IP address) for redirecting you to a local version of their service.
All we want to say here is that if you want to change the location, then you should know if the location is based on an IP address or GPS app. To help you get started with how to change location on Apple iPhone 7 Plus, below we have covered every scenario when you might need to do so.
Part 2: How to break the geo-limitation on downloading Apps?
Step 1: On your Apple iPhone 7 Plus, go to the App Store app.
Step 2: Click on the “Featured” tab.

Step 3: Now, scroll down to locate your Apple id and tap on it.

Step 4: Choose “View Apple ID”. You might be asked to log in to your iTunes store.

Step 5: After that, click “Change Country or Region”.

Step 6: Now, select the country or region you want to set. In this scenario, we have switched to the UK from the US. Then, click “Next’.

Step 7: Agree with Terms and Conditions and enter your billing info. If there is no credit info you have, then select “None”. If you select “None”, then ensure that you have entered a postcode that corresponds to the region that you have chosen.

Step 8: Finally, click “Done” and that’s it.
Your App store will be set to the selected region and you can now get the geo-restricted apps on your Apple iPhone 7 Plus. That’s how to change location on Apple iPhone 7 Plus to get the apps that are not available in your region.
Part 3: How to fake GPS on Pokemon Go on Apple iPhone 7 Plus?
Faking your location might even come into the picture while using location-based apps such as Pokemon Go on Apple iPhone 7 Plus. If you don’t want to travel many miles away from the comfort of your home to pick up a Pokemon, then you could simply trick your device into making Pokemon Go think that you’re somewhere you’re not.
To fake GPS on the Pokemon Go Apple iPhone 7 Plus, we recommend you use Dr.Fone - Virtual Location (iOS) . With this program, teleporting your Apple iPhone 7 Plus GPS location to anywhere worldwide is just one click away. It creates a virtual GPS location so that location-based apps on your Apple iPhone 7 Plus think that you are there where you’re not. The best thing about it is that it helps to do the job with 100% safety.
To learn how to trick Pokemon Go or any location-based app on Apple iPhone 7 Plus, get the Dr.Fone - Virtual Location on your computer and follow the below steps:
Step 1: Run Dr.Fone - Virtual Location on your computer and connect your Apple iPhone 7 Plus to the computer with the help of a digital cable. From the main interface, select “Virtual Location”.

Step 2: Click “Get Started”. Select “Teleport” mode located at the top right side and it is the first one. Now, you can use the search function to change the location. Once selecting the location, click on “Go”.

Step 3: You have changed the location successfully. And you will be now able to see your new location as a current location on your Apple iPhone 7 Plus.


This will trick your Pokemon Go in believing that you’re somewhere you’re not. That’s how to fake GPS Apple iPhone 7 Plus Pokemon Go. Get ready to enjoy the game from the comfort of your home.
Part 4: How to reset location on social Apps on Apple iPhone 7 Plus?
What about social apps such as WhatsApp and Facebook? Well, you can manually set the location on social apps. There are several situations when you want to fake your location on social apps. There’s no doubt that if there are two social platforms that have gained huge popularity on the market, then they are WhatsApp and Facebook. So, below we are going to focus on these social apps.
Below is how to reset the location on WhatsApp on Apple iPhone 7 Plus:
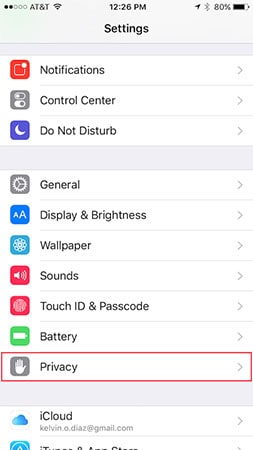
Firstly, you need to turn on GPS location services. To turn it on, go to ‘” Settings”>” Privacy” and select “Location Services” and turn it on. Ensure that WhatsApp is accessing your GPS location. Now, open WhatsApp and choose the conversion to whom you want to send your fake location:
Step 1: Click on the bottom left button (the plus icon). Choose the “Location” option.

Step 2: To send a fake location, use the search box to enter the new location and select the desired location that search results show.

That’s how you can manually set the location on WhatsApp on the Apple iPhone 7 Plus. If you don’t want to share your live location, then you can simply fake the location.
Below is how to reset the location on Facebook on the Apple iPhone 7 Plus:
You can manually change your Facebook check-in location on the Apple iPhone 7 Plus. It comes quite in handy when you want to let others you’re somewhere you’re not.
Step 1: Open your Facebook app on the Apple iPhone 7 Plus and move to the post for which you want to manually set the location.
Step 2:Tap the three-dot icon and choose “Edit Post”.
Step 3: Click the “Location” icon at the bottom and then click the “Check-in” icon.
Step 4: Look for and choose a new location.
Step 5: Finally, click “Save” and that’s it.
That’s how to spoof location on Apple iPhone 7 Plus for social media apps.
Part 5: How to use VPN to fake the location?
As your IP is considered as a digital footprint, a VPN enables you to mask your real IP and conceal your identity. It means that absolute online privacy as well as anonymity. VPN connects you to a server of your preference, which enables you to bypass all geo-restrictions for the desired content access. To simply put, a VPN helps you to unblock streaming services such as Amazon Prime, Netflix, etc outside your country and content access worldwide.
There are so many options available for VPN out there, so choosing the ideal one is a bit challenging. However, you can pick any popular options that support platform - Apple iPhone 7 Plus. You can get ExpressVPN, IPVanish or NordVPN to fake the location on your Apple iPhone 7 Plus.
Here’s a quick guide on how to use VPN to fake or change location on the Apple iPhone 7 Plus:
(We have taken NordVPN as an example)
Step 1: Register with NordVPN by going to its official website.
Step 2: Get the NordVPN app on your Apple iPhone 7 Plus.

Step 3: Run the app and sign-in with your login details.
Step 4: Click on Quick Connect and give permissions the app asked to connect to the VPN. In a while, you’ll view a map that shows various servers worldwide.
Step 5: To change location, select the ‘Map /List” view - you can click on the country or region you want to set. For instance, swipe across the map until you see the UK. Then, you need to click on the server icon in the mid of that region to connect to the UK region.

That’s it. Now, you will be available to access the content that is available in that region.
FAQs You May Want to Know
1. How do I change weather location on Apple iPhone 7 Plus ?
If you have changed your location or the app misperceives your location, follow these steps and get accurate weather updates:
Instructions: Go to your iDevice’s weather widget and long-press to choose the “Edit Weather” option. Now, tap “My Location” to check your current location. If it’s wrong and you want to change it, type and select the exact one in the “Search” bar. This way, your weather location will be changed on the weather app on your Apple iPhone 7 Plus.
2. Will changing my location affect my device’s warranty or performance?
The device’s warranty generally depends on the product and has nothing to do with moving locations. Yet it’s advisable to check the terms and conditions of the warranty. You can check if those conditions cover your device regardless of location. In short, changing location will not affect your phone, but you should note its local regulations.
3. Is there a risk of my account being banned in certain apps or games if I change my location?
Yes, you might encounter issues in certain apps if you change location on your Apple iPhone 7 Plus. This is because some apps have terms that prohibit falsifying locations. If they observe a rapid change in location due to VPN, it could lead to a ban to maintain fair play. To avoid this issue, always use a legitimate means of updating locations and be familiar with other terms.
4. How do I change my location back to my real one?
If you have faked your location on your Apple iPhone 7 Plus for certain games and applications, check the settings of your location spoofer. Within the app settings, you can revert to your actual location. Apart from that, if you are using a VPN to change location, disconnect from it. Upon turning it off, your device will return to the real location.
The Bottom Line
In this guide, you have learned how to change location on the Apple iPhone 7 Plus in different scenarios. Changing or faking a location on an Apple iPhone 7 Plus is easy when you know the right way to do so. We hope that our guide has helped you to spoof GPS location on your Apple iPhone 7 Plus. When it comes to tricking location-based apps such as Pokemon Go, Dr.Fone - Virtual Location (iOS) comes in handy. So, give a try it now for free.
6 Methods to Protect Yourself from Location Tracking on Apple iPhone 7 Plus
With the advent of digitalization in everything, GPS is one feature that has taken world by the storm. There are abundance of apps and websites that demand location for better exposure and services according to the current location. Apple always does the best for keeping the privacy and security features and allows users to have control over location permissions.
Many of the iOS users wonder about “how do I stop someone from tracking my Apple iPhone 7 Plus”. Though the saved locations are not sent to the Apple servers, but for some, privacy is everything. If you are one of those who chooses privacy over anything and doesn’t wish to share location with anyone else, this article deals with the same. We will help you know how to stop tracking on Apple iPhone 7 Plus in different ways.
Importance of Keeping Location Data Private
Considering why keeping privacy is never a bad idea. And of course you have contemplated upon this thing. That is why you felt the need of stopping tracking on Apple iPhone 7 Plus and you are here. Well! In this section, we feel the need to explain more about why you should keep the location privacy in your bucket list. So, before we proceed towards the different ways to stop someone tracking your Apple iPhone 7 Plus, we suggest you to read this part.
- It is all known to us that apps like Find My Friends lets use sharing the location where we are. This means, anyone in our contact list can know the exact location. They can know easily where we are going and when. And a lot of times, we are not comfortable telling or sharing our visits to a particular place. However we can’t stop others habit of asking the questions about our visits.
- Moreover, we can never presume anyone’s intention. We don’t know what one thinks about us. And if there is any person in our contact having any inappropriate objective might take advantage of our location sharing. And the whole purpose of the location-sharing app can go to a wrong level.
- Thirdly, we have a plenty of websites and applications available on the internet that uses our location. As we have already mentioned above that Apple assures us that the data is kept encrypted and not used for any wrong means. But we can’t always trust technology and take it for granted, right!
- Also, when apps use location and later provide us notifications and information based on our location might be a thing we never want. This can be a little annoying.
Thus, to avoid such bothersome situations, keeping the location data private becomes essential. And now that you know the importance, let us understand how to stop tracking on Apple iPhone 7 Plus
Method 1: Switch to a Virtual Location to Stop Someone from Tracking your Apple iPhone 7 Plus
When you want to stop someone tracking your Apple iPhone 7 Plus, why just turning off the tracking option. Why not you try to misguide people and have fun? With the assistance of a tool namely Dr.Fone – Virtual Location (iOS) that aims on keeping privacy, you can surely do that. The tool can help you changing your location and you can teleport anywhere you want. Using this, you can easily mock location in just 1 click. Here is how to use this tool to serve the purpose.
Step 1: Get the Tool and Run it
To start the process, you are required to get the Dr.Fone – Virtual Location (iOS) downloaded in your PC. Install it eventually and then launch it. Once it is launched successfully, click on the “Virtual Location” tab given in the main interface.
Step 2: Connect the Apple iPhone 7 Plus device
Take help of your lightening cable and connect the Apple iPhone 7 Plus to the computer. Upon successful connection, hit on the “Get Started” button.

Step 3: Find your Location
From the following window, you will be able to notice the actual location of yours on the map. In case you aren’t able to, you can go for the “Center On” icon which can be found in the lower right of the screen. This will help you show the appropriate location.

Step 4: Activate Teleport Mode
To do this, simply go to the third icon in the upper right corner of the screen. This “Teleport Mode” icon will let you teleport anywhere you want. Now, you just have to input the name of the place in the filed given and click “Go”.
Step 5: Change Location
You can now easily stop tracking on Apple iPhone 7 Plus by deceiving your location as the program will understand your desired location. You can click on the “Move Here” option from the pop-up. It will change the location and now, any of the location based app in your Apple iPhone 7 Plus will show the selected location.

Method 2: Disable location tracking of Apple iPhone 7 Plus completely
If the above method didn’t suit you, this is how you can turn off tracking on Apple iPhone 7 Plus. Using this method, you will end up deactivating the location services of Apple iPhone 7 Plus completely. The steps are no rocket science and with just one toggling, you can reach to what you want. By doing this, any app in the Apple iPhone 7 Plus that uses your location will be of no use. For instance, the maps, Find My Friends and Find My Apple iPhone 7 Plus apps will not be able to track your location. Also, you will stop anyone from tracking you this way. Here are the steps on how to stop tracking on Apple iPhone 7 Plus completely:
Step 1: Go to the “Settings” in your Apple iPhone 7 Plus as the initial step. Now, look for “Privacy” option and tap on it.
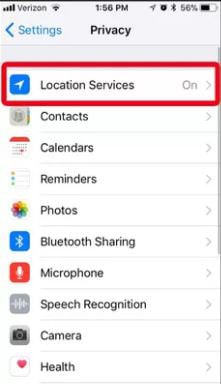
Step 2: Now, go for the “Location Services” and tap on it.
Step 3: Slide the switch next to “Location Services” to turn the locations off.

Method 3: Disable location tracking of specific apps
In the above section, you have stopped tracking on Apple iPhone 7 Plus entirely which means any of the location based app or service won’t be able to locate you. Nevertheless, completely turning it off can sometimes be useless as there are some apps that need the tracking of your location so as to give you better experience. As a solution for this, you can follow the steps below and can turn off location for specific apps only. Here is how to stop tracking on Apple iPhone 7 Plus for specific apps.
Step 1: Open “Settings” as usual firstly and go to “Privacy”.
Step 2: Go to “Location Services” and don’t toggle it off. Instead, you will find apps listed under the option.
Step 3: Select the apps and make adjustments according to your preferences. You can choose among “Never”, “While Using the App” and “Always”.
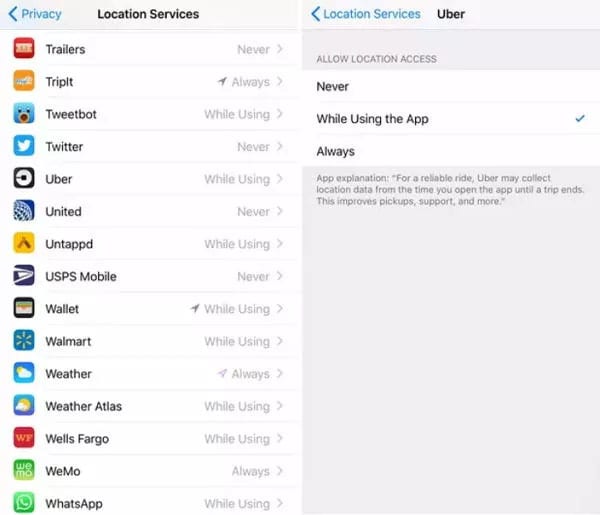
The first option will never send your location to the apps. Second option will use your location only when you use the particular app. And as it suggests itself, by choosing the “Always” option will always track your location.
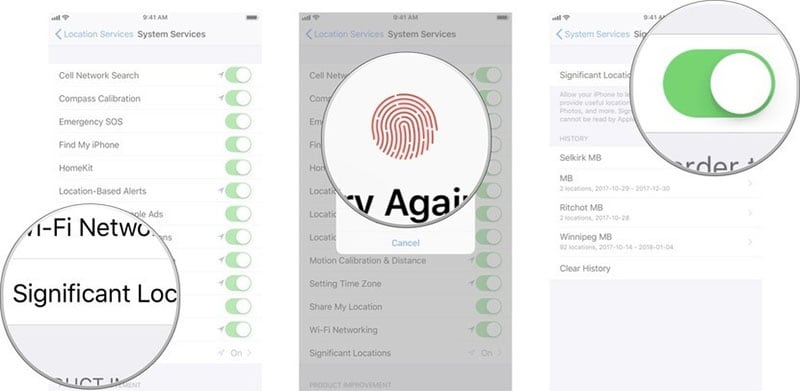
Method 4: Disable Significant Locations on Apple iPhone 7 Plus
Apart from the apps, Apple iPhone 7 Plus itself keeps record of where you travel the most. These frequently visited locations are referred to as significant locations. The purpose of such tracking is to help you providing location concerned suggestions, especially when you employ Siri or other features. If you want to turn off such tracking on Apple iPhone 7 Plus, we can help you. These are the steps that you should follow in this case.
Step 1: From your Apple iPhone 7 Plus’s Home screen, go to the “Settings” app.
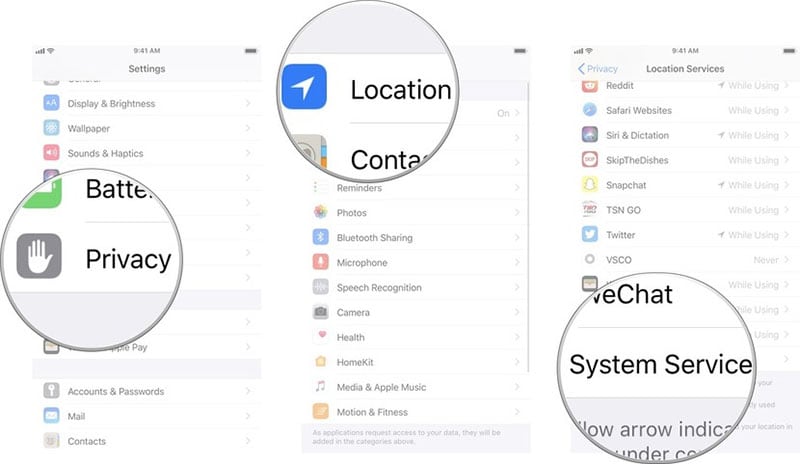
Step 2: Select the “Privacy” option now and head to the “Location Services” located at the top of the screen.
Step 3: After this, click on the “System Services” from the bottom.
Step 4: Look for “Significant Locations”. You will be prompted to use your password or touch ID to access the feature. Do it right away.
Step 5: Toggle off the green slider near “Significant Locations”. This is it!
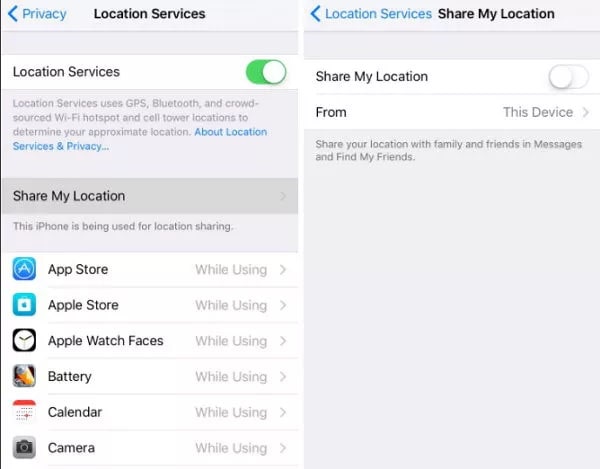
Method 5: Disable Share My Location service
The feature “Share My Locations” enables you to share your locations with your family and friends. They can get to know your current location through apps like Find My Friends if this feature is turned on. So, if your concern is “how to stop my parents from tracking my Apple iPhone 7 Plus”, you can turn this off. The steps are mentioned below. Follow them and stop worrying if someone is tracking you or not.
Step 1: Open “Settings” in your Apple iPhone 7 Plus and go to “Privacy” option.
Step 2: Look for the “Share My Location” and toggle it off.
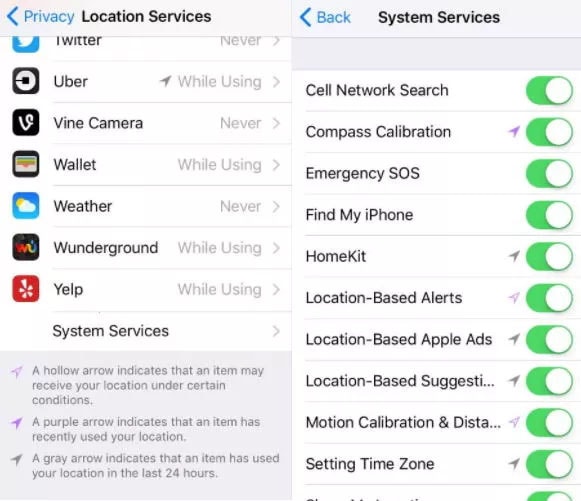
Method 6: Disable location-based notifications or alerts
iPhone provides three kinds of location based services. These include the services regarding alerts, Apple ads and suggestions. If this feature is turned on, you may get the notifications, suggestions or iAds according to what is best for your location. If this bothers you and you don’t want this to happen, you can turn it off by following steps below. This is how to turn off tracking on Apple iPhone 7 Plus in terms of location-based alerts and notifications:
Step 1: Launch “Settings” firstly on your device and scroll for “Privacy”.
Step 2: Head to the “Location Services” followed by “System Services”.
Step 3: Subsequently, you can disable the location based services or alerts as you want.
Final Words
We are concluding the topic here with a great hope that you now are well informed about how to stop someone from tracking your Apple iPhone 7 Plus. We have provided different ways for different situations. Hope you liked our efforts. If you have any doubts or questions, please leave a comment below. Also, if your friend or near one who is in trouble and want to stop someone tracking their Apple iPhone 7 Plus, don’t hesitate sharing this. Tell us how you feel about today’s topic and stay tuned for more interesting updates.
Quick Steps to Change Weather Location on Apple iPhone 7 Plus
It’s no secret that Weather is not everyone’s go-to app on a daily basis. People only open it when the atmospheric conditions around their area suddenly take an unexpected turn. More often than not, the Weather app remains untouched for a long period of time. But don’t worry. That’s completely understandable. Just remember that if you need to know the latest local forecast, Weather can certainly provide it to you.
You can be sure that the Apple iPhone 7 Plus’s Weather app is a reliable source of meteorological information. It can help you dodge weather disturbances and plan your future activities very well. However, the Weather app may sometimes dispense inaccurate reports if the location settings on your Apple iPhone 7 Plus are misconfigured. Is it a big deal? Actually, not. The internet provides tons of tutorials on how to change the weather location on Apple iPhone 7 Plus. For sure, you can easily restore your preferred location settings in no time.
In this article, we will delve into the main benefits that Apple iPhone 7 Plus’s Weather app offers to users. We will also provide some solutions on how to change weather location on Apple iPhone 7 Plus. Lastly, we will discuss how the Weather app can exactly help us in our daily routine. Continue reading below to learn more.
Part 1. Useful Features of Apple iPhone 7 Plus’s Weather App
In most basic explanation, the Weather app is a tool that helps you determine the weather conditions in certain locations. You can view from there how the weather on a particular day will unfold around the area. It is forecasted at least every hour. If there is a significant development, the report is promptly updated to ensure you receive the latest weather news. Yes. The Apple iPhone 7 Plus’s Weather app continues to serve its purpose even though most users don’t use it that often.
Apart from its well-circulated weather updates, the Apple iPhone 7 Plus’s Weather app has a lot more to offer. Check out the list provided below.
Ten-Day Forecast

Are you planning a particular activity in the coming days? If so, the Ten-Day Forecast feature of Apple iPhone 7 Plus’s Weather app can surely help you in this regard. Basically, it provides estimated predictions on atmospheric conditions, precipitations, and temperature for the next ten days.
Severe Weather Alerts

If an extreme weather disturbance is detected in your area, the Weather app will send you an alert straight away. It can be a weather advisory issued by the state meteorological bureau or a flash report from a credible source. That’s why you should ensure the location settings on your Apple iPhone 7 Plus are well-calibrated. If not, take a moment to reconfigure it. There are lots of tutorials out there on how to change weather location on Apple iPhone 7 Plus. One of them can certainly assist you.
Maps

The Apple iPhone 7 Plus’s Weather app has a map feature that exclusively displays the weather conditions in a specific location. From there, you can view certain atmospheric information, including temperature, precipitation, air quality, and wind conditions. Just make sure that your location is set properly. If you want to replace it, just follow the guide on how to change the weather location on your Apple iPhone 7 Plus.
Air Quality

If information regarding air quality is widely available in your country, it will also show up on the Apple iPhone 7 Plus’s Weather app. You can view from there the recorded air quality index in your area together with a rating if it is good or not. At present, we cannot deny that being aware of the air quality around us is indeed essential. It somehow helps us lessen our exposure to harmful pollutants in the atmosphere. That’s why you should take advantage of this feature. Read the tutorial on how to change the weather location on your Apple iPhone 7 Plus and configure your settings. This way, you’ll stay updated on the air quality of the places you will visit going forward.
Part 2. How to Change Weather Location on Apple iPhone 7 Plus?
We have previously learned that location services play a key role in the accuracy and precision of Apple iPhone 7 Plus’s weather reports. That’s why you need to ensure the location settings on your Apple iPhone 7 Plus are well-configured. Don’t worry. In case it needs a few adjustments, there are lots of techniques on how to change weather location on Apple iPhone 7 Plus. Just choose the best one that perfectly suits your situation. Do you want to try it now? Check out the list of methods provided below.
Method 1: Enter the location into the Weather app’s search bar
Let’s say you just need to check the weather conditions in another location. Can you do it without actually going there? The short answer is yes. The Apple iPhone 7 Plus’s Weather app lets you view meteorological updates from various places by simply searching the location on the platform. Here’s how to do it in easy steps.
- Step 1: Launch the Weather app on your Apple iPhone 7 Plus. If you cannot find the application on your Apple iPhone 7 Plus, try to update your iOS first to the latest version.
- Step 2: Click the Menu icon at the top-left corner of your screen.

- Step 3: Enter your preferred location into the search bar. Find and click it from the suggested results.

- Step 4: Then, click Add. The new location will be then added to the list. If you wish to reorder the list based on your preference, just click the More icon at the top-right corner of the left-side panel screen and then click Edit List. From there, drag the locations up and down to reorganize them to your desired order.

Method 2: Change the Weather app’s primary location on the widget
Do you have a Weather widget on your Apple iPhone 7 Plus’s home screen? If so, you can directly modify the location settings from there. Don’t worry. It’s as easy as shooting fish in a barrel. Here’s how to change the weather location on Apple iPhone 7 Plus from the home screen widget.
- Step 1: Find the weather widget on the home screen of your Apple iPhone 7 Plus. Touch and hold it for a few seconds until the hidden menus appear.
- Step 2: Click Edit Weather.

- Step 3: Click Location. From there, enter your desired location into the search bar and choose one from the suggested results.

- Step 4: The location will be then changed immediately on the widget. If the Edit Weather option is unavailable on your end, try to update your iOS first. The Weather app has just been released recently on Apple iPhone 7 Plus. Therefore, Apple is making changes from time to time.
Method 3: Change weather location on Apple iPhone 7 Plus with Wondershare Dr.Fone.
Is there any other way in case the first two techniques do not bring positive results? Luckily, there is. Wondershare Dr.Fone can absolutely help you with that. It has a potent Virtual Location feature capable of modifying your whereabouts without going outdoors and visiting the actual location. Do you want to try it now? That’s great. Here’s a short guide on how to change weather location on Apple iPhone 7 Plus with the aid of Wondershare Dr.Fone.
- Step 1: Download Wondershare Dr.Fone from its official website. Afterwards, install it on your computer.
- Step 2: Launch the newly installed software on your desktop. Once it fully loads up, connect your Apple iPhone 7 Plus using a data cable. Follow the on-screen instructions to grant the necessary access and ensure the connection between the two devices is stable and reliable.
- Step 3: After that, navigate to the left-side panel and then click Toolbox. Head over to the main dashboard and then click Virtual Location. If it’s your first time using this feature, let Wondeshare Dr.Fone download the additional resources first. Don’t worry. It will not take a long time to complete. Just wait as patiently as you can.
- Step 4: Once the downloading process has concluded, Wondershare Dr.Fone - Virtual Location will immediately open on a separate window. From there, go to the top-right menu bar and then click Teleport Mode. It’s the first icon in the row.
- Step 5: Enter your desired location into the search bar and choose one from the list of suggestions. Right after, click the Enter icon to proceed.
- Step 6: The details pertaining to your selected location will be displayed on the screen. Check them very carefully and confirm that it is the exact location you’re looking for. Once you’re done verifying the details, click the Move Here button below to continue.
- Step 7: In no time, the current location registered on your Apple iPhone 7 Plus will be changed along with your weather location. See? It’s just as simple as that. Therefore, it’s best to use Wondershare Dr.Fone if you wish to change the weather location on your Apple iPhone 7 Plus.
NOTE: If you wish to restore the original location settings of your Apple iPhone 7 Plus, simply disconnect it from the computer and restart it.
Part 3. Is the Weather App on Apple iPhone 7 Plus Really Helpful?
It’s fair to say that Weather is not a primary iOS application. You can continue with your usual routine even without it. However, we cannot deny the fact that it’s there for a reason. All we know for now is that the Weather app helps us stay updated with the latest meteorological forecast. But we don’t know what’s waiting ahead. Maybe the Weather app would soon become a paramount component of an upcoming iOS feature. Is it possible to happen in the future? We’re not sure yet. But one way or another, it’s best to keep Weather up and running on our Apple iPhone 7 Plus.

It doesn’t take much to follow the tutorials above on how to change weather location on Apple iPhone 7 Plus. Most of them can instantly be conducted and finished with just the snap of a finger. That’s why you should regularly calibrate its location settings and make sure that it’s showing appropriate weather reports. Who knows? Keeping tabs on the atmospheric conditions around your local area can help you in a specific way you don’t actually expect. For instance, severe weather alerts are definitely capable of preventing you from running or driving toward a bad storm. Another thing is that the Weather’s Ten-Day Forecast feature can help you organize your weekly schedules accordingly. For sure, Weather has a lot more to offer. Thus, try to explore it once in a while and take advantage of the benefits.
Conclusion
By default, the Apple iPhone 7 Plus’s Weather app uses your current location for updates and reports. You don’t have to do anything if your location settings are configured properly. But just in case you need to change your location for various reasons, you can do it very easily. The tutorials above on how to change weather location on Apple iPhone 7 Plus can surely help you with that. Follow the steps indicated and finish the instructions accordingly. For a more convenient and extremely effective approach, try to download Wondershare Dr.Fone. It offers a powerful Virtual Location feature capable of modifying your whereabouts and simulating GPS movements. Don’t worry. It’s very easy to use. You just have to connect your Apple iPhone 7 Plus to the computer and calibrate the location settings from there. In a minute or two, the location on your device will be then changed according to your choice.
Also read:
- [New] The Insider's Method for Youtube Livestreaming in Full Circle
- [Updated] In 2024, Unlock the Potential of Your Facebook Profile with Covers
- 2024 Approved The Hidden Pathway How to Seamlessly Integrate YouTube Content Onto Facebook
- 7 Fixes to No GPS - Showing Approximate Location on Apple iPhone 14 Plus Waze | Dr.fone
- How To Change Country on App Store for Apple iPhone 14 Plus With 7 Methods
- How to Fix the Apple iPhone SE (2022) GPS not Working Issue | Dr.fone
- In 2024, 4 Most-Known Ways to Find Someone on Tinder For Realme C55 by Name | Dr.fone
- In 2024, Can Life360 Track You When Your Infinix Smart 7 is off? | Dr.fone
- In 2024, Double Location Dongle All to Know About Apple iPhone SE (2022)/iPad GPS Spoofing | Dr.fone
- In 2024, How to See Someones Location on Apple iPhone 6s | Dr.fone
- Navigating Links Between Instagram and TikTok
- The Dawn of Transcendent Communication: Unpacking Google’s PaLM 2 Model
- Tom's Tech Insights: Comprehensive Computer and Gadget Reviews
- Title: How to Change Your Location on Apple iPhone 7 Plus | Dr.fone
- Author: Isabella
- Created at : 2024-10-03 20:51:59
- Updated at : 2024-10-05 16:07:37
- Link: https://iphone-location.techidaily.com/how-to-change-your-location-on-apple-iphone-7-plus-drfone-by-drfone-virtual-ios/
- License: This work is licensed under CC BY-NC-SA 4.0.