
How to Enable, Disable, and Change Safari Location on Apple iPhone 11 Pro | Dr.fone
How to Enable, Disable, and Change Safari Location on Apple iPhone 11 Pro
It is quite a common experience where everyone would have gone through “Annoying pop-ups during your serious search’. It is a natural phenomenon but it becomes a distracting one at the time of emergency works.
Simone was surfing through job opportunities in the online job portal and the unrelated pop-ups direct her to different platform displaying false information. She was completely lost and frustrated. This situation occurs due to the sharing of your data with websites you log in. You can protect your private data like location, values entered in the website, time spent on each web page etc by modifying certain settings in the Apple iPhone 11 Pro device’s privacy portfolio.
Explore the techniques in how to change safari location on the Apple iPhone 11 Pro.
Tips: Enhance your Apple iPhone 11 Pro privacy with Dr.Fone - Virtual Location! Change your location to protect your privacy, and prevent your Apple iPhone 11 Pro from being tracked. Get it now!
Part 1: How to enable/disable Safari Location on Apple iPhone 11 Pro
What is the need to enable or disable the Safari location on the Apple iPhone 11 Pro?
The concept is simple if you expose the location details on the cyber world you can find out all sorts of ‘Near me’ searches accurately. For example, if you are caught in a strange place and looking for any restaurants, then immediately you will make a search by just adding keywords like ‘ restaurants near me’. The results will direct you with the hotels closer to your current location. This type of search holds good for all facilities like hospitals, theatres, malls etc. By enabling the location settings you can make the search ease and precise.
The other side of exposing your location details on the internet space is that you are under threat by strangers. When you step into any websites, the built-in programs can sense your location data and flashes pop-ups related to your location. The pop-ups are not reliable mostly it contains false information. Thereby leading you into unwanted issues and therefore it would be a better practice to disable location details on Apple iPhone 11 Pro to overcome further problems in future.
A stepwise guide to learn how to enable /disable Safari location on Apple iPhone 11 Pro
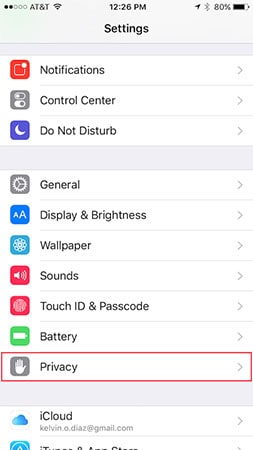
Step 1: Reach for the ‘Privacy’ options
Go to the ‘Settings’ in the home screen of your Apple iPhone 11 Pro and proceed with the ‘Privacy’ option.

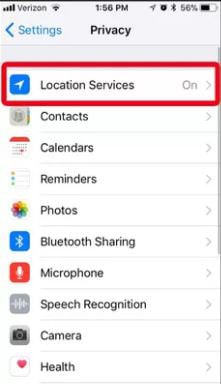
Step 2: Choose Safari to modify the settings
In the ‘Privacy’ window, you have to select ‘Location Services’ option and tap ‘Safari Websites’ from the list

Step 3: Alter the Safari location services
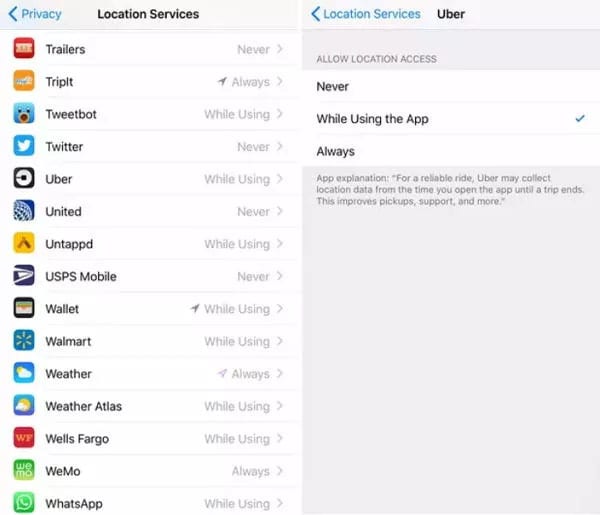
You have to tap the ‘Safari Websites’ option to select from the expanded list. If you want to enable/disable the location services in Safari websites then you have to choose ‘While using’ option. This feature enables location service of the Safari websites when it is active and the location service becomes inactive if the Safari is not in use.

Part 2: How to prevent Safari from asking for your location on Apple iPhone 11 Pro
Why do Apple iPhone 11 Pro users want to stop the Safari from asking the location?
The foremost reason for many Apple iPhone 11 Pro users is that they want to manage their privacy. They do not want to risk their privacy by sharing their location details with apps and Safari websites. It is a safe practice to step into the internet platform concealing your identity to avoid cybercrimes.
Follow the below steps to stop iOS Safari Location Services
Step 1: Reach the ‘Privacy’ screen
In your Apple iPhone 11 Pro, tap ‘Settings’ then select the ‘Privacy’ option.

Step 2: Modify the options in Location Services
In the ‘Privacy’ window, choose ‘Location Services’ and tap ‘Safari Websites’ from the displayed list.

Step 3: Stop the location services
In the pop-up screen, tick the ‘Never’ option to completely stop the ‘Location Services’ for Safari. This modification will prevent Safari from requesting to share the location details of the Apple iPhone 11 Pro device.


Part 3: How to change Safari location on Apple iPhone 11 Pro
It would be great fun with your friends when you change the Safari Location on Apple iPhone 11 Pro. You can bring jealous amidst your colleagues by registering your location details at holiday spots. By changing the location details, you can skip from unwanted false advertisements related to your real location while surfing through the internet space for your needs.
Track the steps to bring changes in the Safari Location on Apple iPhone 11 Pro below
Step 1: Go for an eminent program
Change the location details of your Apple iPhone 11 Pro using the incredible software Dr.Fone. Download this app at its official web address ‘https://drfone.wondershare.com/virtual-location-changer.html ’ or click the Download button below directly. Install it on your computer by following the wizard carefully. Tap the icon to explore the functionalities on the home screen.

Step 2: Establish a Virtual location
In the home page of this program, select the ‘Virtual Location’ option. In the next screen, tap the ‘Get Started’ button to trigger the procedure.

Step 3: Quick look at the map view
The next window displays the current virtual location details of the Apple iPhone 11 Pro device.

Step 4: Enter your favourite spot
Select the ‘Teleport mode’ in the map view. You can find this icon at the top right of the screen. Choose the first image from the horizontal list of symbols. Then enter your favourite spot worldwide in the text box near the ‘Go’ button. It is high time to press the ‘Go’ button and fix your admirable spots as your default device location.

Step 5: Authenticate the changes
The next map view shifts to the new location with a pop-up message ‘Move Here’. You must authenticate the changes by tapping this ‘Move here’ button.

Step 6: Check the default location
Open the current location in your Apple iPhone 11 Pro and verify it displays your favourite spot.

Conclusion
Thus, concealing the location details of your device protects you from unwanted cyber issues. Instead of turning on and off the iOS Safari location services, you can straightaway modify it into a fake zone. This approach would greatly help when you install any apps or enter into websites at this online platform. You can make use of the cyberspace efficiently if you make such modification in your Apple iPhone 11 Pro. Choose Dr.Fone - Virtual Location to make desired changes in your default location of your Apple iPhone 11 Pro.
Why Does iTools Virtual Location Not Work For Apple iPhone 11 Pro/iPad? Solved
It is no secret that a multiplicity of users across the globe have reported a bunch of problems using iTools Virtual Location. These problems vary in magnitude and make iTools Virtual Location not work. In this article, we are going to dig into probable causes and solutions for iTools Virtual Location that fails to work.
Common Issues That iTools Virtual Location Not Working
Although iTools can be of great help in mocking your GPS location, the tool is marred by a plethora of shortcomings. Lots of users have been perennially complaining about some flaws of iTools Virtual Location. Some of the common issues are:
- Developer mode- There are myriads of cases reported by users where iTools crash on developer mode and get stuck here. This mode prevents users from going on to faking GPS location.
- Not downloading- Sometimes, you can follow all necessary processes or satisfy all the requirements, but iTools fails to download to your device. There is no way you can install iTools without downloading it.
- Map crash- Plenty of iTools users have launched over map crash. The program gets stuck loading the map but fails to display the map. Even when the internet connection is established, the map still fails to load in some cases.
- Stop working- ITools failure to work is one of the common issues fronted by scores of users. When you try to change the location, iTools Virtual Location does not respond.
- Not working on iOS 17- If there is an iOS version that hasn’t gone well with ITools is iOS 17. Although iTools has given a temporary solution for this, it still fails to work on some phones.
- Location won’t move- When using iTools Virtual Location, you always provide the desired GPS location data and click “Go.” After that, you are asked to click the “Move here” button to move to the chosen place. However, users have complained that at times the location fails to move from the previous to the currently selected location on apps like Facebook, and you end up finding yourself in a fake location.
- Image load failed- Image loading failure is a common problem amongst iOS 17 users. Droves of users complain they continually get a developer image load failed. The program fails to load various location images, and thus users cannot see the respective location images. The screen is stuck in loading without displaying any image.
Tips: iTools Virtual Location not working? Switch to Dr.Fone - Virtual Location for flawless GPS control. Try it now and never lose your way!
How to Solve These Issues?
With the significant problems mentioned, it’s prudent for someone to ask now what the solution is. Of course, these issues are triggered differently, but there are respective common fixes. However, some can successfully fix the problem while other solutions may hit the blank. Let’s see some of the probable solutions to the issues mentioned above.
- Developer mode- The solution is to check for the iTools updates for your device.
- Not downloading- if the program fails to download, check that your device meets the system requirements. Also, make sure your payments are settled and that the internet connection is established.
- Map crash- If the map crashes, it might be because of a problem with the google map API or unestablished communication with iTools. If Google Maps fails, click the three horizontal lines located at the right of the menu bar and switch to Mapbox. Also, check that your internet connection is working fine. If not, try to refresh your internet connection and ensure the connection is established.
- Stop working- When the iTools Virtual Location stops working, it might be due to unexpected technical issues. Try restarting the program, and if it persists, restart your device.
- Not working on iOS 17- As aforementioned, iOS 17 has had issues with iTools. One of the best ways to ensure a smooth click with iTools is to downgrade your iOS 17 to say iOS 16. The temporary solution offered for iOS 17 seems to work on some devices only.
- Location won’t move- when you change your current location and fail to move on your apps say google maps or Facebook, you will find yourself in fake location. Simply restart your device, and the problem will disappear.
- Image load failed- This issue is often related to compatibility issues. Check if you downloaded the program after the forced PoGo updates. You can try downgrading your device if you are doing iOS 17.
Dr.Fone - Virtual Location: Safer and Stable Tool To Change Location (iOS 17 Supported)
As you have seen above, iTools Virtual Location software is faced with a pile of problems that make it difficult to safely and efficiently fake GPS locations. So no one should teach you that you need a better tool. Yes, a stable and safe tool for changing location as you desire.
There are several tools out there claiming to offer such, but none comes close to Dr.Fone - Virtual Location (iOS/Android) . The powerful iOS location changer has all it takes to make location changing easy and full of fun. This program has a simple and straightforward interface that eases every user’s navigation. With the three simple steps to change GPS location on your device, Dr.Fone is no doubt the location changer you have been looking for. The program is available for all versions of windows including Windows 11/10/8.1/8/7. Some of the features of Dr.Fone - Virtual Location (iOS/Android) include:
- Teleport your Apple iPhone 11 Pro/Android GPS worldwide- if you are using GPS-based gaming applications, you can track and change your current GPS location via a single click. So every app on your device that uses GPS location data will believe you are there when you are mocking your location.
- Adjust the speed to transition from static to dynamic GPS mocking. You can mimic the cycling, walking, or driving speed on real roads or on a user- defined route established by choosing two points. To make your movements more natural, you can add relevant pauses along the journey as per your needs.
- Use Joystick to simulate GPS movement- the use of Joystick will save up to 90% of the labor involved in GPS movement control. Whichever mode you are in as either one-stop, multi-stop, or teleport mode.
- Automatic marching- with one click, you can make GPS spot the move automatically. You can change the directions in real time.
- Change directions up to 360 degrees- use the direction arrows to set the desired movement direction.
- Works with all GPS- based AR games or apps.
Dr.Fone - Virtual Location
1-Click Location Changer for both iOS and Android
- Teleport from one location to another across the world from the comfort of your home.
- With just a few selections on your computer, you can make members of your circle believe you’re anywhere you want.
- Stimulate and imitate movement and set the speed and stops you take along the way.
- Compatible with both iOS and Android systems.
- Work with location-based apps, like Pokemon Go , Snapchat , Instagram , Facebook , etc.
3981454 people have downloaded it
6 Methods to Protect Yourself from Location Tracking on Apple iPhone 11 Pro
With the advent of digitalization in everything, GPS is one feature that has taken world by the storm. There are abundance of apps and websites that demand location for better exposure and services according to the current location. Apple always does the best for keeping the privacy and security features and allows users to have control over location permissions.
Many of the iOS users wonder about “how do I stop someone from tracking my Apple iPhone 11 Pro”. Though the saved locations are not sent to the Apple servers, but for some, privacy is everything. If you are one of those who chooses privacy over anything and doesn’t wish to share location with anyone else, this article deals with the same. We will help you know how to stop tracking on Apple iPhone 11 Pro in different ways.
Importance of Keeping Location Data Private
Considering why keeping privacy is never a bad idea. And of course you have contemplated upon this thing. That is why you felt the need of stopping tracking on Apple iPhone 11 Pro and you are here. Well! In this section, we feel the need to explain more about why you should keep the location privacy in your bucket list. So, before we proceed towards the different ways to stop someone tracking your Apple iPhone 11 Pro, we suggest you to read this part.
- It is all known to us that apps like Find My Friends lets use sharing the location where we are. This means, anyone in our contact list can know the exact location. They can know easily where we are going and when. And a lot of times, we are not comfortable telling or sharing our visits to a particular place. However we can’t stop others habit of asking the questions about our visits.
- Moreover, we can never presume anyone’s intention. We don’t know what one thinks about us. And if there is any person in our contact having any inappropriate objective might take advantage of our location sharing. And the whole purpose of the location-sharing app can go to a wrong level.
- Thirdly, we have a plenty of websites and applications available on the internet that uses our location. As we have already mentioned above that Apple assures us that the data is kept encrypted and not used for any wrong means. But we can’t always trust technology and take it for granted, right!
- Also, when apps use location and later provide us notifications and information based on our location might be a thing we never want. This can be a little annoying.
Thus, to avoid such bothersome situations, keeping the location data private becomes essential. And now that you know the importance, let us understand how to stop tracking on Apple iPhone 11 Pro
Method 1: Switch to a Virtual Location to Stop Someone from Tracking your Apple iPhone 11 Pro
When you want to stop someone tracking your Apple iPhone 11 Pro, why just turning off the tracking option. Why not you try to misguide people and have fun? With the assistance of a tool namely Dr.Fone – Virtual Location (iOS) that aims on keeping privacy, you can surely do that. The tool can help you changing your location and you can teleport anywhere you want. Using this, you can easily mock location in just 1 click. Here is how to use this tool to serve the purpose.
Step 1: Get the Tool and Run it
To start the process, you are required to get the Dr.Fone – Virtual Location (iOS) downloaded in your PC. Install it eventually and then launch it. Once it is launched successfully, click on the “Virtual Location” tab given in the main interface.
Step 2: Connect the Apple iPhone 11 Pro device
Take help of your lightening cable and connect the Apple iPhone 11 Pro to the computer. Upon successful connection, hit on the “Get Started” button.
Step 3: Find your Location
From the following window, you will be able to notice the actual location of yours on the map. In case you aren’t able to, you can go for the “Center On” icon which can be found in the lower right of the screen. This will help you show the appropriate location.
Step 4: Activate Teleport Mode
To do this, simply go to the third icon in the upper right corner of the screen. This “Teleport Mode” icon will let you teleport anywhere you want. Now, you just have to input the name of the place in the filed given and click “Go”.
Step 5: Change Location
You can now easily stop tracking on Apple iPhone 11 Pro by deceiving your location as the program will understand your desired location. You can click on the “Move Here” option from the pop-up. It will change the location and now, any of the location based app in your Apple iPhone 11 Pro will show the selected location.
Method 2: Disable location tracking of Apple iPhone 11 Pro completely
If the above method didn’t suit you, this is how you can turn off tracking on Apple iPhone 11 Pro. Using this method, you will end up deactivating the location services of Apple iPhone 11 Pro completely. The steps are no rocket science and with just one toggling, you can reach to what you want. By doing this, any app in the Apple iPhone 11 Pro that uses your location will be of no use. For instance, the maps, Find My Friends and Find My Apple iPhone 11 Pro apps will not be able to track your location. Also, you will stop anyone from tracking you this way. Here are the steps on how to stop tracking on Apple iPhone 11 Pro completely:
Step 1: Go to the “Settings” in your Apple iPhone 11 Pro as the initial step. Now, look for “Privacy” option and tap on it.
Step 2: Now, go for the “Location Services” and tap on it.
Step 3: Slide the switch next to “Location Services” to turn the locations off.

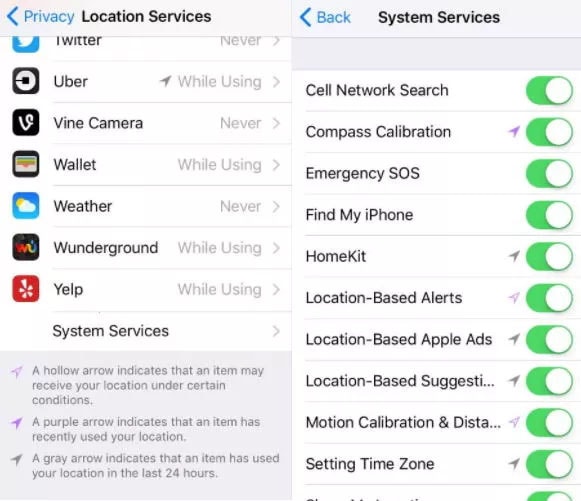
Method 3: Disable location tracking of specific apps
In the above section, you have stopped tracking on Apple iPhone 11 Pro entirely which means any of the location based app or service won’t be able to locate you. Nevertheless, completely turning it off can sometimes be useless as there are some apps that need the tracking of your location so as to give you better experience. As a solution for this, you can follow the steps below and can turn off location for specific apps only. Here is how to stop tracking on Apple iPhone 11 Pro for specific apps.
Step 1: Open “Settings” as usual firstly and go to “Privacy”.
Step 2: Go to “Location Services” and don’t toggle it off. Instead, you will find apps listed under the option.
Step 3: Select the apps and make adjustments according to your preferences. You can choose among “Never”, “While Using the App” and “Always”.
The first option will never send your location to the apps. Second option will use your location only when you use the particular app. And as it suggests itself, by choosing the “Always” option will always track your location.
Method 4: Disable Significant Locations on Apple iPhone 11 Pro
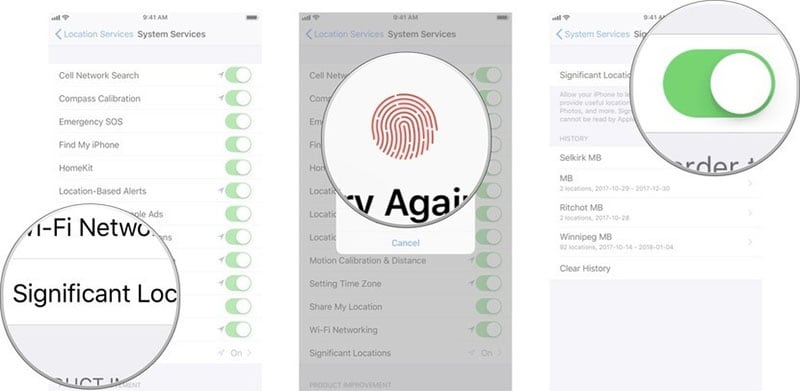
Apart from the apps, Apple iPhone 11 Pro itself keeps record of where you travel the most. These frequently visited locations are referred to as significant locations. The purpose of such tracking is to help you providing location concerned suggestions, especially when you employ Siri or other features. If you want to turn off such tracking on Apple iPhone 11 Pro, we can help you. These are the steps that you should follow in this case.
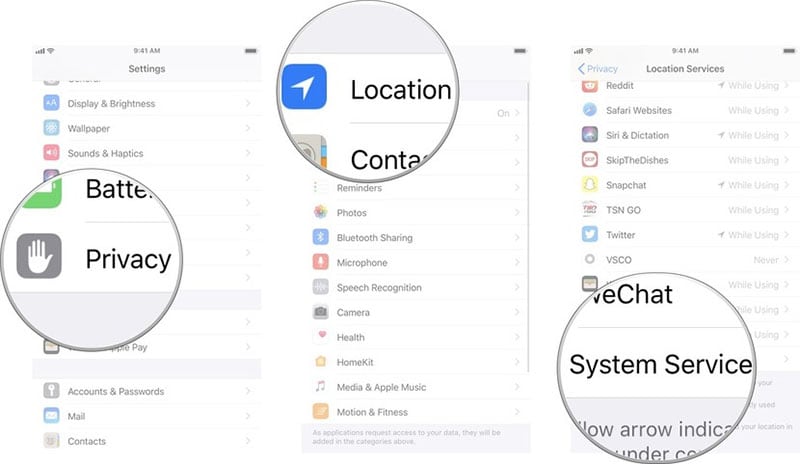
Step 1: From your Apple iPhone 11 Pro’s Home screen, go to the “Settings” app.
Step 2: Select the “Privacy” option now and head to the “Location Services” located at the top of the screen.
Step 3: After this, click on the “System Services” from the bottom.
Step 4: Look for “Significant Locations”. You will be prompted to use your password or touch ID to access the feature. Do it right away.
Step 5: Toggle off the green slider near “Significant Locations”. This is it!
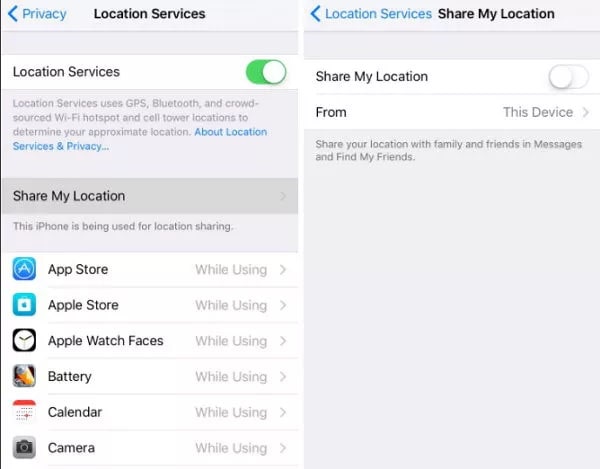
Method 5: Disable Share My Location service
The feature “Share My Locations” enables you to share your locations with your family and friends. They can get to know your current location through apps like Find My Friends if this feature is turned on. So, if your concern is “how to stop my parents from tracking my Apple iPhone 11 Pro”, you can turn this off. The steps are mentioned below. Follow them and stop worrying if someone is tracking you or not.
Step 1: Open “Settings” in your Apple iPhone 11 Pro and go to “Privacy” option.
Step 2: Look for the “Share My Location” and toggle it off.
Method 6: Disable location-based notifications or alerts
iPhone provides three kinds of location based services. These include the services regarding alerts, Apple ads and suggestions. If this feature is turned on, you may get the notifications, suggestions or iAds according to what is best for your location. If this bothers you and you don’t want this to happen, you can turn it off by following steps below. This is how to turn off tracking on Apple iPhone 11 Pro in terms of location-based alerts and notifications:
Step 1: Launch “Settings” firstly on your device and scroll for “Privacy”.
Step 2: Head to the “Location Services” followed by “System Services”.
Step 3: Subsequently, you can disable the location based services or alerts as you want.
Final Words
We are concluding the topic here with a great hope that you now are well informed about how to stop someone from tracking your Apple iPhone 11 Pro. We have provided different ways for different situations. Hope you liked our efforts. If you have any doubts or questions, please leave a comment below. Also, if your friend or near one who is in trouble and want to stop someone tracking their Apple iPhone 11 Pro, don’t hesitate sharing this. Tell us how you feel about today’s topic and stay tuned for more interesting updates.
Also read:
- [New] Selecting Optimal GoPro Protection - Top 10 Selections
- [Updated] Enhancing Viewer Engagement with Smart End Screen Techniques for 2024
- [Updated] Navigating Numbers A Comprehensive Triad Strategy for Monitoring Your YouTube Profitability for 2024
- 5 Ways Change Your Home Address in Google/Apple Map on Apple iPhone 6s/iPad | Dr.fone
- Does PokeGo++ still work on Apple iPhone 13/iPad? | Dr.fone
- Hide location on Apple iPhone 14 Plus and Android without others knowing | Dr.fone
- How to Fix the Apple iPhone 7 Plus GPS not Working Issue | Dr.fone
- How to Share Location in Messenger On Apple iPhone 6s Plus? | Dr.fone
- In 2024, 4 Effective Methods Fake GPS Location on Apple iPhone 12 mini/iPad | Dr.fone
- In 2024, The Full Course on Becoming a YT Creator Expert
- Optimizing Performance: Download the Updated SM Bus Controller Software Patch for Your Dell PC
- Top 5 Nokia C22 Bypass FRP Tools for PC That Actually Work
- Undelete lost music from Lava Yuva 3 Pro
- Title: How to Enable, Disable, and Change Safari Location on Apple iPhone 11 Pro | Dr.fone
- Author: Isabella
- Created at : 2024-09-30 22:43:29
- Updated at : 2024-10-05 20:15:06
- Link: https://iphone-location.techidaily.com/how-to-enable-disable-and-change-safari-location-on-apple-iphone-11-pro-drfone-by-drfone-virtual-ios/
- License: This work is licensed under CC BY-NC-SA 4.0.