
How to View GPX Files Online and Offline Solutions Of Apple iPhone 6 Plus | Dr.fone
How to View GPX Files: Online and Offline Solutions Of Apple iPhone 6 Plus
Also known as GPS Exchange Format, GPX is one of the most resourceful file types that is used to store and import/export map-related data. Ideally, a lot of people use GPX files to access a particular route offline when they are off the grid. Though, there are times when users find it hard to view GPX on a map. Don’t worry, there are plenty of ways to view GPX online or offline. In this post, I will let you know how to view GPX in Google Maps and other resourceful desktop applications in detail.
Part 1: What Can you Do with GPX Files?
Before we discuss how to utilize a GPX view online or offline tool, let’s quickly consider how these files work. It stands for GPS Exchange format and stores map-related data in an XML format. Apart from XML, KML and KMZ are other common file formats to store GPX data.
From the exact coordinates of places to their routes, a GPX file would contain the following information:
- Coordinates: Also know as waypoints, a GPX file would contain details about longitude and latitude that are needed to be covered on the map.
- Routes: The main reason for using GPX files is that they store detailed routing information (the path that we need to take to reach from one point to another).
- Tracks: A track consists of various points that we are merged to form the route or the path.

Let’s suppose you have devised a route between two points that you would need later on. You can now export the GPX file from the application and even import it to the same or another application. When you use the GPX viewer, it will let you access the route offline without an active internet connection. That’s why GPX files are used to view a route offline while hiking, trekking, cycling, and do other offline activities.
Part 2: How to View GPX Files Online in Google Maps?
The good thing is that there are tons of options to view GPX online on desktop, Android, or iOS platforms. Some of these freely available solutions to view GPX on Map are Google Earth, Google Maps, Bing Maps, Garmin BaseCamp, GPX Viewer, and so on.
Out of them, Google Maps is one of the most used solutions to view GPX online on smartphones and desktops alike. As of now, you can import GPX files in the KML format or even load CSV files of exact coordinates on Google Maps. To learn how to view GPX in Google Maps, follow these steps:
Step 1: Go to Your Places in Google Maps
To view GPX on the map, you can first head to the official website of Google Maps on your computer. Now, just click on the hamburger (three-line) icon from the top-left corner to access its options.

This will display various options related to your Google Maps account. From here, you can just click on the “Your Places” feature.

Step 2: Choose to Create a New Map
As a dedicated section of “Your Places” would be launched, you can view all the saved places for your Google Maps account. Here, you can go to the “Maps” tab to view the existing saved route and spots. Since you have to view GPX in Google Maps, you can click on the “Create Map” option from the bottom to load a new map.

Step 3: Import and View the GPX File Online
This will make Google Maps load a new page that will let you create a fresh map as per your preferences. Here, you can just click on the “Import” button to load a browser window from where you can directly load a GPX file on Google Maps and make it available offline as well.


Part 3: How to View a GPX File Offline with Dr.Fone – Virtual Location?
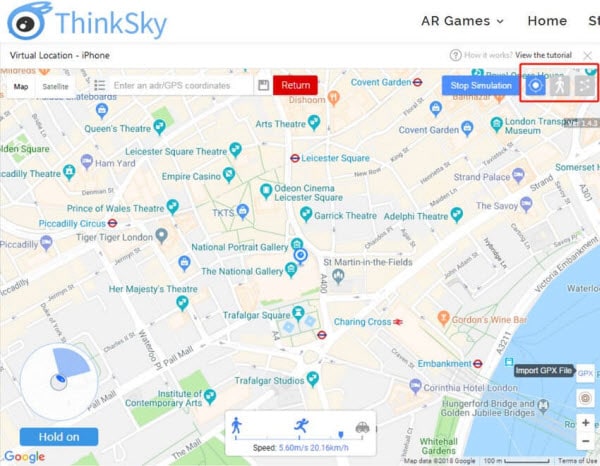
Besides Google Maps, you can also take the assistance of Dr.Fone – Virtual Location to view GPX files on your computers offline. Since it is a desktop tool, it would let you load any GPX file without being connected to an active internet connection. Besides that, the application can also be used to spoof the location of your iOS device or simulate its movement in a route without jailbreaking it.
Therefore, if you want, you can first simulate the movement of your device and export the GPX file. Later, you can import the saved GPX file and simulate your Apple iPhone 6 Plus movement in the same route without any trouble.
Step 1: Launch Dr.Fone – Virtual Location and connect your Apple iPhone 6 Plus
At first, you can just connect your Apple iPhone 6 Plus using a working lightning cable and launch the Dr.Fone – Virtual Location application. Once your device is detected, just click on the “Get Started” and agree to its terms and conditions.

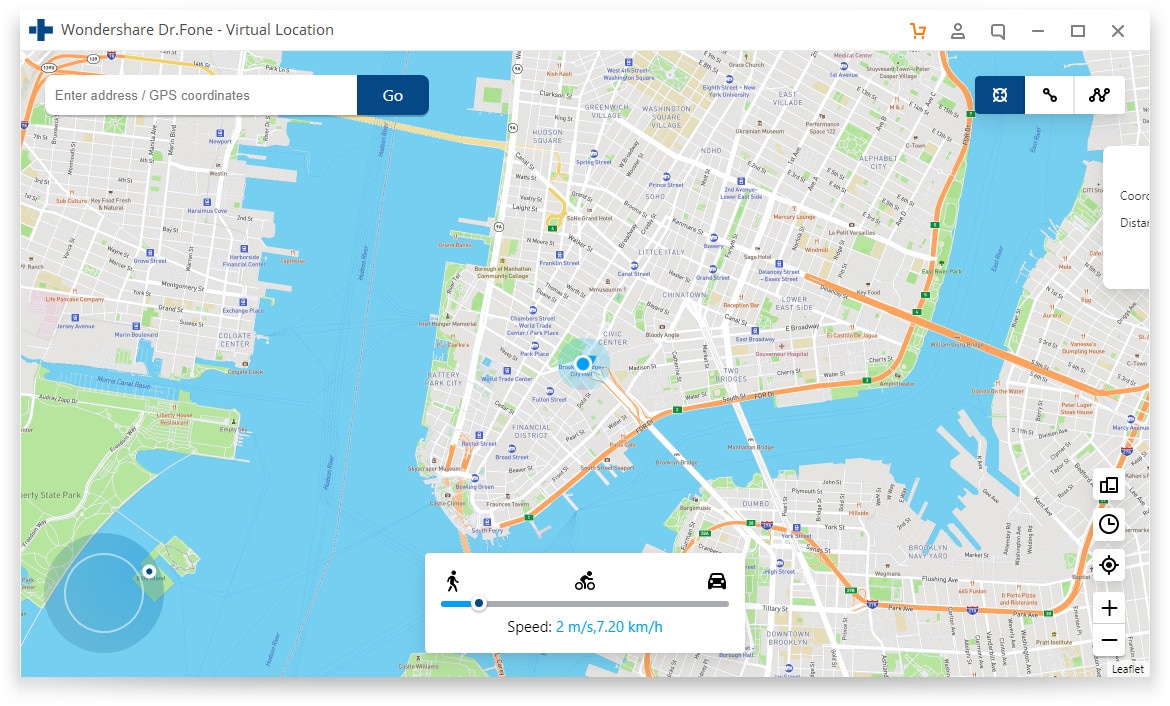
Step 2: Simulate the Movement of your Apple iPhone 6 Plus
The application would automatically detect your Apple iPhone 6 Plus on the interface with its present location. To simulate its movement, you can click on the Multi-stop or One-stop Mode icons from the top.

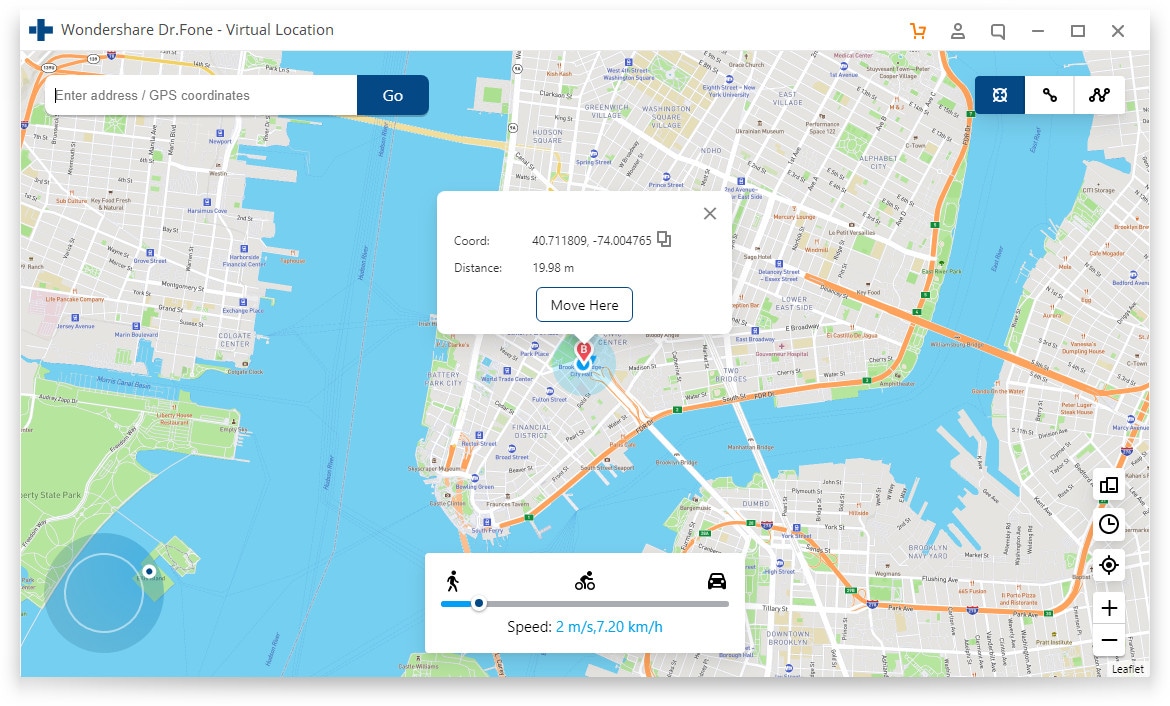
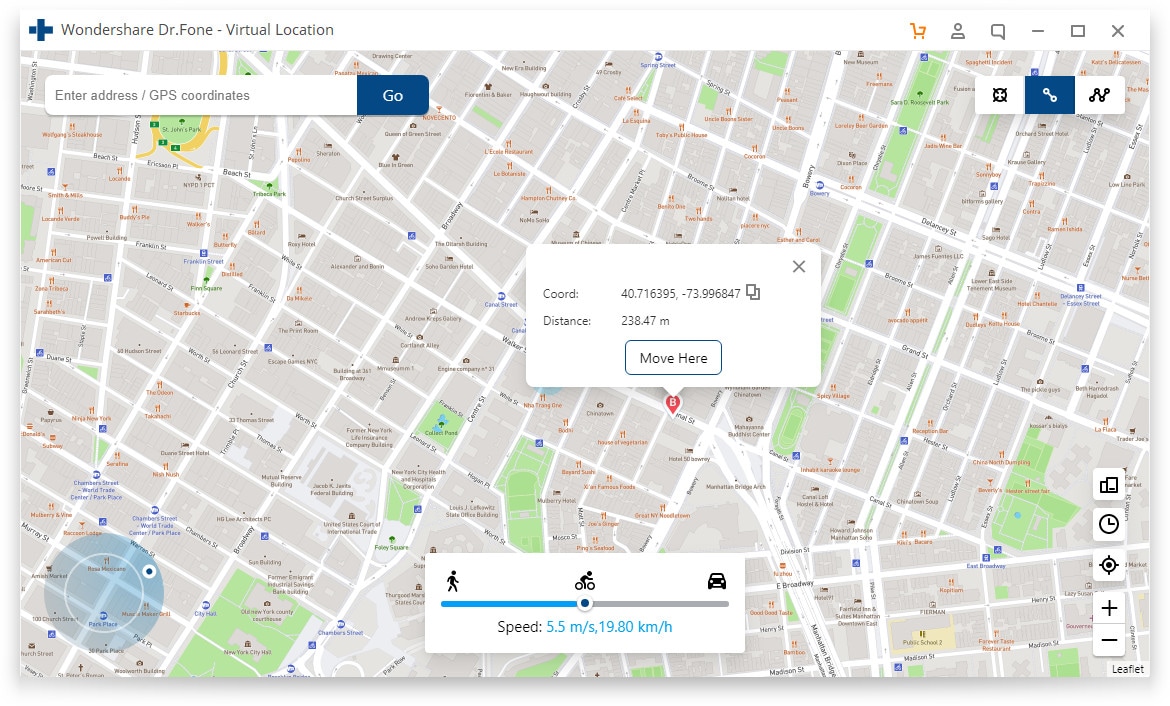
You can now drop the pin in a route on the map and click on the “Move Here” Button to start simulating the movement.

Subsequently, you can select the number of times you want to cover the route and click on the “March” button. The application will even let you select a preferred speed for the movement.

Step 3: Export or Import the GPX Files
Once you have loaded the map on the interface, you can easily save it offline as a GPX file. To do that, just click on the Export icon from the floating menu on the side.

Similarly, you can also import a GPX file directly to the Dr.Fone application. To do this, you just have to click on the “Import” icon from the sidebar. This will open a browser window, letting you go to a location on your computer where the GPX file is saved.

Once the GPX file is loaded, you can simply wait for a while and let the application process it without closing it in between.

As you can see, it is pretty easy to view GPX online or offline using the right tools. In this post, I have included a detailed guide on how to view GPX in Google Maps. Besides that, I have also included another solution to view GPX on a map using Dr.Fone - Virtual Location (iOS). Apart from importing/exporting GPX files, the application can also be used to spoof your Apple iPhone 6 Plus’s location or simulate its movement virtually from anywhere you want.
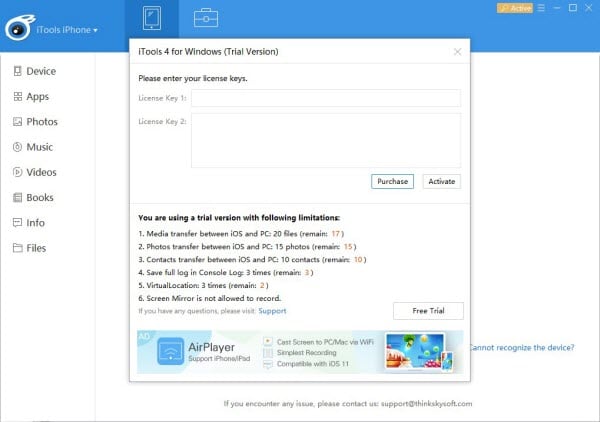
Does iTools virtual location not work On Apple iPhone 6 Plus/iPad?
You must know that iTools virtual location is used worldwide, and it has been reported that there have been many problems. This effective iTools virtual location is a geo-spoofing tool that is mainly for iOS. With this tool, you could easily mock the GPS location, and it also works in an effective manner to access geo-restricted content.
Part 1: Why does my itools not work on Apple iPhone 6 Plus/iPad?
There may be many reasons due to which the iTools virtual location does not work on Apple iPhone 6 Plus/iPad. You must know that iOS 14 is the massive iOS update, but it is the amazing new features that offer a completely new look to your iOS. But iTools not working on Apple iPhone 6 Plus/iPad could make it difficult for the user to use this tool.
With the introduction of the iTools virtual location, many people have been complaining about the issues they are facing using this tool. Some of the common issues are getting stuck in the developer mode, iTools not downloading, Map crash, iTools fail to work, location won’t move, image load failed, and much more. All these issues are making the use of iTools more difficult for the user to use.
Usually the reasons lie with bad internet, Wi-Fi or outdated version of the tool. Let us know in the following section how you can deal with various issues that lead to iTools not working on Apple iPhone 6 Plus/iPad.
Part 2: Ways to fix the iTools not work on Apple iPhone 6 Plus/iPad
iTools Virtual Location is the perfect tool that helps you to spoof location effectively. But there are many iTools not working problems that you may encounter in these tools some of them are like as mentioned below:
1. Stuck in developer mode
This problem is the most common issue that people mainly face with the iTools virtual Location. When you are stuck in the developer mode, you may notice that the application won’t initiate, and it also stops your navigation to the next step. This can be triggered if your iTools is not in the updated version. And hence, in order to resolve this problem, you may update the latest version of iTools on the official website.
2. iTools map not showing
Many of the people are also facing a problem like they cannot see the map while using a particular tool. This problem may be due to an unstable internet connection. Hence you must check with the internet connection to resolve the problem. Or you may also restart the tool and initiate the geo spoofing process.
There are also different ways or you can say some basic ways to go along with whenever iTools doesn’t work. You must know these basic tips when you stuck with such issue with your iOS 14. These are mentioned below:
Step 1: iTools download ios 14 must be of the latest iTools virtual location from the official website.
Step 2: Get a stable internet connection for running the geo spoofing.
Step 3: Restart the tool if you are stuck in any step or the application crash.
Step 4: Keep the tool updated for effective use.
The above mentioned are some of the steps you must follow to avoid any problem while using the iTools on Apple iPhone 6 Plus/iPad.
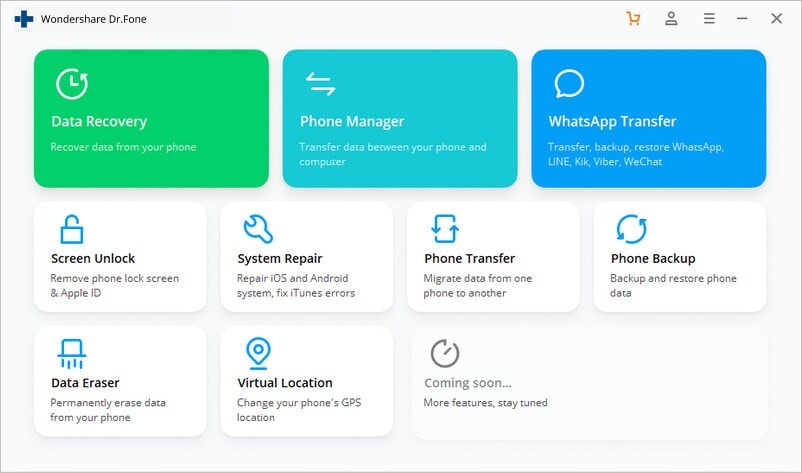
Part 3: Better alternative for iTools virtual location
Dr.Fone Virtual Location (iOS) is an effective and popular tool that could be easily used to change your GPS location to any place you want to change. With this popular tool, you could set any location anywhere in the world by creating a virtual location on iOS. It is the perfect tool that helps you to fake or spoof your location. The best thing about this software is that it is free and safe to use. And with its attractive features, you would love to browse and fake your Apple iPhone 6 Plus’s real-time location.
Key Features
Some of the key features of Dr.Fone – Virtual Location (iOS) that is making is popular all over the globe are mentioned below:
- It helps you to teleport iPhone GPS to anywhere in the world easily and quickly.
- It is the perfect solution to simulate GPS movement along real roads or paths you draw.
- With the help of the joystick, you could easily make the movement of the GPS freely.
- It is the best tool that supports five devices of location management that too in a perfect manner.
Step by Step Tutorial
If you want to know how to use the Dr.Fone – Virtual Location (iOS) to fake Location, then do not worry. Here you could get some of the simple tips to use Dr.Fone – Virtual Location (iOS) to fake your location using “Teleport” mode. With only three steps, you could easily change the GPS location on your Apple iPhone 6 Plus. The simple steps are mentioned below:
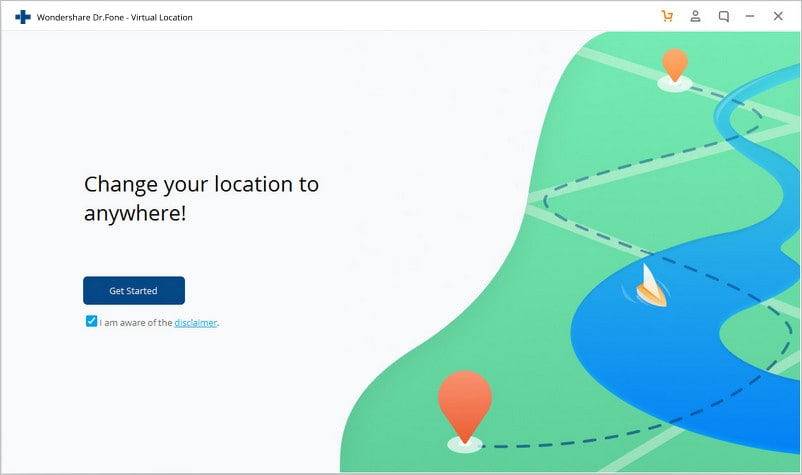
Step 1: Launch the program on your computer
The first step you need to do to use the program is to download and install it from the official website. You must click on the “Virtual Location” from all the options.
Now, have your phone connected to your computer. Then click on the “Get Started” option.
Step 2: Find your actual location on your map
In the second step, you need to find your actual location on your map in the new window. Check that the location is accurately displayed or not. If in case the location is not accurately displayed, then click the Centre On icon. You may find the Centre On icon in the lower right part to show the accurate location.
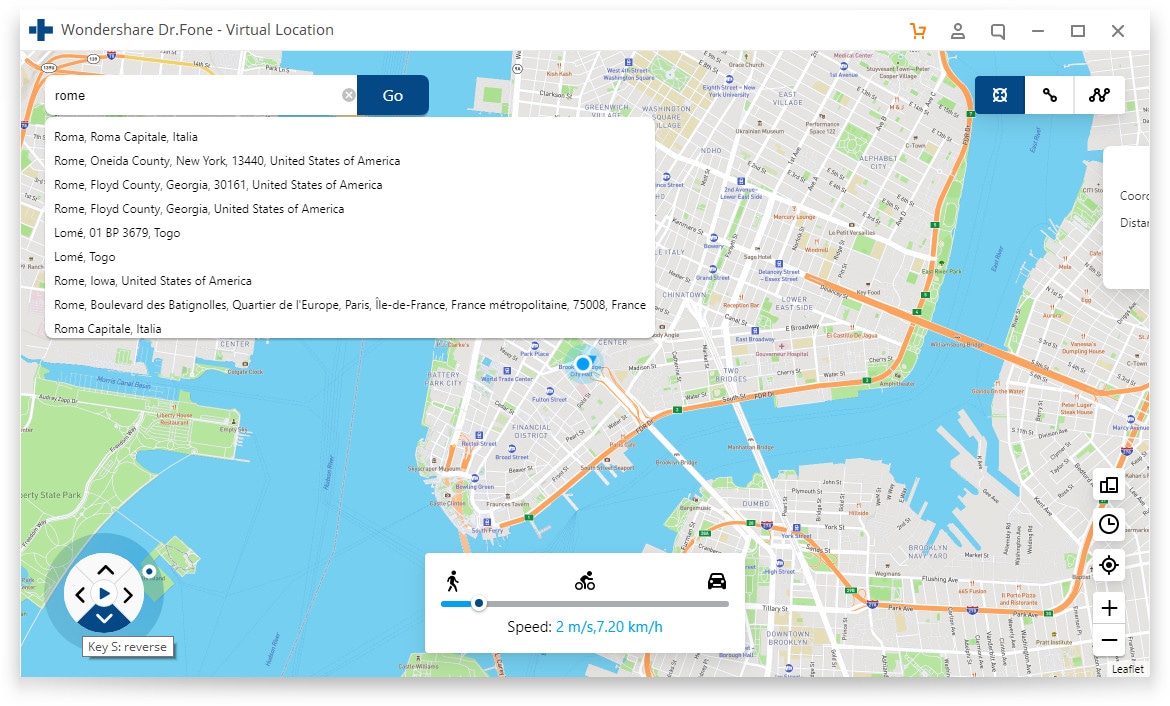
Step 3: Activate the teleport mode
Now, you need to activate the teleport mode by clicking the corresponding icon. You may find the corresponding icon in the upper right corner, and then you need to enter the place that you want to teleport in the upper left field and then click on the “Go” option.
Step 4: Click on the Move Here option
Now you may notice that the system would be able to understand your desired location. Hence click on the popup box of “Move Here.”
Step 5: The location will display on the program and app
In the last step, click the Centre On option. You will find that your location changes and is displaying on the program and app.
Conclusion
iTools ios 14 is designed as a powerful file management tool for all iPhones. Also, it is a greta choice to get your location spoofed on your Apple iPhone 6 Plus. But still, there are many virtual location issues that can break your comfort and lead you to disappointment. However, the problem can be effectively resolved with the help of Dr.Fone – Virtual Location (iOS) as it is the best alternative to iTools. Hence, use this perfect tool to resolve your iTools not work with ios 14 in the best possible manner.
5 Ways:Change Your Home Address in Google/Apple Map on Apple iPhone 6 Plus/iPad
Nothing feels more convenient than identifying the direction to your home with just a few clicks. Likewise, your Apple iPhone 6 Plus can take you home with just a few clicks on the address registered on the maps app. But what if your home address changes? How would you update your new address on your Apple iPhone 6 Plus? Read further to know the details about changing your home address on your Apple iPhone 6 Plus**!**
You can use dual maps apps on an iPhone, i.e., Google Maps and Apple Maps. Both the apps use the address registered on your contact card on your Apple iPhone 6 Plus. But the question arises of how to update the home address on iPhone. Although your phone can detect your location, it can’t set it as your home address on its own. In this article, we will discuss some of the most common ways of setting a home address on an iPhone. So, let’s get started!
You can watch the video below to change your location on Google/Apple Map
Part 1: How to Change Your Home Address in Google Maps on iPhone
You can easily set your home address in Google maps on your Apple iPhone 6 Plus. It helps easily get the correct directions to your destination from and to your home. But when you shift to a new place, you need to update your new home address on Google maps.
Follow the steps given below to know how to change your home address in Google maps on your Apple iPhone 6 Plus:
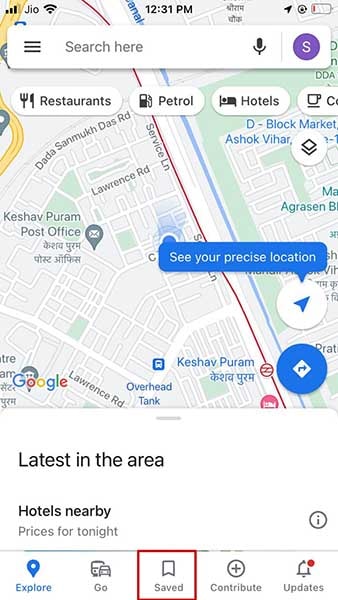
- Step1: Open Google Maps on your Apple iPhone 6 Plus and tap on the “Saved” icon at the bottom of the home screen.
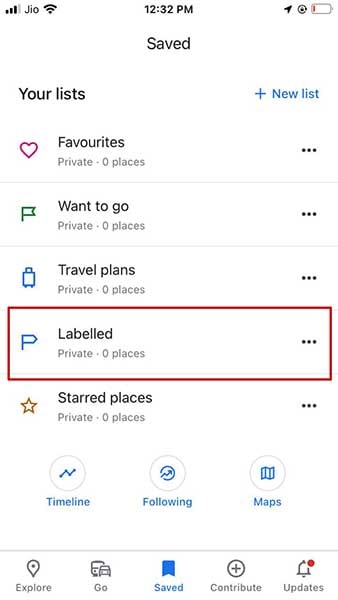
- Step2: Under this section, you will see another section named “Your Lists”.
- Step3: In this section, tap on the option named “Labelled”.
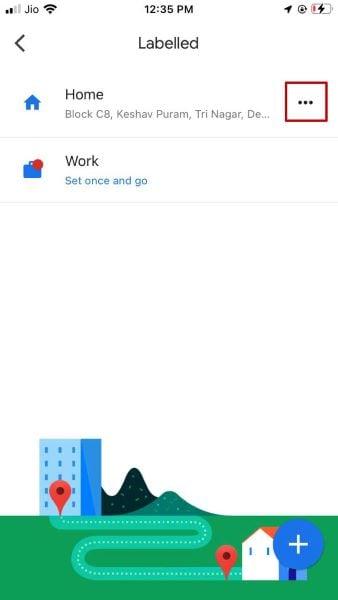
- Step4: The “Labelled” section shows the list of your labeled places such as home, office, etc.
- Step5: You will find the three dots next to each place. For example, tap on the one next to “Home”.
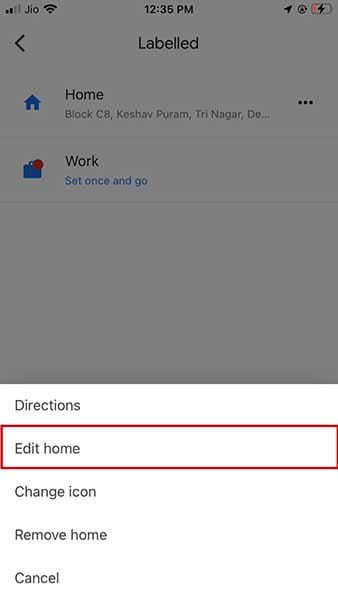
- Step6: When you click on these three dots, you will find different options. For example, select “Edit home”.
- Step7: A new screen will open. Here, you can remove your old address and type the new one. Else you can locate your current home address on the map.
- Step8: Click on the “Save” option available at the bottom of the screen to save your new address.
Part 2: How to Change Your Home Address in Apple Maps on iPhone
Unlike Google Maps, Apple Map doesn’t allow you to change the home address directly in the app, nor does it automatically detect your new home location. To update your home address, you need to change it in your contact card saved on your Apple iPhone 6 Plus.
Here’s how to update your home address in Apple Maps via contact card:
- Step1: Open the “Favorites” section in Apple maps and swipe it up.

- Step2: Tap on the “i” button available beside your home address.
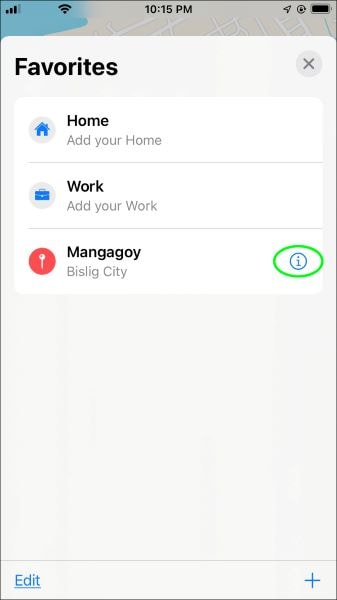
- Step3: Here, you will find an option to open your Contact Card.
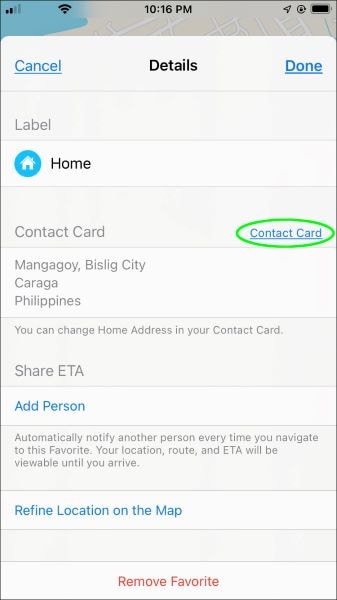
- Step4: Tap on the “Edit” option to add or remove your home address from the contact card.
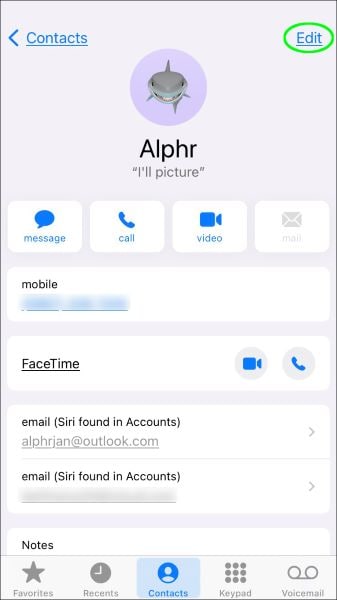
- Step5: Click on the “Done” button when you are done with the modification.
Part 3: Change iPhone Home Location by Modifying Apple ID Address
Are you moving to a new country or a new region? Do you want to update your new home location on your Apple iPhone 6 Plus? You can change your home location by modifying your Apple ID address. Following simple steps will help you to do it with a few clicks:
- Step1: Open the “Settings” of your Apple iPhone 6 Plus.
- Step2: Tap on the “iTunes and App Store”.
- Step3: After this, you need to tap on the “View Apple ID” option available on the screen.
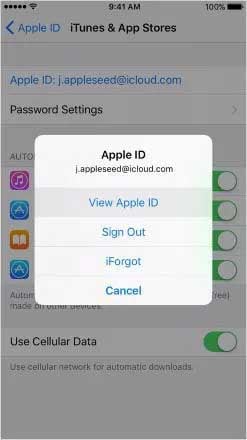
- Step4: Change your location by clicking on “Country/Region” in the “Accounts” section.
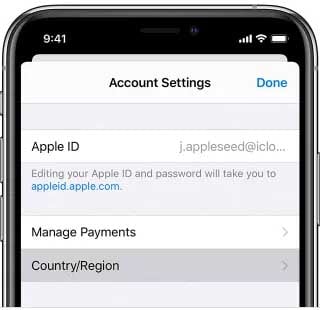
- Step5: Accept the terms and conditions before escaping the window.
Note: Make sure that all your Apple ID subscriptions are used and finished because changing the Appl ID address might make them unusable.
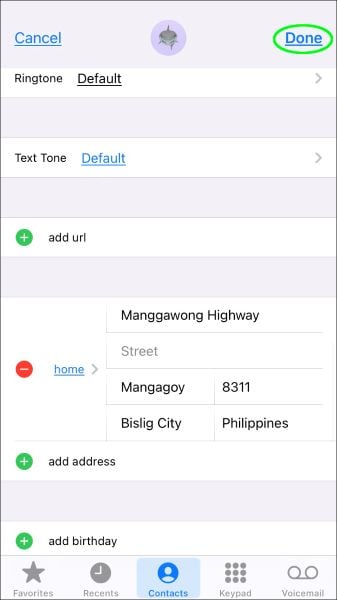
Part 4: Changing My Card to Change Home Address on iPhone
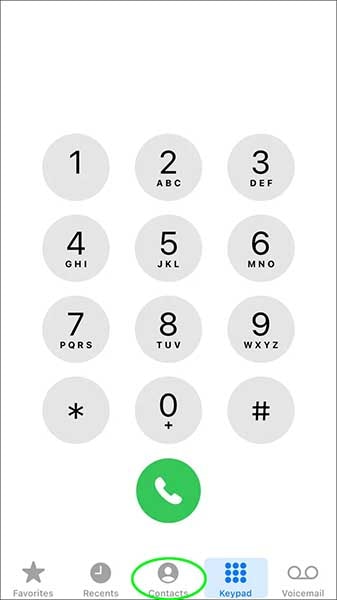
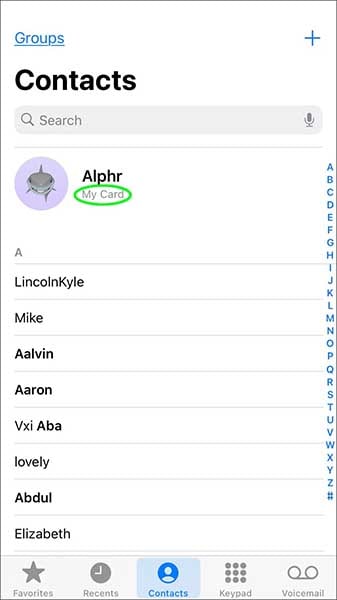
Alternatively, you can try to change “My Card” from your contact list to update your new address on your Apple iPhone 6 Plus. First, you need to follow the simple steps given below to change your home address in Apple on iPhone via contact cards:
- Step1: Open the contacts in your Apple iPhone 6 Plus and tap on “My Card” to edit your home address.
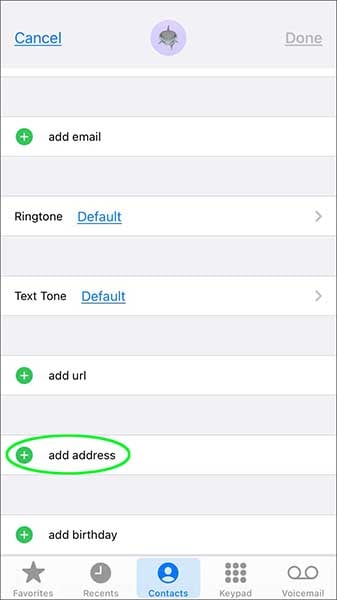
- Step2: You will find the “Edit” option at the top-right corner of the screen. Tap on it.

- Step3: You can easily add your new address here by clicking the “add address” option and deleting the old one.
- Step4: Click on the “Done” tab after modifying the address.

Part 5: Spoof Location on iPhone to Change Home Address
Dr.Fone – Virtual Location is a fantastic application from one of the most trusted software companies – Wondershare. You can easily use Dr.Fone for simulating and teleporting the iPhone GPS location anywhere in the world with just one click. This location faker allows you to travel worldwide without even leaving your home.
Dr. Fone comes with the following benefits:
Dr.Fone - Virtual Location
1-Click Location Changer for both iOS and Android
- It works perfectly with all location-based apps, including Pokemon Go, Snapchat, Tinder, etc.
- Compatibility with iOS and Android without jailbreak.
- It is primarily known for its stability. Hence there is no risk of app crashes.
- Change or fake your location to travel worldwide in one click.
3981454 people have downloaded it
Here, we have mentioned some easy steps of location spoofing using Dr.Fone:
- Step 1: First, you need to install and launch Dr.Fone – Virtual Location on the computer. Then, select the “Virtual Location” module.

- Step 2: Connect your cell phone with your system and click on the “Get Started” option.
- Step 3: Now, you will see your current location on the screen. Activate the teleport mode by clicking on the first icon in the screen’s upper-right corner.

- Step 4: Enter the desired location on the search bar and click on the “Go” button.

- Step 5: The system will now show the entered location, and a pop-up will appear for the confirmation. Click on “Move Here”.

- Step 6: Now, your location is changed.
Note: You can go back to your default location by clicking on the “Reset Location” option.
Conclusion
Updating your home address on your Apple iPhone 6 Plus can sometimes be tricky. Some people face issues while doing so. So, we have tried to summarize all the possible methods of changing home addresses in Google and Apple maps on iPhone. Dr.Fone is one of the best and most effective methods for either changing or spoofing location on an iPhone. We hope that you have got all the answers on how to change your home address on your Apple iPhone 6 Plus.
Also read:
- [New] DIY Tips for Affordable YouTube Intro/End Videos for 2024
- [New] In 2024, ShareX Overview Top Picks & Substitutes
- [Updated] 2024 Approved Elevating Social Influence Top Techniques for Facebook SEO Excellence
- Exploring 8 Creative Uses of ChatGPT’s Image Recognition
- How To Bypass iCloud By Checkra1n Even From iPhone 12 If Youve Tried Everything
- How to Change Your Location on Apple iPhone 14 Plus | Dr.fone
- In 2024, 6 Methods to Protect Yourself from Location Tracking on Apple iPhone 11 | Dr.fone
- In 2024, 6 Methods to Protect Yourself from Location Tracking on Apple iPhone 12 Pro | Dr.fone
- In 2024, Does iTools virtual location not work On Apple iPhone 7/iPad? | Dr.fone
- In 2024, How to Enable, Disable, and Change Safari Location on Apple iPhone 8 Plus | Dr.fone
- Install the New Nvidia Quadro RTX 8000 Driver: Optimized Support for Win 10/8/7
- Live Streaming Mastery with ManyCam: Enhance Your Online Presence with Virtual Camera Capabilities
- MP2 to MP3 Transformation at No Cost - Quick and Easy With Movavi's Online Tool
- NVIDIA GeForce Riva 210 - Fresh Driver Support for Windows 11 Platforms
- Quick Steps to Change Weather Location on Apple iPhone 15 | Dr.fone
- Title: How to View GPX Files Online and Offline Solutions Of Apple iPhone 6 Plus | Dr.fone
- Author: Isabella
- Created at : 2024-09-29 23:10:53
- Updated at : 2024-09-30 23:42:28
- Link: https://iphone-location.techidaily.com/how-to-view-gpx-files-online-and-offline-solutions-of-apple-iphone-6-plus-drfone-by-drfone-virtual-ios/
- License: This work is licensed under CC BY-NC-SA 4.0.