
:max_bytes(150000):strip_icc():format(webp)/GettyImages-1139232374-700d343900854115ad26acf3f1dd80b3.jpg)
How to View GPX Files Online and Offline Solutions Of Apple iPhone SE | Dr.fone
How to View GPX Files: Online and Offline Solutions Of Apple iPhone SE
Also known as GPS Exchange Format, GPX is one of the most resourceful file types that is used to store and import/export map-related data. Ideally, a lot of people use GPX files to access a particular route offline when they are off the grid. Though, there are times when users find it hard to view GPX on a map. Don’t worry, there are plenty of ways to view GPX online or offline. In this post, I will let you know how to view GPX in Google Maps and other resourceful desktop applications in detail.
Part 1: What Can you Do with GPX Files?
Before we discuss how to utilize a GPX view online or offline tool, let’s quickly consider how these files work. It stands for GPS Exchange format and stores map-related data in an XML format. Apart from XML, KML and KMZ are other common file formats to store GPX data.
From the exact coordinates of places to their routes, a GPX file would contain the following information:
- Coordinates: Also know as waypoints, a GPX file would contain details about longitude and latitude that are needed to be covered on the map.
- Routes: The main reason for using GPX files is that they store detailed routing information (the path that we need to take to reach from one point to another).
- Tracks: A track consists of various points that we are merged to form the route or the path.

Let’s suppose you have devised a route between two points that you would need later on. You can now export the GPX file from the application and even import it to the same or another application. When you use the GPX viewer, it will let you access the route offline without an active internet connection. That’s why GPX files are used to view a route offline while hiking, trekking, cycling, and do other offline activities.
Part 2: How to View GPX Files Online in Google Maps?
The good thing is that there are tons of options to view GPX online on desktop, Android, or iOS platforms. Some of these freely available solutions to view GPX on Map are Google Earth, Google Maps, Bing Maps, Garmin BaseCamp, GPX Viewer, and so on.
Out of them, Google Maps is one of the most used solutions to view GPX online on smartphones and desktops alike. As of now, you can import GPX files in the KML format or even load CSV files of exact coordinates on Google Maps. To learn how to view GPX in Google Maps, follow these steps:
Step 1: Go to Your Places in Google Maps
To view GPX on the map, you can first head to the official website of Google Maps on your computer. Now, just click on the hamburger (three-line) icon from the top-left corner to access its options.

This will display various options related to your Google Maps account. From here, you can just click on the “Your Places” feature.

Step 2: Choose to Create a New Map
As a dedicated section of “Your Places” would be launched, you can view all the saved places for your Google Maps account. Here, you can go to the “Maps” tab to view the existing saved route and spots. Since you have to view GPX in Google Maps, you can click on the “Create Map” option from the bottom to load a new map.

Step 3: Import and View the GPX File Online
This will make Google Maps load a new page that will let you create a fresh map as per your preferences. Here, you can just click on the “Import” button to load a browser window from where you can directly load a GPX file on Google Maps and make it available offline as well.

Part 3: How to View a GPX File Offline with Dr.Fone – Virtual Location?
Besides Google Maps, you can also take the assistance of Dr.Fone – Virtual Location to view GPX files on your computers offline. Since it is a desktop tool, it would let you load any GPX file without being connected to an active internet connection. Besides that, the application can also be used to spoof the location of your iOS device or simulate its movement in a route without jailbreaking it.
Therefore, if you want, you can first simulate the movement of your device and export the GPX file. Later, you can import the saved GPX file and simulate your Apple iPhone SE movement in the same route without any trouble.
Step 1: Launch Dr.Fone – Virtual Location and connect your Apple iPhone SE
At first, you can just connect your Apple iPhone SE using a working lightning cable and launch the Dr.Fone – Virtual Location application. Once your device is detected, just click on the “Get Started” and agree to its terms and conditions.

Step 2: Simulate the Movement of your Apple iPhone SE
The application would automatically detect your Apple iPhone SE on the interface with its present location. To simulate its movement, you can click on the Multi-stop or One-stop Mode icons from the top.

You can now drop the pin in a route on the map and click on the “Move Here” Button to start simulating the movement.

Subsequently, you can select the number of times you want to cover the route and click on the “March” button. The application will even let you select a preferred speed for the movement.

Step 3: Export or Import the GPX Files
Once you have loaded the map on the interface, you can easily save it offline as a GPX file. To do that, just click on the Export icon from the floating menu on the side.

Similarly, you can also import a GPX file directly to the Dr.Fone application. To do this, you just have to click on the “Import” icon from the sidebar. This will open a browser window, letting you go to a location on your computer where the GPX file is saved.

Once the GPX file is loaded, you can simply wait for a while and let the application process it without closing it in between.

As you can see, it is pretty easy to view GPX online or offline using the right tools. In this post, I have included a detailed guide on how to view GPX in Google Maps. Besides that, I have also included another solution to view GPX on a map using Dr.Fone - Virtual Location (iOS). Apart from importing/exporting GPX files, the application can also be used to spoof your Apple iPhone SE’s location or simulate its movement virtually from anywhere you want.
How to Fix the Apple iPhone SE GPS not Working Issue
GPS (Global Positioning System) is an important utility in this modern age. After all, it tracks an individual’s or object’s live location, making route navigation easier. Henceforth, this feature is incorporated in all modern smartphones. However, most Apple iPhone SE users these days complain about the Apple iPhone SE GPS problem.
As a user with daily traveling, you want to avoid such issues. This article will make things easier because you will find ways and solutions to overcome this issue.
Part 1: What Happens If Your Apple iPhone SE GPS Does Not Work on Apple iPhone SE?
Apple iPhone SE is among the most popular gadget devices in current times. Meanwhile, its GPS function allows users to stay active on the real-time map technology. However, GPS not working on Apple iPhone SEs is a common problem. When this happens, you cannot track pinpoint locations.
This means you will find difficulty in locating your destination. Moreover, you will not be able to use those applications that rely on GPS technology. For example, a fitness app needs to track your distance and route. Not to forget, a malfunctioning GPS may also drain more battery.
Part 2: What Are the Potential Reasons for Apple iPhone SE GPS Not Working?
With GPS, you can track the live locations of your destination in seconds. In fact, you can also track any human depending on their live location. But as an iOS user, it’s normal to face Apple iPhone SE GPS not working. Why does this happen? Here are the following reasons behind this error:
- Glitches and Bugs: A most common reason for GPS not working is due to glitches and bugs. Hence, this may happen because of underlying iOS or GPS app issues. Either there was a bug in the version update, or the app is facing malfunctions.
- Airplane Mode: When airplane mode is enabled on your Apple iPhone SE, this may cause a GPS issue. You may have forgotten to turn off your airplane mode after air travel. Not to forget, turning off GPS is necessary during flight as per regulations.
- Incorrect Settings: It’s possible that GPS settings are not properly configured on your Apple iPhone SE. Like, you may have accidentally turned off location services. While using your Apple iPhone SE, turning on and off certain features is common.
- Hardware Issue: If your phone is exposed to water or physical damage, this may affect GPS. There may be a hardware issue caused due to this situation. Thus, the GPS antenna or chip may have been damaged.
Part 3: How To Fix Apple iPhone SE GPS Not Working?
Having an erroneous Apple iPhone SE GPS is not a new thing. But it does bring many inconveniences for the users. After all, you are deprived of live location tracking and positioning. To fix such Apple iPhone SE GPS not working issues, these ways are ideal solutions:
Way 1: Make Sure GPS Service is Enabled on Apple iPhone SE
A majority of people forget to turn on GPS services on their respective Apple iPhone SEs. Thus, most times, users don’t know how to turn on GPS back. Henceforth, GPS not working issues become evident. To enable GPS service on Apple iPhone SE, follow these steps:
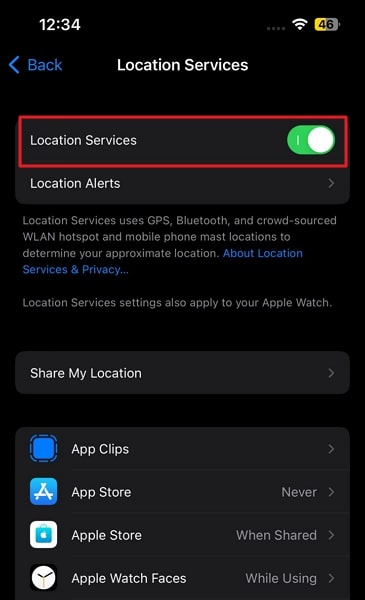
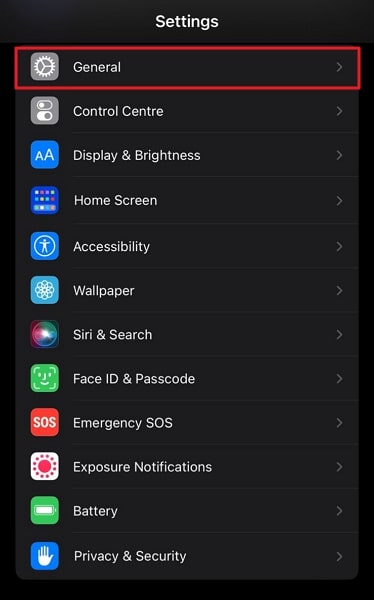
- Step 1: Launch your Apple iPhone SE Settings, scroll down, and find “Privacy & Security” from the menu.
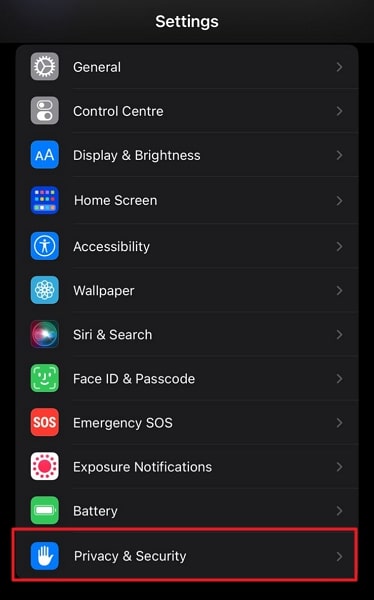
- Step 2: Press “Privacy & Security” and turn on “Location Services” to enable GPS. You can also enable location for other apps from the same settings.
Way 2: Simple Restart Apple iPhone SE
Restarting an Apple iPhone SE is the ultimate way to rectify underlying problems. Sometimes GPS is not working because of cache or network problems, and restarting Apple iPhone SE can help. For restarting an Apple iPhone SE, these steps will help you:
- Step 1: From the Apple iPhone SE settings, move into the “General” category, scroll down, and press “Shut Down.” Now slide right to power off your Apple iPhone SE.
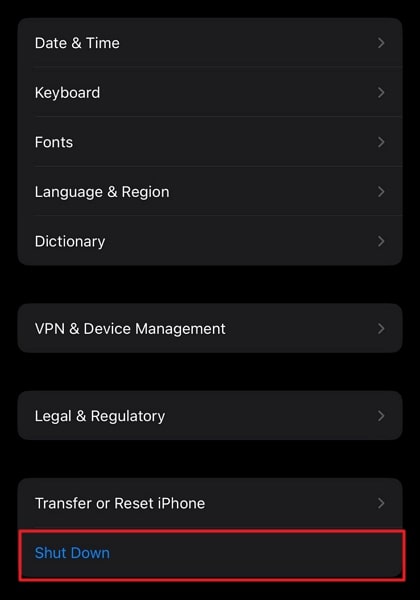
- Step 2: Wait for some time till your device gets powered off. After this, hold the “Power” button until the Apple logo appears to restart your device.
Way 3: Force Restart Apple iPhone SE
Sometimes your Apple iPhone SE may get hung up due to an underlying issue. So, when your device is not responding, you cannot restart it from settings. In this scenario, you need to force restart Apple iPhone SE. To do this, perform these simple instructions:
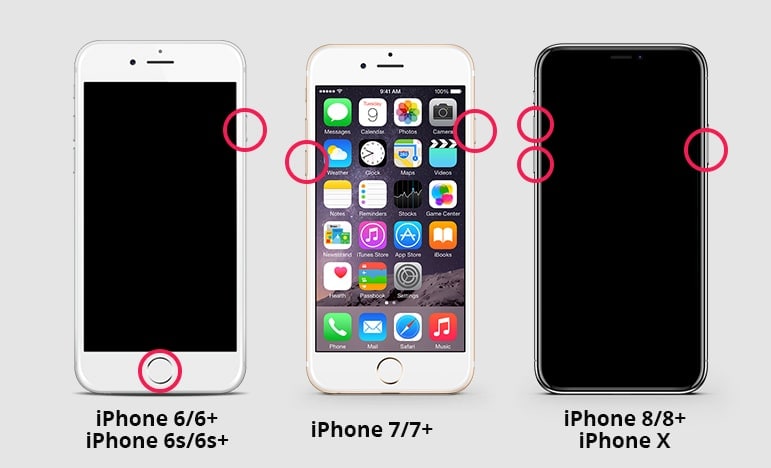
- Apple iPhone SE 6, 6S Plus, and Older: Simultaneously press and hold the “Home” and “Sleep/Wake” buttons. Make sure to keep holding both buttons until you see the Apple logo. Finally, release the buttons when the logo appears.
- Apple iPhone SE 7 or 7 Plus: Start by holding the “Sleep/Wake” button and “Volume Down” button at the same time. Afterward, stop holding the buttons and release them when you see the Apple logo.
- Apple iPhone SE 8 and Later: Initially, quickly press and release the “Volume Up” button, then perform the same with the “Volume Down” button. After this, press and hold the “Sleep/Wake” button, and release the button once the Apple logo appears.
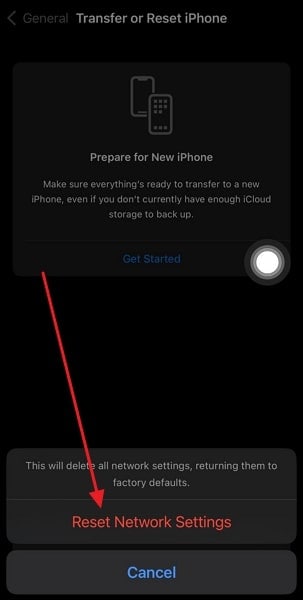
Way 4: Reset Network Settings
A network connection error is also the reason for Apple iPhone SE GPS not working. This happens when your Apple iPhone SE isn’t connected to a Wi-Fi network or facing problems in connection. For resetting the network settings, these steps are your trusted solution.
- Step 1: From your Apple iPhone SE, launch “Settings,” scroll down, and move into “General” from the settings menu.

- Step 2: Access the “Transfer or Reset Apple iPhone SE” options, tap the “Reset” option, and select “Reset Network Settings.” Now reset your Apple iPhone SE network settings to default by tapping “Reset Network Settings.”
Way 5: Reset Location and Privacy Settings
In most scenarios, your location is used on many apps that risk GPS optimal functioning. For this purpose, you need to reset the location to the default factory settings. Thinking about how to do it? Get along with these steps:
- Step 1: Move into the settings of your Apple iPhone SE, scroll down, and tap “General” from the available options.
- Step 2: Now press the “Transfer or Reset Apple iPhone SE” option from General. From the next screen, choose the “Reset” option, and select “Reset Location & Privacy.” After pressing “Reset Settings,” your device location settings will reset to default.

Way 6: Use Wondershare Dr.Fone to Fix Apple iPhone SE GPS Problems
Fixing persistent GPS problems on iOS is now easier with Wondershare Dr.Fone. This system repair tool has solutions to repair issues in over 50+ iOS systems. Interestingly, you can update or downgrade the iOS version without jailbreaking with Wondershare Dr.Fone.
So, if you have consistent problems with your Apple iPhone SE GPS system, this tool can rectify the iOS version. Moreover, you don’t need special expertise or knowledge to use Wondershare Dr.Fone to fix your Apple iPhone SE. Meanwhile, you enter or exit DFU/Recovery mode with a single click.
Dr.Fone - Virtual Location
1-Click Location Changer for both iOS and Android
- Teleport from one location to another across the world from the comfort of your home.
- With just a few selections on your computer, you can make members of your circle believe you’re anywhere you want.
- Stimulate and imitate movement and set the speed and stops you take along the way.
- Compatible with both iOS and Android systems.
- Work with location-based apps, like Pokemon Go , Snapchat , Instagram , Facebook , etc.
3981454 people have downloaded it
Key Features of Wondershare Dr.Fone
- Efficiently solves issues like black screen or white screen of death from Apple iPhone SE. So if you are facing such an issue, Wondershare Dr.Fone can help.
- In most scenarios, Wondershare Dr.Fone will repair your Apple iPhone SE without damaging or losing data. Meanwhile, the recovery will be completed in a few minutes.
- With Wondershare Dr.Fone, you can upgrade your iOS version to the latest beta version. This way, you can enjoy new features for free.
Step-by-Step Instructions for Wondershare Dr.Fone To Fix Apple iPhone SE GPS Problems
Wondershare Dr.Fone is the most reliable tool for fixing Apple iPhone SE GPS not working problems. Are you also looking to use this amazing platform? These straightforward instructions will help you move forward:
- Step 1: Connect Apple iPhone SE with Computer
Download and launch Wondershare Dr.Fone’s latest version on your computer. Next, select “System Repair” from the “Toolbox” tab and connect your Apple iPhone SE using a USB cable. Select your device type as Apple iPhone SE to proceed further.

- Step 2: Choose Desired Repair Mode
Here choose “iOS Repair,” and on the next screen, select the desired repair mode. Proceed with the “Standard Repair,” as it will not affect your data. Now follow the on-screen instructions to activate Recovery Mode.

- Step 3: Repair the GPS Issue
After recovery mode is enabled, the platform will automatically detect the Apple iPhone SE device and provide firmware accordingly. Press “Download” against the required firmware to start downloading it. Once the firmware is downloaded, click “Repair Now” to repair GPS not working issue on Apple iPhone SE.

Conclusion
GPS is an important feature to have in this modern world. After all, it keeps a person’s or object’s location active in live mapping technology. This way, tracking people in an emergency or finding destinations is easier. Meanwhile, the Apple iPhone SE GPS problem is a common issue in most devices. Thus, users have to face a lot of difficulties while navigating GPS locations.
Apparently, this article provides step-by-step procedures to solve Apple iPhone SE GPS issues in different ways. Among the different ways shared, Wondershare Dr.Fone is the most trusted solution for your device. So, if you don’t get reliable solutions from other ways, Wondershare Dr.Fone is available. If you want to explore further solutions, such as fake GPS location , Dr.Fone Virtual Location is also available now.
Why Does iTools Virtual Location Not Work For Apple iPhone SE/iPad? Solved
It is no secret that a multiplicity of users across the globe have reported a bunch of problems using iTools Virtual Location. These problems vary in magnitude and make iTools Virtual Location not work. In this article, we are going to dig into probable causes and solutions for iTools Virtual Location that fails to work.
Common Issues That iTools Virtual Location Not Working
Although iTools can be of great help in mocking your GPS location, the tool is marred by a plethora of shortcomings. Lots of users have been perennially complaining about some flaws of iTools Virtual Location. Some of the common issues are:
- Developer mode- There are myriads of cases reported by users where iTools crash on developer mode and get stuck here. This mode prevents users from going on to faking GPS location.
- Not downloading- Sometimes, you can follow all necessary processes or satisfy all the requirements, but iTools fails to download to your device. There is no way you can install iTools without downloading it.
- Map crash- Plenty of iTools users have launched over map crash. The program gets stuck loading the map but fails to display the map. Even when the internet connection is established, the map still fails to load in some cases.
- Stop working- ITools failure to work is one of the common issues fronted by scores of users. When you try to change the location, iTools Virtual Location does not respond.
- Not working on iOS 17- If there is an iOS version that hasn’t gone well with ITools is iOS 17. Although iTools has given a temporary solution for this, it still fails to work on some phones.
- Location won’t move- When using iTools Virtual Location, you always provide the desired GPS location data and click “Go.” After that, you are asked to click the “Move here” button to move to the chosen place. However, users have complained that at times the location fails to move from the previous to the currently selected location on apps like Facebook, and you end up finding yourself in a fake location.
- Image load failed- Image loading failure is a common problem amongst iOS 17 users. Droves of users complain they continually get a developer image load failed. The program fails to load various location images, and thus users cannot see the respective location images. The screen is stuck in loading without displaying any image.
Tips: iTools Virtual Location not working? Switch to Dr.Fone - Virtual Location for flawless GPS control. Try it now and never lose your way!
How to Solve These Issues?
With the significant problems mentioned, it’s prudent for someone to ask now what the solution is. Of course, these issues are triggered differently, but there are respective common fixes. However, some can successfully fix the problem while other solutions may hit the blank. Let’s see some of the probable solutions to the issues mentioned above.
- Developer mode- The solution is to check for the iTools updates for your device.
- Not downloading- if the program fails to download, check that your device meets the system requirements. Also, make sure your payments are settled and that the internet connection is established.
- Map crash- If the map crashes, it might be because of a problem with the google map API or unestablished communication with iTools. If Google Maps fails, click the three horizontal lines located at the right of the menu bar and switch to Mapbox. Also, check that your internet connection is working fine. If not, try to refresh your internet connection and ensure the connection is established.
- Stop working- When the iTools Virtual Location stops working, it might be due to unexpected technical issues. Try restarting the program, and if it persists, restart your device.
- Not working on iOS 17- As aforementioned, iOS 17 has had issues with iTools. One of the best ways to ensure a smooth click with iTools is to downgrade your iOS 17 to say iOS 16. The temporary solution offered for iOS 17 seems to work on some devices only.
- Location won’t move- when you change your current location and fail to move on your apps say google maps or Facebook, you will find yourself in fake location. Simply restart your device, and the problem will disappear.
- Image load failed- This issue is often related to compatibility issues. Check if you downloaded the program after the forced PoGo updates. You can try downgrading your device if you are doing iOS 17.
Dr.Fone - Virtual Location: Safer and Stable Tool To Change Location (iOS 17 Supported)
As you have seen above, iTools Virtual Location software is faced with a pile of problems that make it difficult to safely and efficiently fake GPS locations. So no one should teach you that you need a better tool. Yes, a stable and safe tool for changing location as you desire.
There are several tools out there claiming to offer such, but none comes close to Dr.Fone - Virtual Location (iOS/Android) . The powerful iOS location changer has all it takes to make location changing easy and full of fun. This program has a simple and straightforward interface that eases every user’s navigation. With the three simple steps to change GPS location on your device, Dr.Fone is no doubt the location changer you have been looking for. The program is available for all versions of windows including Windows 11/10/8.1/8/7. Some of the features of Dr.Fone - Virtual Location (iOS/Android) include:
- Teleport your Apple iPhone SE/Android GPS worldwide- if you are using GPS-based gaming applications, you can track and change your current GPS location via a single click. So every app on your device that uses GPS location data will believe you are there when you are mocking your location.
- Adjust the speed to transition from static to dynamic GPS mocking. You can mimic the cycling, walking, or driving speed on real roads or on a user- defined route established by choosing two points. To make your movements more natural, you can add relevant pauses along the journey as per your needs.
- Use Joystick to simulate GPS movement- the use of Joystick will save up to 90% of the labor involved in GPS movement control. Whichever mode you are in as either one-stop, multi-stop, or teleport mode.
- Automatic marching- with one click, you can make GPS spot the move automatically. You can change the directions in real time.
- Change directions up to 360 degrees- use the direction arrows to set the desired movement direction.
- Works with all GPS- based AR games or apps.
Dr.Fone - Virtual Location
1-Click Location Changer for both iOS and Android
- Teleport from one location to another across the world from the comfort of your home.
- With just a few selections on your computer, you can make members of your circle believe you’re anywhere you want.
- Stimulate and imitate movement and set the speed and stops you take along the way.
- Compatible with both iOS and Android systems.
- Work with location-based apps, like Pokemon Go , Snapchat , Instagram , Facebook , etc.
3981454 people have downloaded it
Also read:
- Find My App Troubleshooting No Location Found vs. Location Not Available & How to Fix Them On Apple iPhone 14 | Dr.fone
- In 2024, 5 Ways Change Your Home Address in Google/Apple Map on Apple iPhone XR/iPad | Dr.fone
- In 2024, Double Location Dongle All to Know About Apple iPhone 13 mini/iPad GPS Spoofing | Dr.fone
- In 2024, 5 Ways Change Your Home Address in Google/Apple Map on Apple iPhone 15/iPad | Dr.fone
- 7 Fixes to No GPS - Showing Approximate Location on Apple iPhone SE Waze | Dr.fone
- In 2024, Hide location on Apple iPhone SE and Android without others knowing | Dr.fone
- How to See Someones Location on Apple iPhone 13 Pro | Dr.fone
- In 2024, How to See Someones Location on Apple iPhone 7 Plus | Dr.fone
- In 2024, A Full Review for iTools Virtual Location and Top 5 Alternatives For Apple iPhone 15 Pro Max/iPad | Dr.fone
- In 2024, How to Fix the Apple iPhone 15 Pro GPS not Working Issue | Dr.fone
- Why Does iTools Virtual Location Not Work For Apple iPhone XR/iPad? Solved | Dr.fone
- In 2024, 6 Methods to Protect Yourself from Location Tracking on Apple iPhone 15 Pro | Dr.fone
- How to View GPX Files Online and Offline Solutions Of Apple iPhone 8 | Dr.fone
- 4 Effective Methods Fake GPS Location on Apple iPhone 6s/iPad | Dr.fone
- Hide location on Apple iPhone 8 Plus and Android without others knowing | Dr.fone
- In 2024, Hide location on Apple iPhone 7 Plus and Android without others knowing | Dr.fone
- In 2024, How to Fix the Apple iPhone 13 mini GPS not Working Issue | Dr.fone
- In 2024, How to View GPX Files Online and Offline Solutions Of Apple iPhone 6s | Dr.fone
- Find My App Troubleshooting No Location Found vs. Location Not Available & How to Fix Them On Apple iPhone 11 Pro Max | Dr.fone
- In 2024, 7 Fixes to No GPS - Showing Approximate Location on Apple iPhone XS Waze | Dr.fone
- A Full Review for iTools Virtual Location and Top 5 Alternatives For Apple iPhone 14 Plus/iPad | Dr.fone
- A Full Review for iTools Virtual Location and Top 5 Alternatives For Apple iPhone 15/iPad | Dr.fone
- Quick Steps to Change Weather Location on Apple iPhone 6 Plus | Dr.fone
- In 2024, Find My App Troubleshooting No Location Found vs. Location Not Available & How to Fix Them On Apple iPhone 11 Pro | Dr.fone
- In 2024, Why Does iTools Virtual Location Not Work For Apple iPhone 14 Pro/iPad? Solved | Dr.fone
- In 2024, How to Fix the Apple iPhone 13 GPS not Working Issue | Dr.fone
- In 2024, 3 Smart and Simple Ways to Change Home Address on Apple iPhone 13 | Dr.fone
- In 2024, 5 Ways Change Your Home Address in Google/Apple Map on Apple iPhone 13/iPad | Dr.fone
- 6 Methods to Protect Yourself from Location Tracking on Apple iPhone 13 Pro Max | Dr.fone
- In 2024, Does iTools virtual location not work On Apple iPhone 7/iPad? | Dr.fone
- In 2024, 4 Effective Methods Fake GPS Location on Apple iPhone 15 Pro Max/iPad | Dr.fone
- Does PokeGo++ still work on Apple iPhone X/iPad? | Dr.fone
- Why Does iTools Virtual Location Not Work For Apple iPhone 15 Pro/iPad? Solved | Dr.fone
- In 2024, 7 Fixes to No GPS - Showing Approximate Location on Apple iPhone 14 Plus Waze | Dr.fone
- In 2024, Find My App Troubleshooting No Location Found vs. Location Not Available & How to Fix Them On Apple iPhone 8 Plus | Dr.fone
- How to View GPX Files Online and Offline Solutions Of Apple iPhone 6s Plus | Dr.fone
- In 2024, How to View GPX Files Online and Offline Solutions Of Apple iPhone 12 Pro Max | Dr.fone
- How to Fix the Apple iPhone 8 Plus GPS not Working Issue | Dr.fone
- In 2024, Pokémon Go Cooldown Chart On Honor 90 | Dr.fone
- In 2024, iCloud Unlocker Download Unlock iCloud Lock for your iPhone 13
- Reasons why Pokémon GPS does not Work On Vivo X Fold 2? | Dr.fone
- How to Share Location in Messenger On Nubia Red Magic 9 Pro? | Dr.fone
- Forgot Apple iPhone SE (2022) Backup Password? Heres What to Do
- Refurbished Apple iPhone 8 Plus Everything You Need to Know | Dr.fone
- In 2024, How To Use Allshare Cast To Turn On Screen Mirroring On Realme GT 3 | Dr.fone
- In 2024, Top 10 AirPlay Apps in Realme 12 Pro+ 5G for Streaming | Dr.fone
- Best Android Data Recovery - Undelete Lost Music from S23+
- How to Factory Reset Vivo Y100A in 5 Easy Ways | Dr.fone
- How to Change Google Play Location On Vivo Y100 5G | Dr.fone
- In 2024, Best 3 Oppo Reno 8T 5G Emulator for Mac to Run Your Wanted Android Apps | Dr.fone
- How To Upgrade or Downgrade iPhone 13 Pro? | Dr.fone
- Which is the Best Fake GPS Joystick App On Oppo A58 4G? | Dr.fone
- Top Apps and Online Tools To Track Vivo V30 Pro Phone With/Without IMEI Number
- How to Bypass Apple iPhone 12 Passcode Easily Video Inside
- 3 Best Tools to Hard Reset Lava Yuva 2 | Dr.fone
- Title: How to View GPX Files Online and Offline Solutions Of Apple iPhone SE | Dr.fone
- Author: Isabella
- Created at : 2024-05-19 02:40:09
- Updated at : 2024-05-20 02:40:09
- Link: https://iphone-location.techidaily.com/how-to-view-gpx-files-online-and-offline-solutions-of-apple-iphone-se-drfone-by-drfone-virtual-ios/
- License: This work is licensed under CC BY-NC-SA 4.0.
