
In 2024, 5 Ways Change Your Home Address in Google/Apple Map on Apple iPhone 8/iPad | Dr.fone
5 Ways:Change Your Home Address in Google/Apple Map on Apple iPhone 8/iPad
Nothing feels more convenient than identifying the direction to your home with just a few clicks. Likewise, your Apple iPhone 8 can take you home with just a few clicks on the address registered on the maps app. But what if your home address changes? How would you update your new address on your Apple iPhone 8? Read further to know the details about changing your home address on your Apple iPhone 8**!**
You can use dual maps apps on an iPhone, i.e., Google Maps and Apple Maps. Both the apps use the address registered on your contact card on your Apple iPhone 8. But the question arises of how to update the home address on iPhone. Although your phone can detect your location, it can’t set it as your home address on its own. In this article, we will discuss some of the most common ways of setting a home address on an iPhone. So, let’s get started!
You can watch the video below to change your location on Google/Apple Map
Part 1: How to Change Your Home Address in Google Maps on iPhone
You can easily set your home address in Google maps on your Apple iPhone 8. It helps easily get the correct directions to your destination from and to your home. But when you shift to a new place, you need to update your new home address on Google maps.
Follow the steps given below to know how to change your home address in Google maps on your Apple iPhone 8:
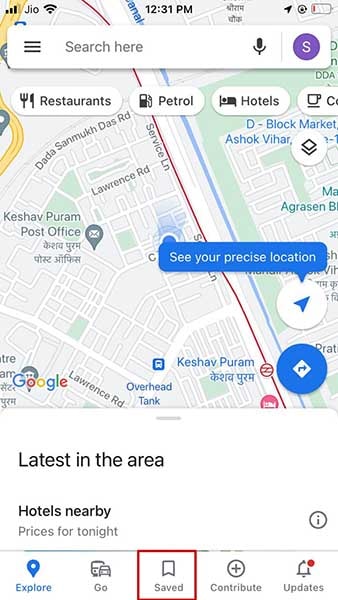
- Step1: Open Google Maps on your Apple iPhone 8 and tap on the “Saved” icon at the bottom of the home screen.
- Step2: Under this section, you will see another section named “Your Lists”.
- Step3: In this section, tap on the option named “Labelled”.
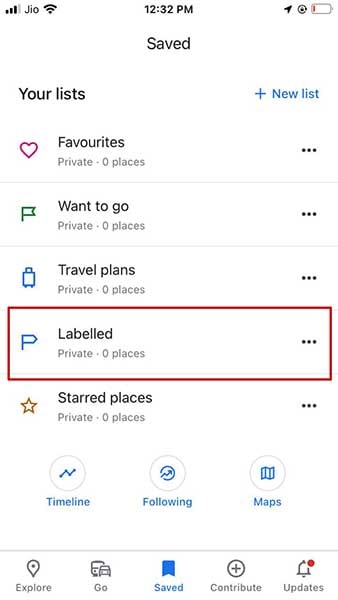
- Step4: The “Labelled” section shows the list of your labeled places such as home, office, etc.
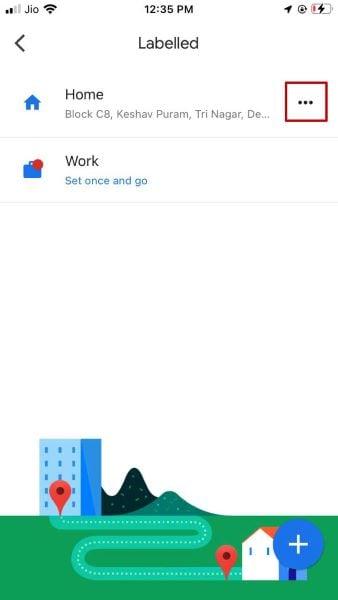
- Step5: You will find the three dots next to each place. For example, tap on the one next to “Home”.
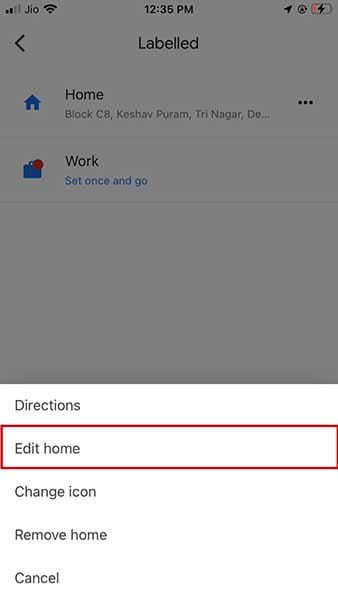
- Step6: When you click on these three dots, you will find different options. For example, select “Edit home”.
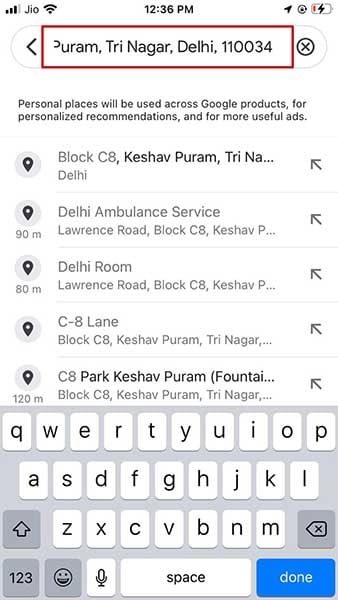
- Step7: A new screen will open. Here, you can remove your old address and type the new one. Else you can locate your current home address on the map.
- Step8: Click on the “Save” option available at the bottom of the screen to save your new address.
Part 2: How to Change Your Home Address in Apple Maps on iPhone
Unlike Google Maps, Apple Map doesn’t allow you to change the home address directly in the app, nor does it automatically detect your new home location. To update your home address, you need to change it in your contact card saved on your Apple iPhone 8.
Here’s how to update your home address in Apple Maps via contact card:
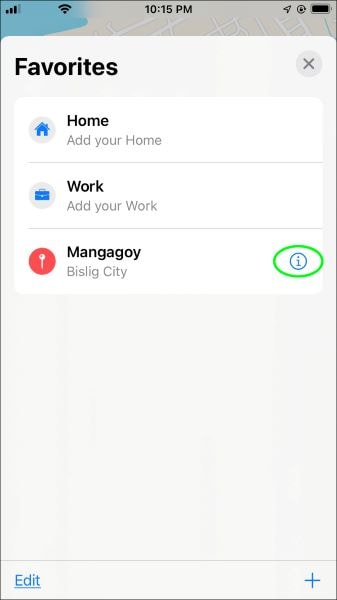
- Step1: Open the “Favorites” section in Apple maps and swipe it up.

- Step2: Tap on the “i” button available beside your home address.
- Step3: Here, you will find an option to open your Contact Card.
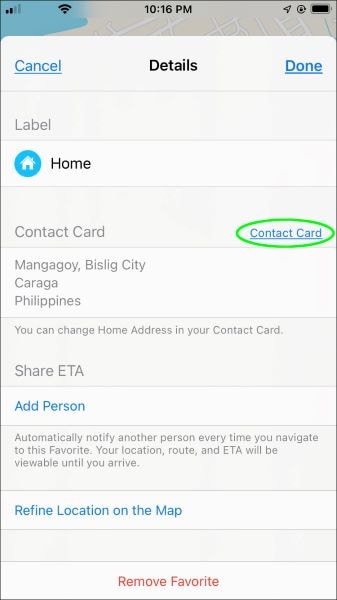
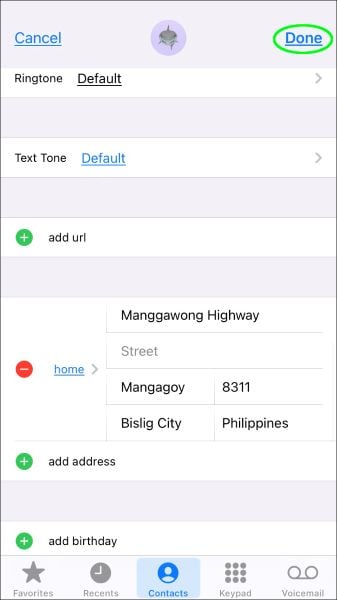
- Step4: Tap on the “Edit” option to add or remove your home address from the contact card.
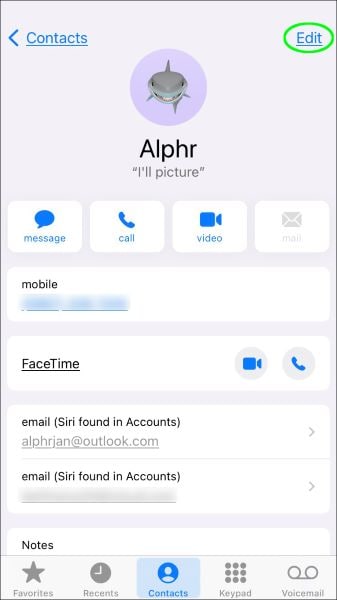

- Step5: Click on the “Done” button when you are done with the modification.
Part 3: Change iPhone Home Location by Modifying Apple ID Address
Are you moving to a new country or a new region? Do you want to update your new home location on your Apple iPhone 8? You can change your home location by modifying your Apple ID address. Following simple steps will help you to do it with a few clicks:
- Step1: Open the “Settings” of your Apple iPhone 8.
- Step2: Tap on the “iTunes and App Store”.
- Step3: After this, you need to tap on the “View Apple ID” option available on the screen.
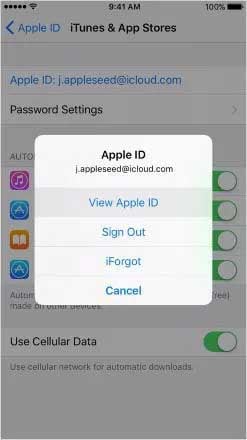
- Step4: Change your location by clicking on “Country/Region” in the “Accounts” section.
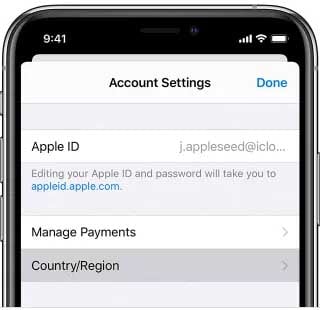
- Step5: Accept the terms and conditions before escaping the window.
Note: Make sure that all your Apple ID subscriptions are used and finished because changing the Appl ID address might make them unusable.
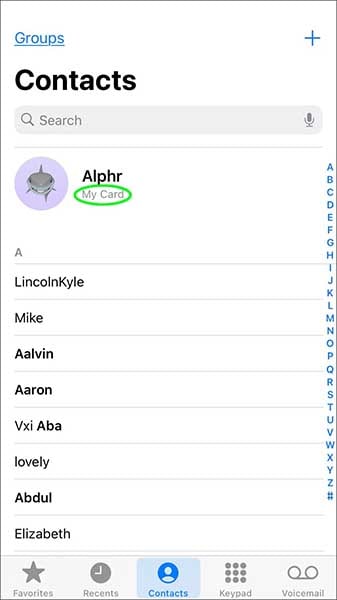
Part 4: Changing My Card to Change Home Address on iPhone
Alternatively, you can try to change “My Card” from your contact list to update your new address on your Apple iPhone 8. First, you need to follow the simple steps given below to change your home address in Apple on iPhone via contact cards:
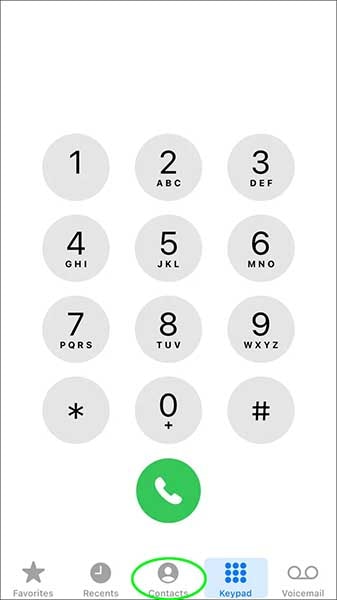
- Step1: Open the contacts in your Apple iPhone 8 and tap on “My Card” to edit your home address.
- Step2: You will find the “Edit” option at the top-right corner of the screen. Tap on it.

- Step3: You can easily add your new address here by clicking the “add address” option and deleting the old one.
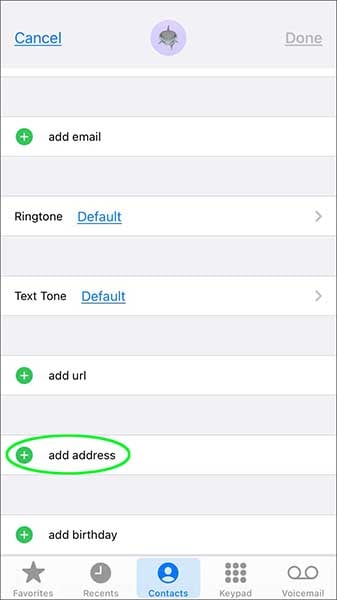
- Step4: Click on the “Done” tab after modifying the address.

Part 5: Spoof Location on iPhone to Change Home Address
Dr.Fone – Virtual Location is a fantastic application from one of the most trusted software companies – Wondershare. You can easily use Dr.Fone for simulating and teleporting the iPhone GPS location anywhere in the world with just one click. This location faker allows you to travel worldwide without even leaving your home.
Dr. Fone comes with the following benefits:
Dr.Fone - Virtual Location
1-Click Location Changer for both iOS and Android
- It works perfectly with all location-based apps, including Pokemon Go, Snapchat, Tinder, etc.
- Compatibility with iOS and Android without jailbreak.
- It is primarily known for its stability. Hence there is no risk of app crashes.
- Change or fake your location to travel worldwide in one click.
3981454 people have downloaded it
Here, we have mentioned some easy steps of location spoofing using Dr.Fone:
- Step 1: First, you need to install and launch Dr.Fone – Virtual Location on the computer. Then, select the “Virtual Location” module.

- Step 2: Connect your cell phone with your system and click on the “Get Started” option.

- Step 3: Now, you will see your current location on the screen. Activate the teleport mode by clicking on the first icon in the screen’s upper-right corner.

- Step 4: Enter the desired location on the search bar and click on the “Go” button.

- Step 5: The system will now show the entered location, and a pop-up will appear for the confirmation. Click on “Move Here”.

- Step 6: Now, your location is changed.
Note: You can go back to your default location by clicking on the “Reset Location” option.
Conclusion
Updating your home address on your Apple iPhone 8 can sometimes be tricky. Some people face issues while doing so. So, we have tried to summarize all the possible methods of changing home addresses in Google and Apple maps on iPhone. Dr.Fone is one of the best and most effective methods for either changing or spoofing location on an iPhone. We hope that you have got all the answers on how to change your home address on your Apple iPhone 8.
How to Enable, Disable, and Change Safari Location on Apple iPhone 8
It is quite a common experience where everyone would have gone through “Annoying pop-ups during your serious search’. It is a natural phenomenon but it becomes a distracting one at the time of emergency works.
Simone was surfing through job opportunities in the online job portal and the unrelated pop-ups direct her to different platform displaying false information. She was completely lost and frustrated. This situation occurs due to the sharing of your data with websites you log in. You can protect your private data like location, values entered in the website, time spent on each web page etc by modifying certain settings in the Apple iPhone 8 device’s privacy portfolio.
Explore the techniques in how to change safari location on the Apple iPhone 8.
Tips: Enhance your Apple iPhone 8 privacy with Dr.Fone - Virtual Location! Change your location to protect your privacy, and prevent your Apple iPhone 8 from being tracked. Get it now!
Part 1: How to enable/disable Safari Location on Apple iPhone 8
What is the need to enable or disable the Safari location on the Apple iPhone 8?
The concept is simple if you expose the location details on the cyber world you can find out all sorts of ‘Near me’ searches accurately. For example, if you are caught in a strange place and looking for any restaurants, then immediately you will make a search by just adding keywords like ‘ restaurants near me’. The results will direct you with the hotels closer to your current location. This type of search holds good for all facilities like hospitals, theatres, malls etc. By enabling the location settings you can make the search ease and precise.
The other side of exposing your location details on the internet space is that you are under threat by strangers. When you step into any websites, the built-in programs can sense your location data and flashes pop-ups related to your location. The pop-ups are not reliable mostly it contains false information. Thereby leading you into unwanted issues and therefore it would be a better practice to disable location details on Apple iPhone 8 to overcome further problems in future.
A stepwise guide to learn how to enable /disable Safari location on Apple iPhone 8
Step 1: Reach for the ‘Privacy’ options
Go to the ‘Settings’ in the home screen of your Apple iPhone 8 and proceed with the ‘Privacy’ option.

Step 2: Choose Safari to modify the settings
In the ‘Privacy’ window, you have to select ‘Location Services’ option and tap ‘Safari Websites’ from the list

Step 3: Alter the Safari location services
You have to tap the ‘Safari Websites’ option to select from the expanded list. If you want to enable/disable the location services in Safari websites then you have to choose ‘While using’ option. This feature enables location service of the Safari websites when it is active and the location service becomes inactive if the Safari is not in use.

Part 2: How to prevent Safari from asking for your location on Apple iPhone 8
Why do Apple iPhone 8 users want to stop the Safari from asking the location?
The foremost reason for many Apple iPhone 8 users is that they want to manage their privacy. They do not want to risk their privacy by sharing their location details with apps and Safari websites. It is a safe practice to step into the internet platform concealing your identity to avoid cybercrimes.
Follow the below steps to stop iOS Safari Location Services
Step 1: Reach the ‘Privacy’ screen
In your Apple iPhone 8, tap ‘Settings’ then select the ‘Privacy’ option.

Step 2: Modify the options in Location Services
In the ‘Privacy’ window, choose ‘Location Services’ and tap ‘Safari Websites’ from the displayed list.

Step 3: Stop the location services
In the pop-up screen, tick the ‘Never’ option to completely stop the ‘Location Services’ for Safari. This modification will prevent Safari from requesting to share the location details of the Apple iPhone 8 device.

Part 3: How to change Safari location on Apple iPhone 8
It would be great fun with your friends when you change the Safari Location on Apple iPhone 8. You can bring jealous amidst your colleagues by registering your location details at holiday spots. By changing the location details, you can skip from unwanted false advertisements related to your real location while surfing through the internet space for your needs.
Track the steps to bring changes in the Safari Location on Apple iPhone 8 below
Step 1: Go for an eminent program
Change the location details of your Apple iPhone 8 using the incredible software Dr.Fone. Download this app at its official web address ‘https://drfone.wondershare.com/virtual-location-changer.html ’ or click the Download button below directly. Install it on your computer by following the wizard carefully. Tap the icon to explore the functionalities on the home screen.
Step 2: Establish a Virtual location
In the home page of this program, select the ‘Virtual Location’ option. In the next screen, tap the ‘Get Started’ button to trigger the procedure.
Step 3: Quick look at the map view
The next window displays the current virtual location details of the Apple iPhone 8 device.
Step 4: Enter your favourite spot
Select the ‘Teleport mode’ in the map view. You can find this icon at the top right of the screen. Choose the first image from the horizontal list of symbols. Then enter your favourite spot worldwide in the text box near the ‘Go’ button. It is high time to press the ‘Go’ button and fix your admirable spots as your default device location.
Step 5: Authenticate the changes
The next map view shifts to the new location with a pop-up message ‘Move Here’. You must authenticate the changes by tapping this ‘Move here’ button.
Step 6: Check the default location
Open the current location in your Apple iPhone 8 and verify it displays your favourite spot.

Conclusion
Thus, concealing the location details of your device protects you from unwanted cyber issues. Instead of turning on and off the iOS Safari location services, you can straightaway modify it into a fake zone. This approach would greatly help when you install any apps or enter into websites at this online platform. You can make use of the cyberspace efficiently if you make such modification in your Apple iPhone 8. Choose Dr.Fone - Virtual Location to make desired changes in your default location of your Apple iPhone 8.
How to View GPX Files: Online and Offline Solutions Of Apple iPhone 8
Also known as GPS Exchange Format, GPX is one of the most resourceful file types that is used to store and import/export map-related data. Ideally, a lot of people use GPX files to access a particular route offline when they are off the grid. Though, there are times when users find it hard to view GPX on a map. Don’t worry, there are plenty of ways to view GPX online or offline. In this post, I will let you know how to view GPX in Google Maps and other resourceful desktop applications in detail.
Part 1: What Can you Do with GPX Files?
Before we discuss how to utilize a GPX view online or offline tool, let’s quickly consider how these files work. It stands for GPS Exchange format and stores map-related data in an XML format. Apart from XML, KML and KMZ are other common file formats to store GPX data.
From the exact coordinates of places to their routes, a GPX file would contain the following information:
- Coordinates: Also know as waypoints, a GPX file would contain details about longitude and latitude that are needed to be covered on the map.
- Routes: The main reason for using GPX files is that they store detailed routing information (the path that we need to take to reach from one point to another).
- Tracks: A track consists of various points that we are merged to form the route or the path.

Let’s suppose you have devised a route between two points that you would need later on. You can now export the GPX file from the application and even import it to the same or another application. When you use the GPX viewer, it will let you access the route offline without an active internet connection. That’s why GPX files are used to view a route offline while hiking, trekking, cycling, and do other offline activities.
Part 2: How to View GPX Files Online in Google Maps?
The good thing is that there are tons of options to view GPX online on desktop, Android, or iOS platforms. Some of these freely available solutions to view GPX on Map are Google Earth, Google Maps, Bing Maps, Garmin BaseCamp, GPX Viewer, and so on.
Out of them, Google Maps is one of the most used solutions to view GPX online on smartphones and desktops alike. As of now, you can import GPX files in the KML format or even load CSV files of exact coordinates on Google Maps. To learn how to view GPX in Google Maps, follow these steps:
Step 1: Go to Your Places in Google Maps
To view GPX on the map, you can first head to the official website of Google Maps on your computer. Now, just click on the hamburger (three-line) icon from the top-left corner to access its options.

This will display various options related to your Google Maps account. From here, you can just click on the “Your Places” feature.

Step 2: Choose to Create a New Map
As a dedicated section of “Your Places” would be launched, you can view all the saved places for your Google Maps account. Here, you can go to the “Maps” tab to view the existing saved route and spots. Since you have to view GPX in Google Maps, you can click on the “Create Map” option from the bottom to load a new map.

Step 3: Import and View the GPX File Online
This will make Google Maps load a new page that will let you create a fresh map as per your preferences. Here, you can just click on the “Import” button to load a browser window from where you can directly load a GPX file on Google Maps and make it available offline as well.

Part 3: How to View a GPX File Offline with Dr.Fone – Virtual Location?
Besides Google Maps, you can also take the assistance of Dr.Fone – Virtual Location to view GPX files on your computers offline. Since it is a desktop tool, it would let you load any GPX file without being connected to an active internet connection. Besides that, the application can also be used to spoof the location of your iOS device or simulate its movement in a route without jailbreaking it.
Therefore, if you want, you can first simulate the movement of your device and export the GPX file. Later, you can import the saved GPX file and simulate your Apple iPhone 8 movement in the same route without any trouble.
Step 1: Launch Dr.Fone – Virtual Location and connect your Apple iPhone 8
At first, you can just connect your Apple iPhone 8 using a working lightning cable and launch the Dr.Fone – Virtual Location application. Once your device is detected, just click on the “Get Started” and agree to its terms and conditions.
Step 2: Simulate the Movement of your Apple iPhone 8
The application would automatically detect your Apple iPhone 8 on the interface with its present location. To simulate its movement, you can click on the Multi-stop or One-stop Mode icons from the top.

You can now drop the pin in a route on the map and click on the “Move Here” Button to start simulating the movement.

Subsequently, you can select the number of times you want to cover the route and click on the “March” button. The application will even let you select a preferred speed for the movement.

Step 3: Export or Import the GPX Files
Once you have loaded the map on the interface, you can easily save it offline as a GPX file. To do that, just click on the Export icon from the floating menu on the side.

Similarly, you can also import a GPX file directly to the Dr.Fone application. To do this, you just have to click on the “Import” icon from the sidebar. This will open a browser window, letting you go to a location on your computer where the GPX file is saved.

Once the GPX file is loaded, you can simply wait for a while and let the application process it without closing it in between.

As you can see, it is pretty easy to view GPX online or offline using the right tools. In this post, I have included a detailed guide on how to view GPX in Google Maps. Besides that, I have also included another solution to view GPX on a map using Dr.Fone - Virtual Location (iOS). Apart from importing/exporting GPX files, the application can also be used to spoof your Apple iPhone 8’s location or simulate its movement virtually from anywhere you want.
Also read:
- [New] Gopro Face-By-Face Guide to Selectivity for 2024
- [New] Unveiling The Foremost Android Alternatives for PlayStation 2 Emulation
- [Updated] 2024 Approved Instant TV Viewing of Popular Facebook Feeds
- 5 Ways Change Your Home Address in Google/Apple Map on Apple iPhone 6/iPad | Dr.fone
- 5 Ways Change Your Home Address in Google/Apple Map on Apple iPhone XS Max/iPad | Dr.fone
- Addressing High CPU Consumption on Host Systems
- Does PokeGo++ still work on Apple iPhone 14 Plus/iPad? | Dr.fone
- Facing Issues with Your iPhone's Cellular Data? Discover 10 Remedies
- Generate Unique iPhone Alert Sounds at No Cost Using Easy-to-Use M4R Converter
- How to Fix the Apple iPhone 6 GPS not Working Issue | Dr.fone
- How to Mirror PC Screen to Vivo Y27s Phones? | Dr.fone
- Navigating the Giants of Online Communication - Facebook, Twitter, Instagram & YouTube
- Quick Steps to Change Weather Location on Apple iPhone 12 | Dr.fone
- Title: In 2024, 5 Ways Change Your Home Address in Google/Apple Map on Apple iPhone 8/iPad | Dr.fone
- Author: Isabella
- Created at : 2024-09-23 18:59:45
- Updated at : 2024-09-30 20:33:17
- Link: https://iphone-location.techidaily.com/in-2024-5-ways-change-your-home-address-in-googleapple-map-on-apple-iphone-8ipad-drfone-by-drfone-virtual-ios/
- License: This work is licensed under CC BY-NC-SA 4.0.