
In 2024, 5 Ways Change Your Home Address in Google/Apple Map on Apple iPhone SE/iPad | Dr.fone
5 Ways:Change Your Home Address in Google/Apple Map on Apple iPhone SE/iPad
Nothing feels more convenient than identifying the direction to your home with just a few clicks. Likewise, your Apple iPhone SE can take you home with just a few clicks on the address registered on the maps app. But what if your home address changes? How would you update your new address on your Apple iPhone SE? Read further to know the details about changing your home address on your Apple iPhone SE**!**
You can use dual maps apps on an iPhone, i.e., Google Maps and Apple Maps. Both the apps use the address registered on your contact card on your Apple iPhone SE. But the question arises of how to update the home address on iPhone. Although your phone can detect your location, it can’t set it as your home address on its own. In this article, we will discuss some of the most common ways of setting a home address on an iPhone. So, let’s get started!
You can watch the video below to change your location on Google/Apple Map
Part 1: How to Change Your Home Address in Google Maps on iPhone
You can easily set your home address in Google maps on your Apple iPhone SE. It helps easily get the correct directions to your destination from and to your home. But when you shift to a new place, you need to update your new home address on Google maps.
Follow the steps given below to know how to change your home address in Google maps on your Apple iPhone SE:
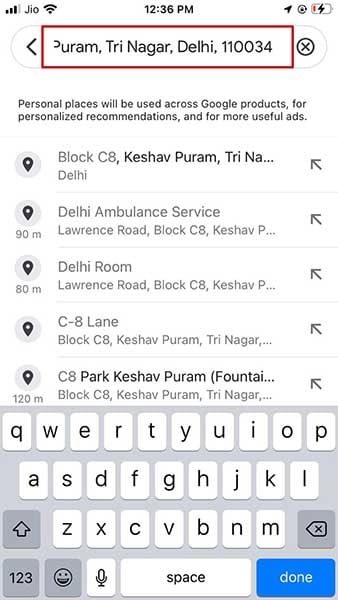
- Step1: Open Google Maps on your Apple iPhone SE and tap on the “Saved” icon at the bottom of the home screen.
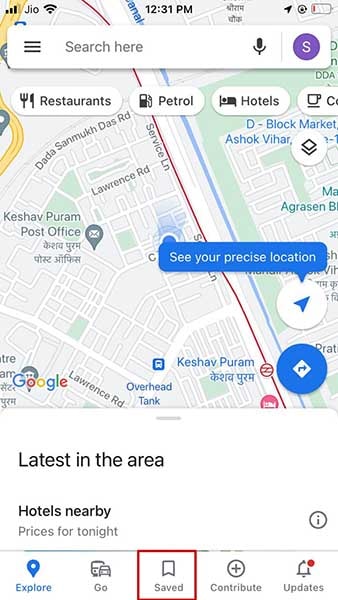
- Step2: Under this section, you will see another section named “Your Lists”.
- Step3: In this section, tap on the option named “Labelled”.
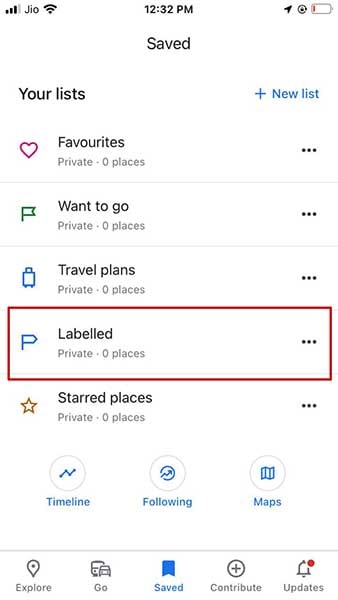
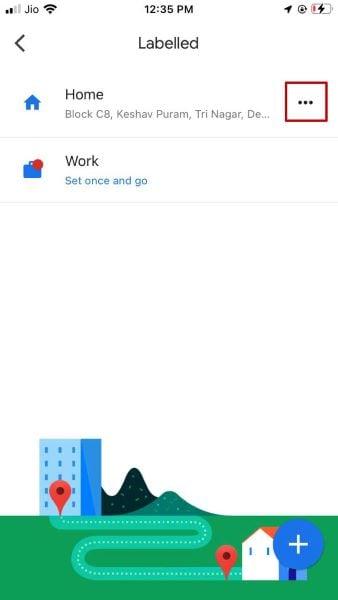
- Step4: The “Labelled” section shows the list of your labeled places such as home, office, etc.
- Step5: You will find the three dots next to each place. For example, tap on the one next to “Home”.
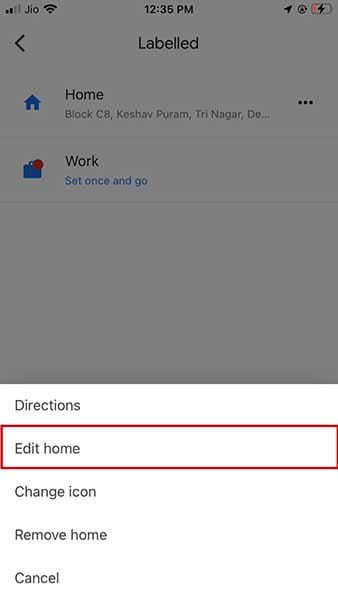
- Step6: When you click on these three dots, you will find different options. For example, select “Edit home”.
- Step7: A new screen will open. Here, you can remove your old address and type the new one. Else you can locate your current home address on the map.
- Step8: Click on the “Save” option available at the bottom of the screen to save your new address.
Part 2: How to Change Your Home Address in Apple Maps on iPhone
Unlike Google Maps, Apple Map doesn’t allow you to change the home address directly in the app, nor does it automatically detect your new home location. To update your home address, you need to change it in your contact card saved on your Apple iPhone SE.
Here’s how to update your home address in Apple Maps via contact card:
- Step1: Open the “Favorites” section in Apple maps and swipe it up.

- Step2: Tap on the “i” button available beside your home address.
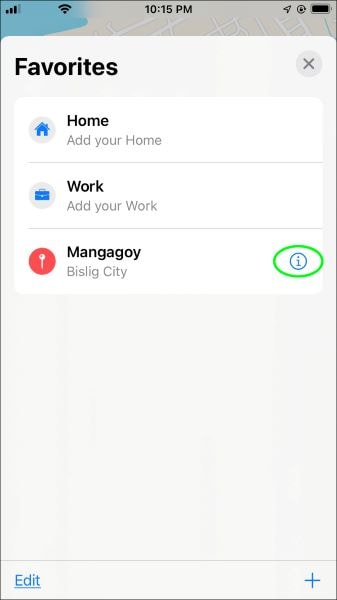
- Step3: Here, you will find an option to open your Contact Card.
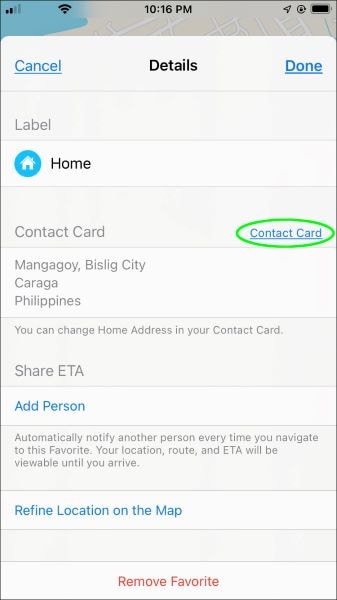
- Step4: Tap on the “Edit” option to add or remove your home address from the contact card.
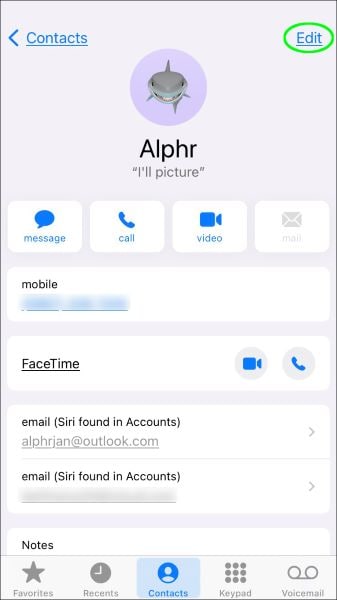

- Step5: Click on the “Done” button when you are done with the modification.
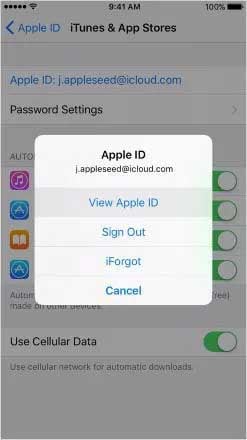
Part 3: Change iPhone Home Location by Modifying Apple ID Address
Are you moving to a new country or a new region? Do you want to update your new home location on your Apple iPhone SE? You can change your home location by modifying your Apple ID address. Following simple steps will help you to do it with a few clicks:
- Step1: Open the “Settings” of your Apple iPhone SE.
- Step2: Tap on the “iTunes and App Store”.
- Step3: After this, you need to tap on the “View Apple ID” option available on the screen.
- Step4: Change your location by clicking on “Country/Region” in the “Accounts” section.
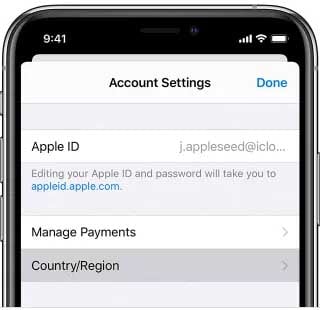
- Step5: Accept the terms and conditions before escaping the window.
Note: Make sure that all your Apple ID subscriptions are used and finished because changing the Appl ID address might make them unusable.
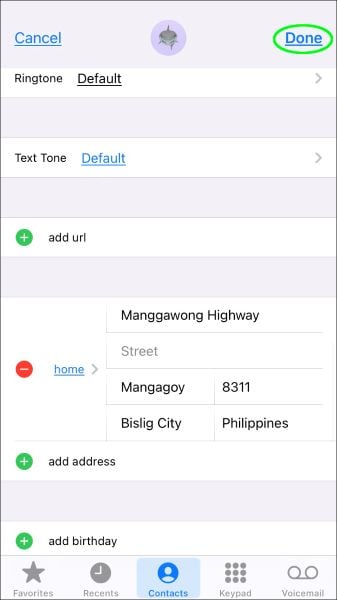
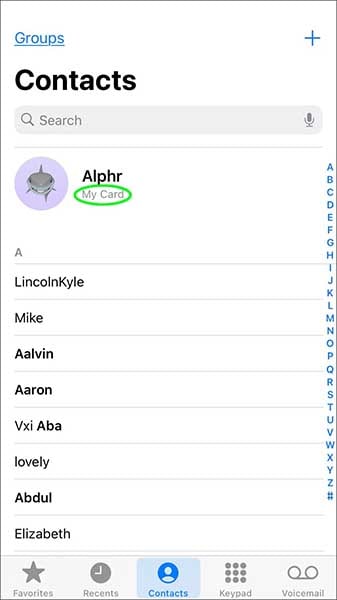
Part 4: Changing My Card to Change Home Address on iPhone
Alternatively, you can try to change “My Card” from your contact list to update your new address on your Apple iPhone SE. First, you need to follow the simple steps given below to change your home address in Apple on iPhone via contact cards:
- Step1: Open the contacts in your Apple iPhone SE and tap on “My Card” to edit your home address.
- Step2: You will find the “Edit” option at the top-right corner of the screen. Tap on it.

- Step3: You can easily add your new address here by clicking the “add address” option and deleting the old one.
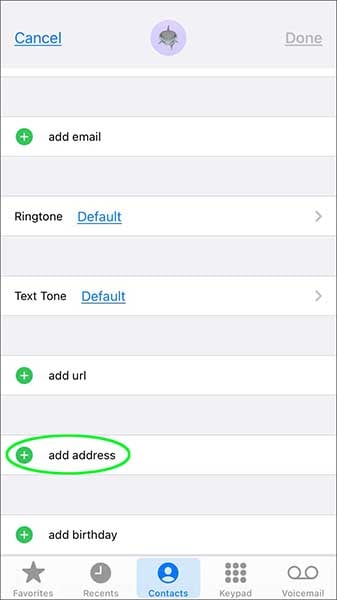
- Step4: Click on the “Done” tab after modifying the address.

Part 5: Spoof Location on iPhone to Change Home Address
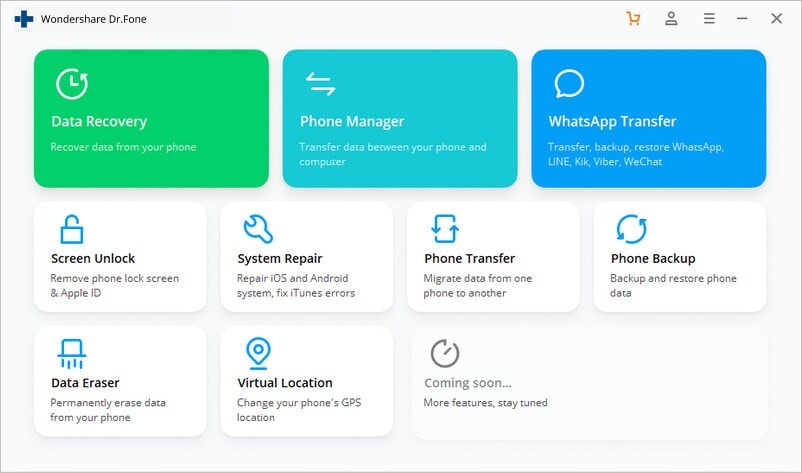
Dr.Fone – Virtual Location is a fantastic application from one of the most trusted software companies – Wondershare. You can easily use Dr.Fone for simulating and teleporting the iPhone GPS location anywhere in the world with just one click. This location faker allows you to travel worldwide without even leaving your home.
Dr. Fone comes with the following benefits:
Dr.Fone - Virtual Location
1-Click Location Changer for both iOS and Android
- It works perfectly with all location-based apps, including Pokemon Go, Snapchat, Tinder, etc.
- Compatibility with iOS and Android without jailbreak.
- It is primarily known for its stability. Hence there is no risk of app crashes.
- Change or fake your location to travel worldwide in one click.
3981454 people have downloaded it
Here, we have mentioned some easy steps of location spoofing using Dr.Fone:
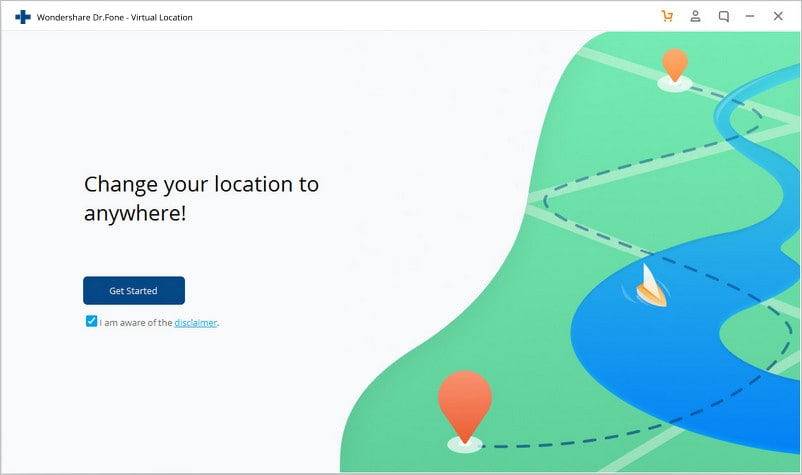
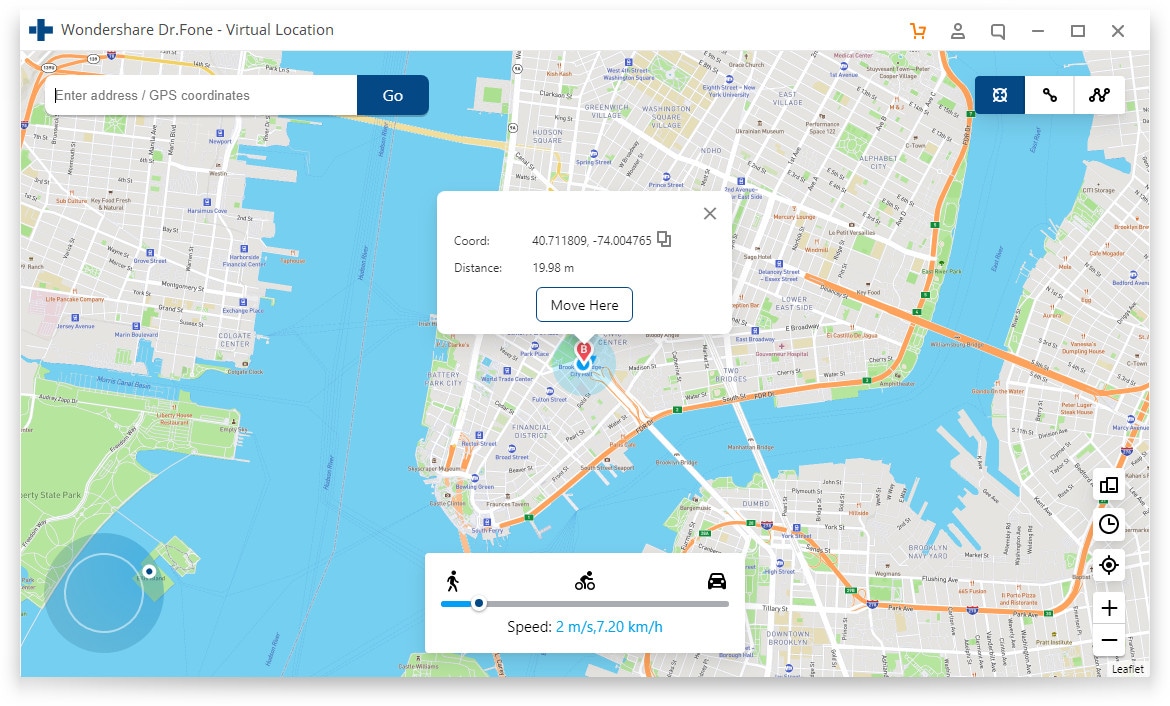
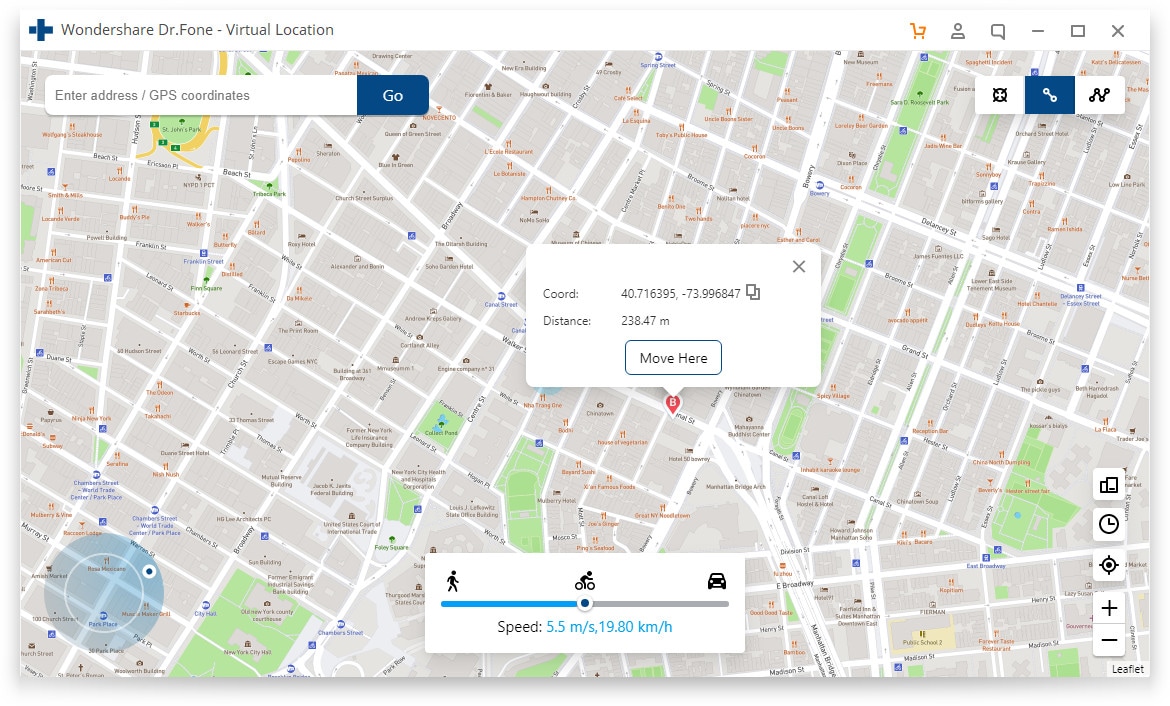
- Step 1: First, you need to install and launch Dr.Fone – Virtual Location on the computer. Then, select the “Virtual Location” module.

- Step 2: Connect your cell phone with your system and click on the “Get Started” option.

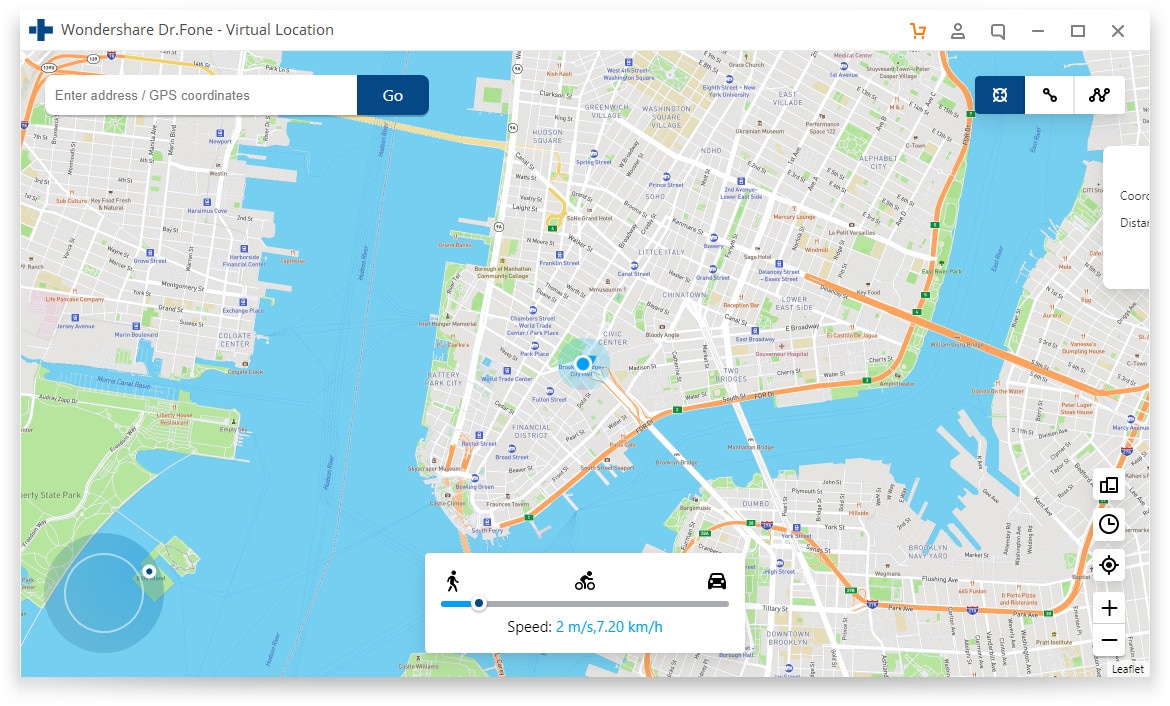
- Step 3: Now, you will see your current location on the screen. Activate the teleport mode by clicking on the first icon in the screen’s upper-right corner.

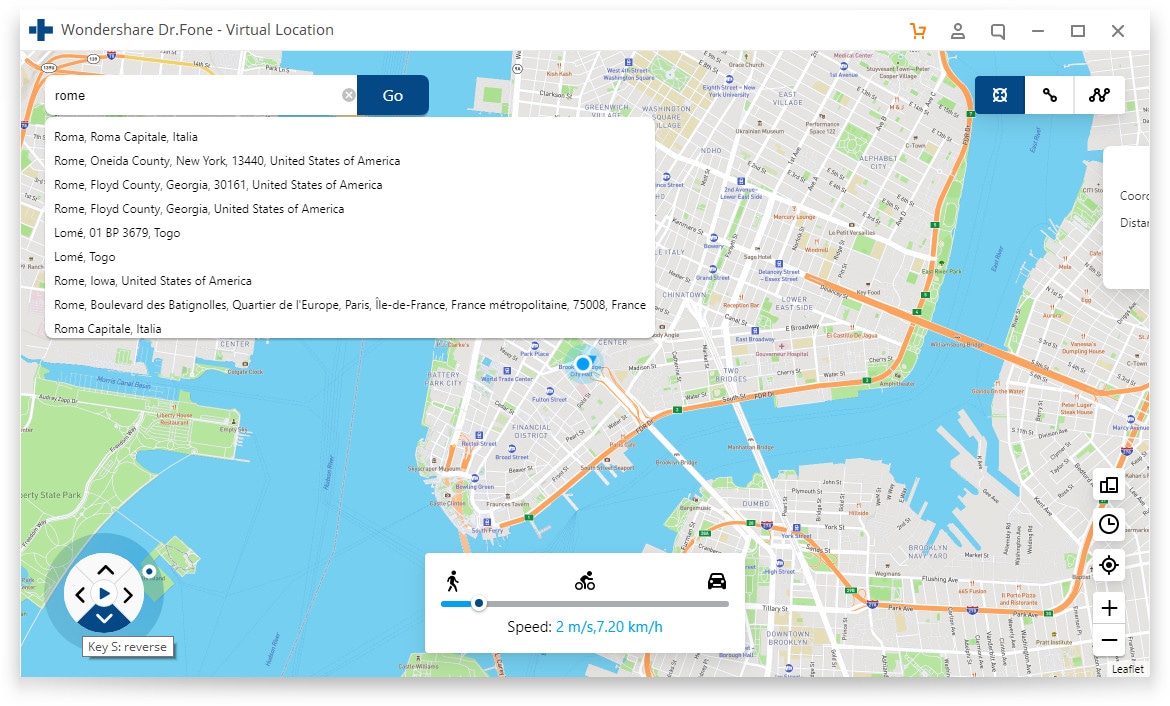
- Step 4: Enter the desired location on the search bar and click on the “Go” button.

- Step 5: The system will now show the entered location, and a pop-up will appear for the confirmation. Click on “Move Here”.

- Step 6: Now, your location is changed.
Note: You can go back to your default location by clicking on the “Reset Location” option.
Conclusion
Updating your home address on your Apple iPhone SE can sometimes be tricky. Some people face issues while doing so. So, we have tried to summarize all the possible methods of changing home addresses in Google and Apple maps on iPhone. Dr.Fone is one of the best and most effective methods for either changing or spoofing location on an iPhone. We hope that you have got all the answers on how to change your home address on your Apple iPhone SE.
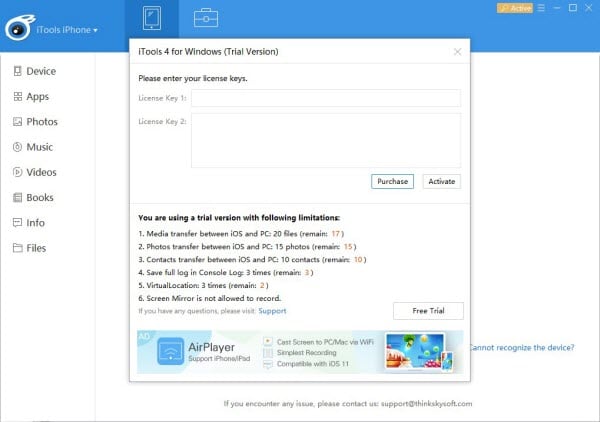
Does iTools virtual location not work On Apple iPhone SE/iPad?
You must know that iTools virtual location is used worldwide, and it has been reported that there have been many problems. This effective iTools virtual location is a geo-spoofing tool that is mainly for iOS. With this tool, you could easily mock the GPS location, and it also works in an effective manner to access geo-restricted content.
Part 1: Why does my itools not work on Apple iPhone SE/iPad?
There may be many reasons due to which the iTools virtual location does not work on Apple iPhone SE/iPad. You must know that iOS 14 is the massive iOS update, but it is the amazing new features that offer a completely new look to your iOS. But iTools not working on Apple iPhone SE/iPad could make it difficult for the user to use this tool.
With the introduction of the iTools virtual location, many people have been complaining about the issues they are facing using this tool. Some of the common issues are getting stuck in the developer mode, iTools not downloading, Map crash, iTools fail to work, location won’t move, image load failed, and much more. All these issues are making the use of iTools more difficult for the user to use.
Usually the reasons lie with bad internet, Wi-Fi or outdated version of the tool. Let us know in the following section how you can deal with various issues that lead to iTools not working on Apple iPhone SE/iPad.
Part 2: Ways to fix the iTools not work on Apple iPhone SE/iPad
iTools Virtual Location is the perfect tool that helps you to spoof location effectively. But there are many iTools not working problems that you may encounter in these tools some of them are like as mentioned below:
1. Stuck in developer mode
This problem is the most common issue that people mainly face with the iTools virtual Location. When you are stuck in the developer mode, you may notice that the application won’t initiate, and it also stops your navigation to the next step. This can be triggered if your iTools is not in the updated version. And hence, in order to resolve this problem, you may update the latest version of iTools on the official website.
2. iTools map not showing
Many of the people are also facing a problem like they cannot see the map while using a particular tool. This problem may be due to an unstable internet connection. Hence you must check with the internet connection to resolve the problem. Or you may also restart the tool and initiate the geo spoofing process.
There are also different ways or you can say some basic ways to go along with whenever iTools doesn’t work. You must know these basic tips when you stuck with such issue with your iOS 14. These are mentioned below:
Step 1: iTools download ios 14 must be of the latest iTools virtual location from the official website.
Step 2: Get a stable internet connection for running the geo spoofing.
Step 3: Restart the tool if you are stuck in any step or the application crash.
Step 4: Keep the tool updated for effective use.
The above mentioned are some of the steps you must follow to avoid any problem while using the iTools on Apple iPhone SE/iPad.
Part 3: Better alternative for iTools virtual location
Dr.Fone Virtual Location (iOS) is an effective and popular tool that could be easily used to change your GPS location to any place you want to change. With this popular tool, you could set any location anywhere in the world by creating a virtual location on iOS. It is the perfect tool that helps you to fake or spoof your location. The best thing about this software is that it is free and safe to use. And with its attractive features, you would love to browse and fake your Apple iPhone SE’s real-time location.
Key Features
Some of the key features of Dr.Fone – Virtual Location (iOS) that is making is popular all over the globe are mentioned below:
- It helps you to teleport iPhone GPS to anywhere in the world easily and quickly.
- It is the perfect solution to simulate GPS movement along real roads or paths you draw.
- With the help of the joystick, you could easily make the movement of the GPS freely.
- It is the best tool that supports five devices of location management that too in a perfect manner.
Step by Step Tutorial
If you want to know how to use the Dr.Fone – Virtual Location (iOS) to fake Location, then do not worry. Here you could get some of the simple tips to use Dr.Fone – Virtual Location (iOS) to fake your location using “Teleport” mode. With only three steps, you could easily change the GPS location on your Apple iPhone SE. The simple steps are mentioned below:
Step 1: Launch the program on your computer
The first step you need to do to use the program is to download and install it from the official website. You must click on the “Virtual Location” from all the options.
Now, have your phone connected to your computer. Then click on the “Get Started” option.
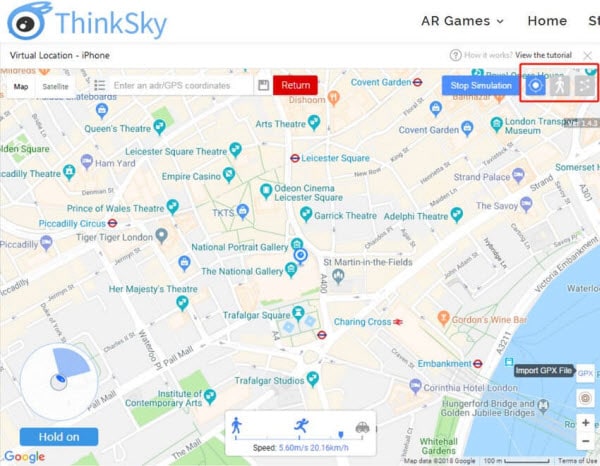
Step 2: Find your actual location on your map
In the second step, you need to find your actual location on your map in the new window. Check that the location is accurately displayed or not. If in case the location is not accurately displayed, then click the Centre On icon. You may find the Centre On icon in the lower right part to show the accurate location.
Step 3: Activate the teleport mode
Now, you need to activate the teleport mode by clicking the corresponding icon. You may find the corresponding icon in the upper right corner, and then you need to enter the place that you want to teleport in the upper left field and then click on the “Go” option.
Step 4: Click on the Move Here option
Now you may notice that the system would be able to understand your desired location. Hence click on the popup box of “Move Here.”
Step 5: The location will display on the program and app
In the last step, click the Centre On option. You will find that your location changes and is displaying on the program and app.
Conclusion
iTools ios 14 is designed as a powerful file management tool for all iPhones. Also, it is a greta choice to get your location spoofed on your Apple iPhone SE. But still, there are many virtual location issues that can break your comfort and lead you to disappointment. However, the problem can be effectively resolved with the help of Dr.Fone – Virtual Location (iOS) as it is the best alternative to iTools. Hence, use this perfect tool to resolve your iTools not work with ios 14 in the best possible manner.
How to Fix the Apple iPhone SE GPS not Working Issue
GPS (Global Positioning System) is an important utility in this modern age. After all, it tracks an individual’s or object’s live location, making route navigation easier. Henceforth, this feature is incorporated in all modern smartphones. However, most Apple iPhone SE users these days complain about the Apple iPhone SE GPS problem.
As a user with daily traveling, you want to avoid such issues. This article will make things easier because you will find ways and solutions to overcome this issue.
Part 1: What Happens If Your Apple iPhone SE GPS Does Not Work on Apple iPhone SE?
Apple iPhone SE is among the most popular gadget devices in current times. Meanwhile, its GPS function allows users to stay active on the real-time map technology. However, GPS not working on Apple iPhone SEs is a common problem. When this happens, you cannot track pinpoint locations.
This means you will find difficulty in locating your destination. Moreover, you will not be able to use those applications that rely on GPS technology. For example, a fitness app needs to track your distance and route. Not to forget, a malfunctioning GPS may also drain more battery.
Part 2: What Are the Potential Reasons for Apple iPhone SE GPS Not Working?
With GPS, you can track the live locations of your destination in seconds. In fact, you can also track any human depending on their live location. But as an iOS user, it’s normal to face Apple iPhone SE GPS not working. Why does this happen? Here are the following reasons behind this error:
- Glitches and Bugs: A most common reason for GPS not working is due to glitches and bugs. Hence, this may happen because of underlying iOS or GPS app issues. Either there was a bug in the version update, or the app is facing malfunctions.
- Airplane Mode: When airplane mode is enabled on your Apple iPhone SE, this may cause a GPS issue. You may have forgotten to turn off your airplane mode after air travel. Not to forget, turning off GPS is necessary during flight as per regulations.
- Incorrect Settings: It’s possible that GPS settings are not properly configured on your Apple iPhone SE. Like, you may have accidentally turned off location services. While using your Apple iPhone SE, turning on and off certain features is common.
- Hardware Issue: If your phone is exposed to water or physical damage, this may affect GPS. There may be a hardware issue caused due to this situation. Thus, the GPS antenna or chip may have been damaged.
Part 3: How To Fix Apple iPhone SE GPS Not Working?
Having an erroneous Apple iPhone SE GPS is not a new thing. But it does bring many inconveniences for the users. After all, you are deprived of live location tracking and positioning. To fix such Apple iPhone SE GPS not working issues, these ways are ideal solutions:
Way 1: Make Sure GPS Service is Enabled on Apple iPhone SE
A majority of people forget to turn on GPS services on their respective Apple iPhone SEs. Thus, most times, users don’t know how to turn on GPS back. Henceforth, GPS not working issues become evident. To enable GPS service on Apple iPhone SE, follow these steps:
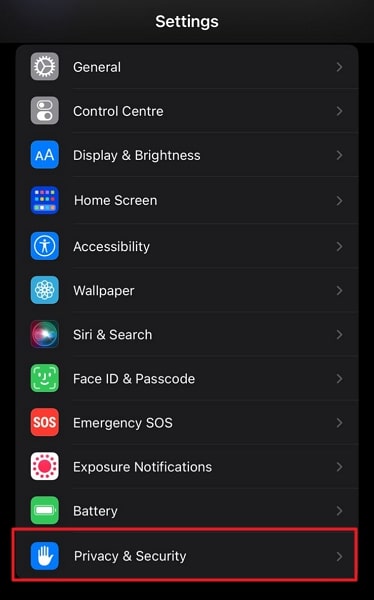
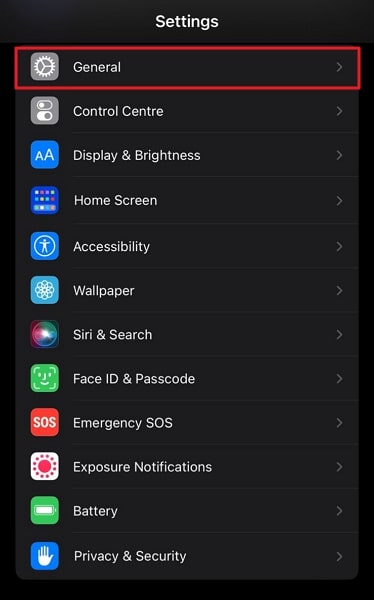
- Step 1: Launch your Apple iPhone SE Settings, scroll down, and find “Privacy & Security” from the menu.
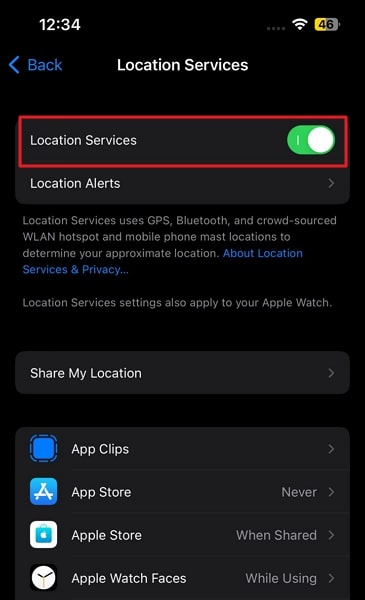
- Step 2: Press “Privacy & Security” and turn on “Location Services” to enable GPS. You can also enable location for other apps from the same settings.
Way 2: Simple Restart Apple iPhone SE
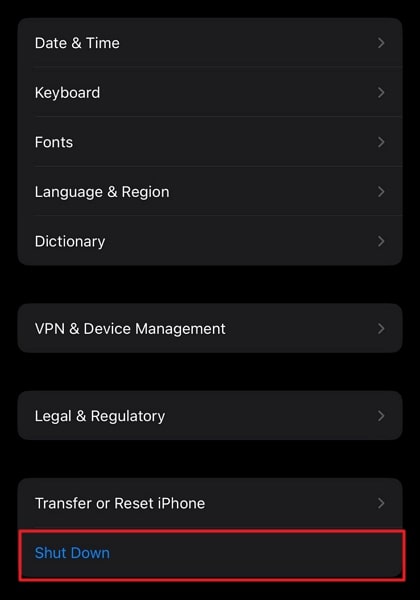
Restarting an Apple iPhone SE is the ultimate way to rectify underlying problems. Sometimes GPS is not working because of cache or network problems, and restarting Apple iPhone SE can help. For restarting an Apple iPhone SE, these steps will help you:
- Step 1: From the Apple iPhone SE settings, move into the “General” category, scroll down, and press “Shut Down.” Now slide right to power off your Apple iPhone SE.
- Step 2: Wait for some time till your device gets powered off. After this, hold the “Power” button until the Apple logo appears to restart your device.
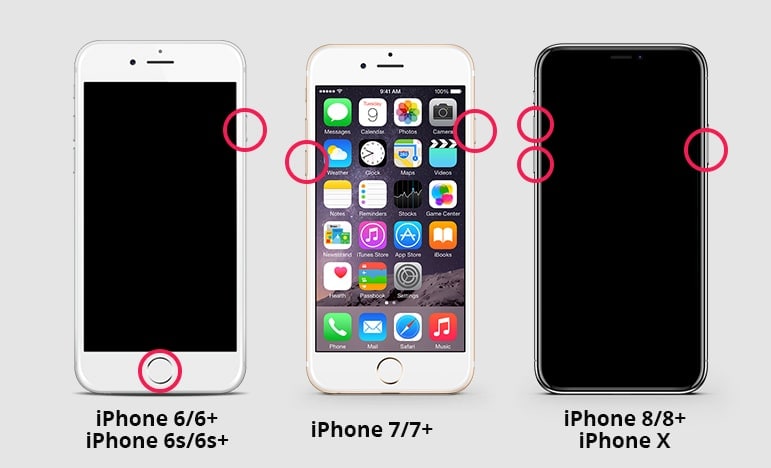
Way 3: Force Restart Apple iPhone SE
Sometimes your Apple iPhone SE may get hung up due to an underlying issue. So, when your device is not responding, you cannot restart it from settings. In this scenario, you need to force restart Apple iPhone SE. To do this, perform these simple instructions:
- Apple iPhone SE 6, 6S Plus, and Older: Simultaneously press and hold the “Home” and “Sleep/Wake” buttons. Make sure to keep holding both buttons until you see the Apple logo. Finally, release the buttons when the logo appears.
- Apple iPhone SE 7 or 7 Plus: Start by holding the “Sleep/Wake” button and “Volume Down” button at the same time. Afterward, stop holding the buttons and release them when you see the Apple logo.
- Apple iPhone SE 8 and Later: Initially, quickly press and release the “Volume Up” button, then perform the same with the “Volume Down” button. After this, press and hold the “Sleep/Wake” button, and release the button once the Apple logo appears.
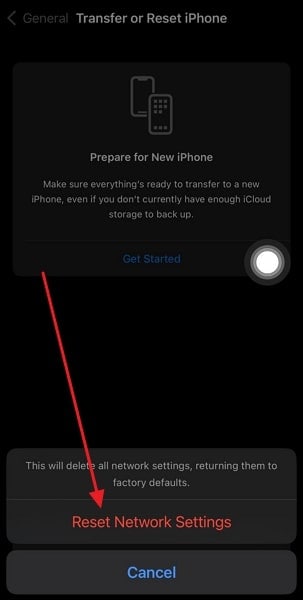
Way 4: Reset Network Settings
A network connection error is also the reason for Apple iPhone SE GPS not working. This happens when your Apple iPhone SE isn’t connected to a Wi-Fi network or facing problems in connection. For resetting the network settings, these steps are your trusted solution.
- Step 1: From your Apple iPhone SE, launch “Settings,” scroll down, and move into “General” from the settings menu.

- Step 2: Access the “Transfer or Reset Apple iPhone SE” options, tap the “Reset” option, and select “Reset Network Settings.” Now reset your Apple iPhone SE network settings to default by tapping “Reset Network Settings.”
Way 5: Reset Location and Privacy Settings
In most scenarios, your location is used on many apps that risk GPS optimal functioning. For this purpose, you need to reset the location to the default factory settings. Thinking about how to do it? Get along with these steps:
- Step 1: Move into the settings of your Apple iPhone SE, scroll down, and tap “General” from the available options.
- Step 2: Now press the “Transfer or Reset Apple iPhone SE” option from General. From the next screen, choose the “Reset” option, and select “Reset Location & Privacy.” After pressing “Reset Settings,” your device location settings will reset to default.

Way 6: Use Wondershare Dr.Fone to Fix Apple iPhone SE GPS Problems
Fixing persistent GPS problems on iOS is now easier with Wondershare Dr.Fone. This system repair tool has solutions to repair issues in over 50+ iOS systems. Interestingly, you can update or downgrade the iOS version without jailbreaking with Wondershare Dr.Fone.
So, if you have consistent problems with your Apple iPhone SE GPS system, this tool can rectify the iOS version. Moreover, you don’t need special expertise or knowledge to use Wondershare Dr.Fone to fix your Apple iPhone SE. Meanwhile, you enter or exit DFU/Recovery mode with a single click.
Dr.Fone - Virtual Location
1-Click Location Changer for both iOS and Android
- Teleport from one location to another across the world from the comfort of your home.
- With just a few selections on your computer, you can make members of your circle believe you’re anywhere you want.
- Stimulate and imitate movement and set the speed and stops you take along the way.
- Compatible with both iOS and Android systems.
- Work with location-based apps, like Pokemon Go , Snapchat , Instagram , Facebook , etc.
3981454 people have downloaded it
Key Features of Wondershare Dr.Fone
- Efficiently solves issues like black screen or white screen of death from Apple iPhone SE. So if you are facing such an issue, Wondershare Dr.Fone can help.
- In most scenarios, Wondershare Dr.Fone will repair your Apple iPhone SE without damaging or losing data. Meanwhile, the recovery will be completed in a few minutes.
- With Wondershare Dr.Fone, you can upgrade your iOS version to the latest beta version. This way, you can enjoy new features for free.
Step-by-Step Instructions for Wondershare Dr.Fone To Fix Apple iPhone SE GPS Problems
Wondershare Dr.Fone is the most reliable tool for fixing Apple iPhone SE GPS not working problems. Are you also looking to use this amazing platform? These straightforward instructions will help you move forward:
- Step 1: Connect Apple iPhone SE with Computer
Download and launch Wondershare Dr.Fone’s latest version on your computer. Next, select “System Repair” from the “Toolbox” tab and connect your Apple iPhone SE using a USB cable. Select your device type as Apple iPhone SE to proceed further.
- Step 2: Choose Desired Repair Mode
Here choose “iOS Repair,” and on the next screen, select the desired repair mode. Proceed with the “Standard Repair,” as it will not affect your data. Now follow the on-screen instructions to activate Recovery Mode.

- Step 3: Repair the GPS Issue
After recovery mode is enabled, the platform will automatically detect the Apple iPhone SE device and provide firmware accordingly. Press “Download” against the required firmware to start downloading it. Once the firmware is downloaded, click “Repair Now” to repair GPS not working issue on Apple iPhone SE.

Conclusion
GPS is an important feature to have in this modern world. After all, it keeps a person’s or object’s location active in live mapping technology. This way, tracking people in an emergency or finding destinations is easier. Meanwhile, the Apple iPhone SE GPS problem is a common issue in most devices. Thus, users have to face a lot of difficulties while navigating GPS locations.
Apparently, this article provides step-by-step procedures to solve Apple iPhone SE GPS issues in different ways. Among the different ways shared, Wondershare Dr.Fone is the most trusted solution for your device. So, if you don’t get reliable solutions from other ways, Wondershare Dr.Fone is available. If you want to explore further solutions, such as fake GPS location , Dr.Fone Virtual Location is also available now.
Also read:
- [New] 2024 Approved From Scripts to Subscribers Mastering the Production of Engaging Educational Videos for YouTube
- [New] Passport Self-Portrait Maker – Free Access to Top Quality Images
- [Updated] 2024 Approved Crafting Flawless Subtitles with Precision and Tips
- 7 Fixes to No GPS - Showing Approximate Location on Apple iPhone 13 mini Waze | Dr.fone
- Facebook Outlines What's Funny and Not
- Hide location on Apple iPhone 6 Plus and Android without others knowing | Dr.fone
- How to Change Your Location on Apple iPhone XS | Dr.fone
- How to View GPX Files Online and Offline Solutions Of Apple iPhone 11 | Dr.fone
- In 2024, 3 Smart and Simple Ways to Change Home Address on Apple iPhone 12 mini | Dr.fone
- In 2024, 4 Methods to Turn off Life 360 On Realme V30 without Anyone Knowing | Dr.fone
- In 2024, 6 Methods to Protect Yourself from Location Tracking on Apple iPhone 11 Pro Max | Dr.fone
- In 2024, How to Change Your Location on Apple iPhone XS Max | Dr.fone
- In 2024, Why Does iTools Virtual Location Not Work For Apple iPhone SE (2020)/iPad? Solved | Dr.fone
- Navigate Auto-Lock Settings in Windows
- TikTok Titans The Ultimate List of 30 Stellar Handle Ideas
- Undelete lost data from Infinix Smart 7 HD
- Understanding and Repairing Your System When S sleaY32.dll Can’t Be Located
- Title: In 2024, 5 Ways Change Your Home Address in Google/Apple Map on Apple iPhone SE/iPad | Dr.fone
- Author: Isabella
- Created at : 2024-09-24 23:08:25
- Updated at : 2024-09-30 19:33:12
- Link: https://iphone-location.techidaily.com/in-2024-5-ways-change-your-home-address-in-googleapple-map-on-apple-iphone-seipad-drfone-by-drfone-virtual-ios/
- License: This work is licensed under CC BY-NC-SA 4.0.