
In 2024, How to Change Your Location on Apple iPhone 12 | Dr.fone
How to Change Your Location on Apple iPhone 12
There are several situations when you might have to change the location on your Apple iPhone 12. Perhaps you are moving to another region, so you have to make changes with your Apple ID to get App Store access. Or it could be the case that you want to change your region to access a certain application. Whatever your reason is to change your location on the Apple iPhone 12, you have come to the right place. In this post, we have discussed everything you should know about to spoof location on Apple iPhone 12.
Tips: Experience the freedom to teleport anywhere with Dr.Fone - Virtual Location! The Fake GPS feature for Apple iPhone 12 allows you to break geo limitations and explore the world from your device. Try it now!
Part 1: Do you know how does these locations work?
While both terms may sound to you similar, there are certain differences between them. Your smartphone, be it iPhone, Apple iPhone 12 or Android is a GPS device. Almost every smartphone comes with a GPS chip. If your device’s location services are enabled, it will interact with the GPS satellites, enabling you and others as well to detect your location to a considerably accurate degree.
When your device connects to the internet, your internet service provider assigns an IP address to the Apple iPhone 12 device. The IP address is a collection of numbers that determine who the internet service provider is and where you’re connecting from. This location accuracy depends on how that specific provider assigns an IP address, but it’s probably to be somewhere between the city and the street you’re in. For instance, search engines and streaming services check where you are from (your IP address) for redirecting you to a local version of their service.
All we want to say here is that if you want to change the location, then you should know if the location is based on an IP address or GPS app. To help you get started with how to change location on Apple iPhone 12, below we have covered every scenario when you might need to do so.
Part 2: How to break the geo-limitation on downloading Apps?
Step 1: On your Apple iPhone 12, go to the App Store app.
Step 2: Click on the “Featured” tab.

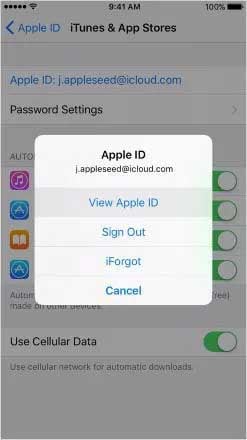
Step 3: Now, scroll down to locate your Apple id and tap on it.

Step 4: Choose “View Apple ID”. You might be asked to log in to your iTunes store.

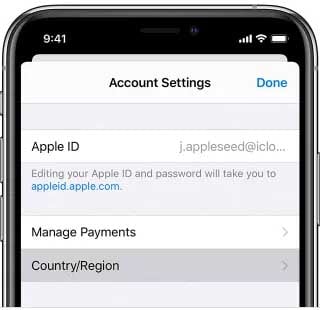
Step 5: After that, click “Change Country or Region”.

Step 6: Now, select the country or region you want to set. In this scenario, we have switched to the UK from the US. Then, click “Next’.

Step 7: Agree with Terms and Conditions and enter your billing info. If there is no credit info you have, then select “None”. If you select “None”, then ensure that you have entered a postcode that corresponds to the region that you have chosen.

Step 8: Finally, click “Done” and that’s it.
Your App store will be set to the selected region and you can now get the geo-restricted apps on your Apple iPhone 12. That’s how to change location on Apple iPhone 12 to get the apps that are not available in your region.
Part 3: How to fake GPS on Pokemon Go on Apple iPhone 12?
Faking your location might even come into the picture while using location-based apps such as Pokemon Go on Apple iPhone 12. If you don’t want to travel many miles away from the comfort of your home to pick up a Pokemon, then you could simply trick your device into making Pokemon Go think that you’re somewhere you’re not.
To fake GPS on the Pokemon Go Apple iPhone 12, we recommend you use Dr.Fone - Virtual Location (iOS) . With this program, teleporting your Apple iPhone 12 GPS location to anywhere worldwide is just one click away. It creates a virtual GPS location so that location-based apps on your Apple iPhone 12 think that you are there where you’re not. The best thing about it is that it helps to do the job with 100% safety.
To learn how to trick Pokemon Go or any location-based app on Apple iPhone 12, get the Dr.Fone - Virtual Location on your computer and follow the below steps:
Step 1: Run Dr.Fone - Virtual Location on your computer and connect your Apple iPhone 12 to the computer with the help of a digital cable. From the main interface, select “Virtual Location”.

Step 2: Click “Get Started”. Select “Teleport” mode located at the top right side and it is the first one. Now, you can use the search function to change the location. Once selecting the location, click on “Go”.

Step 3: You have changed the location successfully. And you will be now able to see your new location as a current location on your Apple iPhone 12.

This will trick your Pokemon Go in believing that you’re somewhere you’re not. That’s how to fake GPS Apple iPhone 12 Pokemon Go. Get ready to enjoy the game from the comfort of your home.
Part 4: How to reset location on social Apps on Apple iPhone 12?
What about social apps such as WhatsApp and Facebook? Well, you can manually set the location on social apps. There are several situations when you want to fake your location on social apps. There’s no doubt that if there are two social platforms that have gained huge popularity on the market, then they are WhatsApp and Facebook. So, below we are going to focus on these social apps.
Below is how to reset the location on WhatsApp on Apple iPhone 12:
Firstly, you need to turn on GPS location services. To turn it on, go to ‘” Settings”>” Privacy” and select “Location Services” and turn it on. Ensure that WhatsApp is accessing your GPS location. Now, open WhatsApp and choose the conversion to whom you want to send your fake location:
Step 1: Click on the bottom left button (the plus icon). Choose the “Location” option.

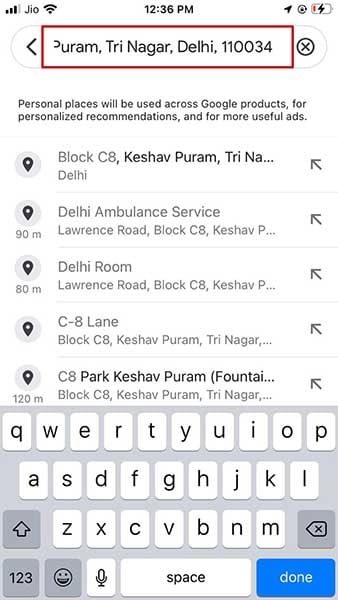
Step 2: To send a fake location, use the search box to enter the new location and select the desired location that search results show.

That’s how you can manually set the location on WhatsApp on the Apple iPhone 12. If you don’t want to share your live location, then you can simply fake the location.
Below is how to reset the location on Facebook on the Apple iPhone 12:
You can manually change your Facebook check-in location on the Apple iPhone 12. It comes quite in handy when you want to let others you’re somewhere you’re not.
Step 1: Open your Facebook app on the Apple iPhone 12 and move to the post for which you want to manually set the location.
Step 2:Tap the three-dot icon and choose “Edit Post”.
Step 3: Click the “Location” icon at the bottom and then click the “Check-in” icon.
Step 4: Look for and choose a new location.
Step 5: Finally, click “Save” and that’s it.
That’s how to spoof location on Apple iPhone 12 for social media apps.
Part 5: How to use VPN to fake the location?
As your IP is considered as a digital footprint, a VPN enables you to mask your real IP and conceal your identity. It means that absolute online privacy as well as anonymity. VPN connects you to a server of your preference, which enables you to bypass all geo-restrictions for the desired content access. To simply put, a VPN helps you to unblock streaming services such as Amazon Prime, Netflix, etc outside your country and content access worldwide.
There are so many options available for VPN out there, so choosing the ideal one is a bit challenging. However, you can pick any popular options that support platform - Apple iPhone 12. You can get ExpressVPN, IPVanish or NordVPN to fake the location on your Apple iPhone 12.
Here’s a quick guide on how to use VPN to fake or change location on the Apple iPhone 12:
(We have taken NordVPN as an example)
Step 1: Register with NordVPN by going to its official website.
Step 2: Get the NordVPN app on your Apple iPhone 12.

Step 3: Run the app and sign-in with your login details.
Step 4: Click on Quick Connect and give permissions the app asked to connect to the VPN. In a while, you’ll view a map that shows various servers worldwide.
Step 5: To change location, select the ‘Map /List” view - you can click on the country or region you want to set. For instance, swipe across the map until you see the UK. Then, you need to click on the server icon in the mid of that region to connect to the UK region.

That’s it. Now, you will be available to access the content that is available in that region.
FAQs You May Want to Know
1. How do I change weather location on Apple iPhone 12 ?
If you have changed your location or the app misperceives your location, follow these steps and get accurate weather updates:
Instructions: Go to your iDevice’s weather widget and long-press to choose the “Edit Weather” option. Now, tap “My Location” to check your current location. If it’s wrong and you want to change it, type and select the exact one in the “Search” bar. This way, your weather location will be changed on the weather app on your Apple iPhone 12.
2. Will changing my location affect my device’s warranty or performance?
The device’s warranty generally depends on the product and has nothing to do with moving locations. Yet it’s advisable to check the terms and conditions of the warranty. You can check if those conditions cover your device regardless of location. In short, changing location will not affect your phone, but you should note its local regulations.
3. Is there a risk of my account being banned in certain apps or games if I change my location?
Yes, you might encounter issues in certain apps if you change location on your Apple iPhone 12. This is because some apps have terms that prohibit falsifying locations. If they observe a rapid change in location due to VPN, it could lead to a ban to maintain fair play. To avoid this issue, always use a legitimate means of updating locations and be familiar with other terms.
4. How do I change my location back to my real one?
If you have faked your location on your Apple iPhone 12 for certain games and applications, check the settings of your location spoofer. Within the app settings, you can revert to your actual location. Apart from that, if you are using a VPN to change location, disconnect from it. Upon turning it off, your device will return to the real location.
The Bottom Line
In this guide, you have learned how to change location on the Apple iPhone 12 in different scenarios. Changing or faking a location on an Apple iPhone 12 is easy when you know the right way to do so. We hope that our guide has helped you to spoof GPS location on your Apple iPhone 12. When it comes to tricking location-based apps such as Pokemon Go, Dr.Fone - Virtual Location (iOS) comes in handy. So, give a try it now for free.
5 Ways:Change Your Home Address in Google/Apple Map on Apple iPhone 12/iPad
Nothing feels more convenient than identifying the direction to your home with just a few clicks. Likewise, your Apple iPhone 12 can take you home with just a few clicks on the address registered on the maps app. But what if your home address changes? How would you update your new address on your Apple iPhone 12? Read further to know the details about changing your home address on your Apple iPhone 12**!**
You can use dual maps apps on an iPhone, i.e., Google Maps and Apple Maps. Both the apps use the address registered on your contact card on your Apple iPhone 12. But the question arises of how to update the home address on iPhone. Although your phone can detect your location, it can’t set it as your home address on its own. In this article, we will discuss some of the most common ways of setting a home address on an iPhone. So, let’s get started!
You can watch the video below to change your location on Google/Apple Map
Part 1: How to Change Your Home Address in Google Maps on iPhone
You can easily set your home address in Google maps on your Apple iPhone 12. It helps easily get the correct directions to your destination from and to your home. But when you shift to a new place, you need to update your new home address on Google maps.
Follow the steps given below to know how to change your home address in Google maps on your Apple iPhone 12:
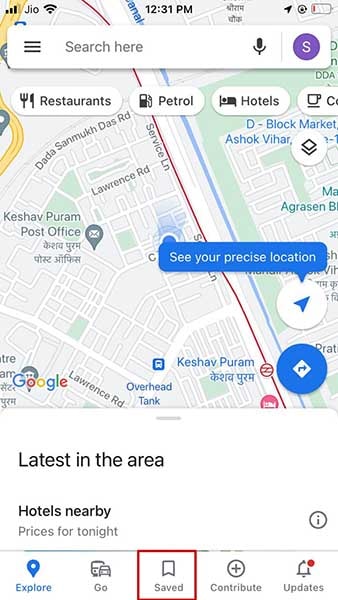
- Step1: Open Google Maps on your Apple iPhone 12 and tap on the “Saved” icon at the bottom of the home screen.
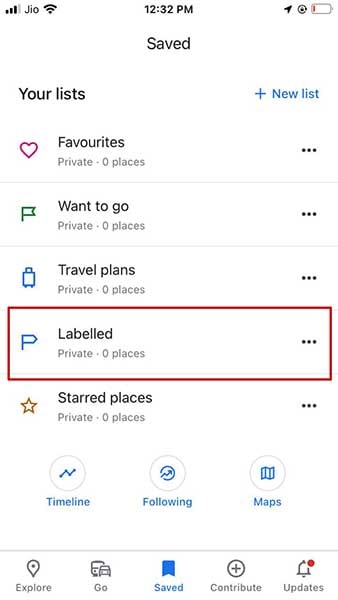
- Step2: Under this section, you will see another section named “Your Lists”.
- Step3: In this section, tap on the option named “Labelled”.
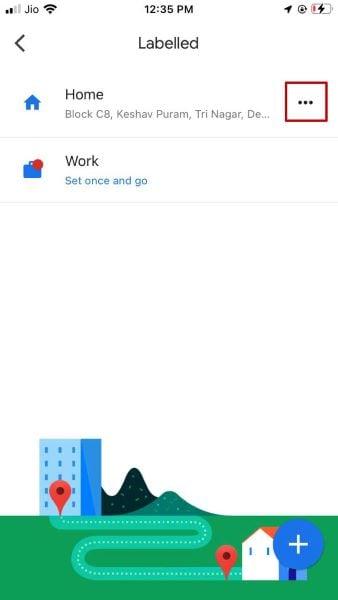
- Step4: The “Labelled” section shows the list of your labeled places such as home, office, etc.
- Step5: You will find the three dots next to each place. For example, tap on the one next to “Home”.
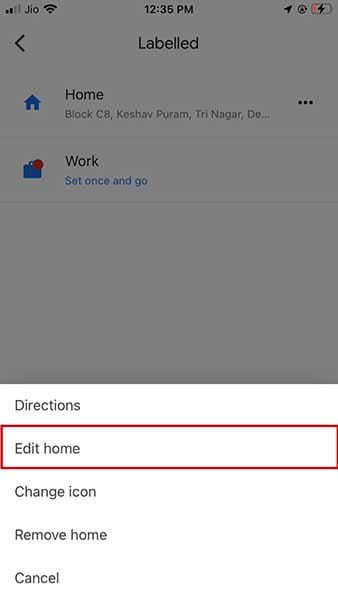
- Step6: When you click on these three dots, you will find different options. For example, select “Edit home”.
- Step7: A new screen will open. Here, you can remove your old address and type the new one. Else you can locate your current home address on the map.
- Step8: Click on the “Save” option available at the bottom of the screen to save your new address.
Part 2: How to Change Your Home Address in Apple Maps on iPhone
Unlike Google Maps, Apple Map doesn’t allow you to change the home address directly in the app, nor does it automatically detect your new home location. To update your home address, you need to change it in your contact card saved on your Apple iPhone 12.
Here’s how to update your home address in Apple Maps via contact card:
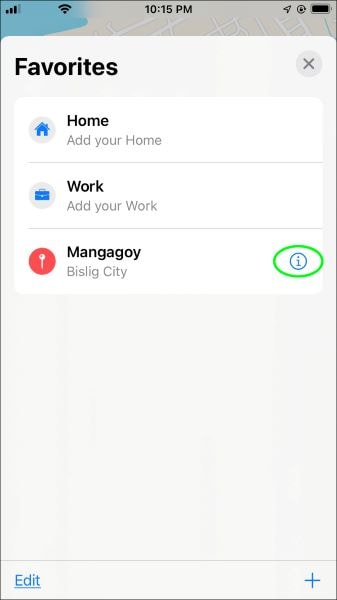
- Step1: Open the “Favorites” section in Apple maps and swipe it up.

- Step2: Tap on the “i” button available beside your home address.
- Step3: Here, you will find an option to open your Contact Card.
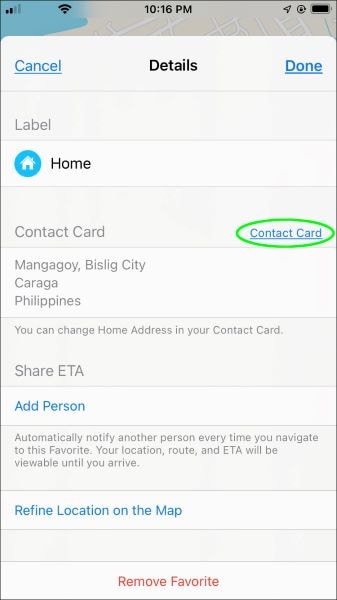
- Step4: Tap on the “Edit” option to add or remove your home address from the contact card.
- Step5: Click on the “Done” button when you are done with the modification.
Part 3: Change iPhone Home Location by Modifying Apple ID Address
Are you moving to a new country or a new region? Do you want to update your new home location on your Apple iPhone 12? You can change your home location by modifying your Apple ID address. Following simple steps will help you to do it with a few clicks:
- Step1: Open the “Settings” of your Apple iPhone 12.
- Step2: Tap on the “iTunes and App Store”.
- Step3: After this, you need to tap on the “View Apple ID” option available on the screen.
- Step4: Change your location by clicking on “Country/Region” in the “Accounts” section.
- Step5: Accept the terms and conditions before escaping the window.
Note: Make sure that all your Apple ID subscriptions are used and finished because changing the Appl ID address might make them unusable.
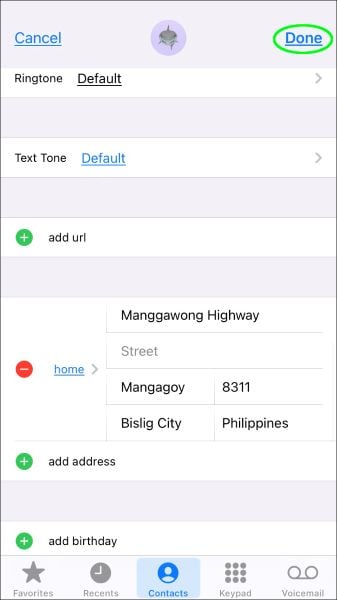
Part 4: Changing My Card to Change Home Address on iPhone
Alternatively, you can try to change “My Card” from your contact list to update your new address on your Apple iPhone 12. First, you need to follow the simple steps given below to change your home address in Apple on iPhone via contact cards:
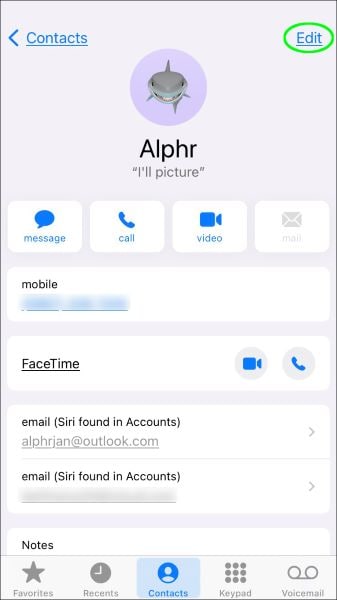
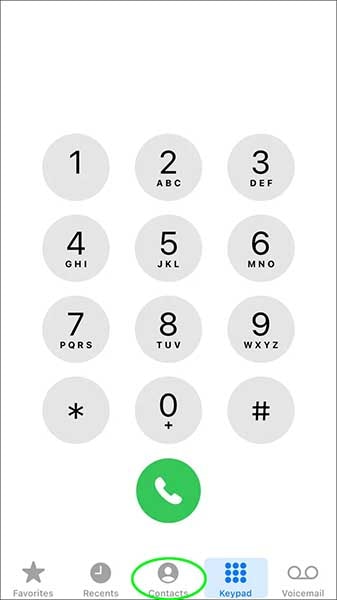
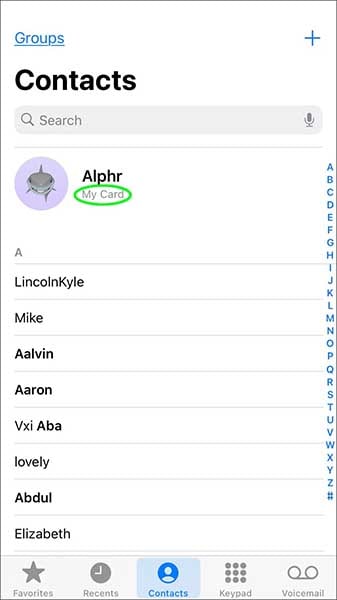
- Step1: Open the contacts in your Apple iPhone 12 and tap on “My Card” to edit your home address.
- Step2: You will find the “Edit” option at the top-right corner of the screen. Tap on it.

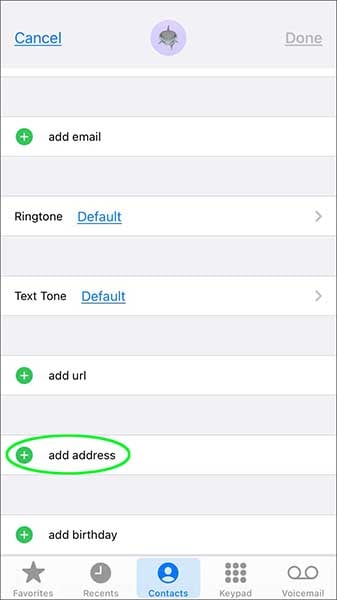
- Step3: You can easily add your new address here by clicking the “add address” option and deleting the old one.
- Step4: Click on the “Done” tab after modifying the address.

Part 5: Spoof Location on iPhone to Change Home Address
Dr.Fone – Virtual Location is a fantastic application from one of the most trusted software companies – Wondershare. You can easily use Dr.Fone for simulating and teleporting the iPhone GPS location anywhere in the world with just one click. This location faker allows you to travel worldwide without even leaving your home.
Dr. Fone comes with the following benefits:
Dr.Fone - Virtual Location
1-Click Location Changer for both iOS and Android
- It works perfectly with all location-based apps, including Pokemon Go, Snapchat, Tinder, etc.
- Compatibility with iOS and Android without jailbreak.
- It is primarily known for its stability. Hence there is no risk of app crashes.
- Change or fake your location to travel worldwide in one click.
3981454 people have downloaded it
Here, we have mentioned some easy steps of location spoofing using Dr.Fone:
- Step 1: First, you need to install and launch Dr.Fone – Virtual Location on the computer. Then, select the “Virtual Location” module.
- Step 2: Connect your cell phone with your system and click on the “Get Started” option.

- Step 3: Now, you will see your current location on the screen. Activate the teleport mode by clicking on the first icon in the screen’s upper-right corner.

- Step 4: Enter the desired location on the search bar and click on the “Go” button.
- Step 5: The system will now show the entered location, and a pop-up will appear for the confirmation. Click on “Move Here”.

- Step 6: Now, your location is changed.
Note: You can go back to your default location by clicking on the “Reset Location” option.
Conclusion
Updating your home address on your Apple iPhone 12 can sometimes be tricky. Some people face issues while doing so. So, we have tried to summarize all the possible methods of changing home addresses in Google and Apple maps on iPhone. Dr.Fone is one of the best and most effective methods for either changing or spoofing location on an iPhone. We hope that you have got all the answers on how to change your home address on your Apple iPhone 12.
Hide location on Apple iPhone 12 and Android without others knowing
There’s no denying that Apple iPhone 12’s location services offer a whole new level of convenience. How so? Well, let’s start with the basics. First, you can get real-time updates on traffic situations and weather conditions around your neighborhood. Another thing, the GPS-based apps you commonly use for food delivery and online shopping will work better on your end. Lastly, location services can help you find your device if you ever lose it somewhere. That’s why you should consider activating this feature on your Apple iPhone 12 and take advantage of its benefits.
It’s true to say that location services on Apple iPhone 12s do more good than harm. But at some point, we cannot simply brush off the latter and dismiss its possibility. A number of things could happen in the blink of an eye as soon as we provide our personal information to anyone or anything. Hence, it’s highly recommended to take extra caution when toggling on the location services on your Apple iPhone 12. Don’t worry. For more stringent security, there are many tutorials online on how to hide location on Apple iPhone 12. One of them can certainly help you protect Your Apple iPhone 12 privacy at all costs.
In this article, we will talk about the reasons why you should conceal your location on your Apple iPhone 12. We will also provide some methods on how to hide your location on your Apple iPhone 12. Continue reading below to learn more.
Part 1. Is it Necessary to Hide Your Location on Your Apple iPhone 12?
First and foremost, most of the apps and services we use today rely heavily on location services. One of which is the Maps app. If we decide to deactivate the location settings on our Apple iPhone 12, Maps cannot provide us with accurate directions. The same thing goes for ride-hailing applications. We cannot book a ride if our Apple iPhone 12s fail to detect our current location. Simply put, location services are very essential nowadays. Shutting it down will certainly affect our overall mobile experience. That’s why you should think twice before you consider cutting off the location services on your Apple iPhone 12. If you’re worried about your privacy, maybe you can just hide your real location and nominate a different one. Is it possible? Of course, it is.

It’s no secret that online crimes are now rampant everywhere. Anyone who has internet access can become the next victim. That’s why you should remain vigilant every time you connect to the internet and surf the web. Don’t surrender confidential information unless the transaction is verified and legitimate. As for your location details, try to recalibrate the settings and hide it from public access? How do you stop sharing location on Apple iPhone 12? Well, there are many ways to do it. Just choose the best method that works perfectly for your current needs and situation.
Once again, it’s hard to say that turning off the location services on your Apple iPhone 12 is a must. We need to consider numerous things before we do that. But in a way, concealing our location information can be of great help to somehow protect us from cyber fraud. Do you want to try it now? Find the tutorials below on how to hide location on Apple iPhone 12. One of them can assist you in this regard.
Part 2. How to Hide Location on Apple iPhone 12?
The truth is that it’s only you who can tell whether or not to hide your location on your Apple iPhone 12. The discussions provided above serve only as a guide to help you arrive at a wise decision. If you decide to prioritize your privacy and hide your location, take note that there are many ways to do it. Check out the tutorials below on how to hide your location on your Apple iPhone 12.
Method 1: Deactivate location services on your Apple iPhone 12
How do you stop sharing location on Apple iPhone 12? Well, the easiest way is to turn off the location services. Once applied, access to your location information will be immediately restricted across your mobile device. Do you want to try it now? Check out the guide provided below on how to hide location on Apple iPhone 12 by deactivating the location services.
- Step 1: Go to Settings.
- Step 2: Click Privacy & Security.

- Step 3: Click Location Services.

- Step 4: Toggle off the radio button next to Location Services.

Method 2: Turn on Airplane Mode
For Apple iPhone 12 and other iOS devices, you can instantly deactivate location sharing by putting your device in Airplane Mode. You may opt for this method if you’re planning to turn off the location services for just a little while. However, it’s not recommended for long-term use because Airplane Mode also shuts down access to mobile data and Wi-Fi. Do you want to try it now? Here’s the tutorial on how to hide location on your Apple iPhone 12 by activating Airplane Mode.
- Step 1: Go to Settings.
- Step 2: Toggle on the radio button next to Airplane Mode. If you wish to turn it off again, simply click the same button or bring out the Control Center and click the Airplane icon.

Method 3: Toggle off the Share My Location feature on the Find My Friends app
Find My Friends is a useful iOS application to help you monitor the whereabouts of your friends and relatives. In return, they can also view your location information from their end. Oftentimes, it does not cause any problems. But still, we don’t know what’s waiting ahead of us. Data breaches may happen and compromise our personal data. Therefore, it’s best to cut off location services on the Find My Friends app if you don’t need it. Here’s how to hide your location on your Apple iPhone 12 with the aid of this method.
- Step 1: Launch the Settings app on your Apple iPhone 12.
- Step 2: Find and click Privacy & Security.
- Step 3: Click Location Services.
- Step 4: Click Share My Location.

- Step 5: Toggle off the radio button next to Share My Location.

Method 4: Switch off Significant Location settings
In a specific way, the Apple iPhone 12 is capable of remembering certain places that are quite significant to you. It’s often the locations that are frequently detected by the Apple iPhone 12 device. Although it’s quite helpful to some users, you may opt to deactivate it if you’re uncomfortable sharing your location. Don’t worry. It only takes a few minutes to complete. Here’s a short guide on how to hide your location on your Apple iPhone 12 by turning off Significant Location.
- Step 1: Go to Settings.
- Step 2: Click Privacy & Security.
- Step 3: Click Location Services.
- Step 4: Scroll down and then click System Services.

- Step 5: Find and click Significant Locations.
- Step 6: From there, toggle off the radio button next to Significant Location. Furthermore, scroll down and click Clear History to get rid of the previous records.

Method 5: Deactivate Location Services on individual mobile applications
Instead of entirely turning off the Location Services across your Apple iPhone 12, you may just reconfigure the access of individual apps. For instance, the Maps app retains access while Apple TV is restricted. Is it possible? Definitely. Here’s a short guide on how to hide your location on your Apple iPhone 12 by reviewing the location access of each application.
- Step 1: Go to Settings.
- Step 2: Tap Privacy and Security.
- Step 3: Click Location Services.
- Step 4: Browse the list below and find the specific app you wish to modify the location service settings. Click on it afterward.

- Step 5: Click Never under the Allow Location Access section. Alternatively, you may select Ask Next Time or While Using the App if you just wish to keep the location access within bounds.

NOTE: The changes on this setting are individually applied. You need to do the same procedure in all the apps you want to reconfigure the location access.
Part 3. Alternative Way to Hide Location on Apple iPhone 12 Using Wondershare Dr.Fone
The tutorials above on how to hide location on Apple iPhone 12 are indeed helpful to protect your privacy. One of them surely fits your preference when it comes to security matters for your mobile device. But aside from recalibrating the location services settings on your Apple iPhone 12, there is another way you can try. Wondershare Dr.Fone offers a potent Virtual Location feature capable of modifying and simulating GPS records on your mobile device. This way, you can somehow conceal your real location details while enjoying the benefits of Apple iPhone 12’s location services. Don’t worry. It’s very easy to use. Here’s a short guide on how to hide location on Apple iPhone 12 using Wondershare Dr.Fone.
- Step 1: Download Wondershare Dr.Fone from its official website. Right after, install it on your computer.
- Step 2: Launch the newly installed software on your desktop. Once it fully loads up, connect your Apple iPhone 12 using a data cable. Follow the on-screen instructions and perform the steps indicated to make sure that the connection between the two devices is stable enough to facilitate the succeeding operations.
- Step 3: Access the left-side panel and then click Toolbox. Head over to the main dashboard afterward and then click Virtual Location. Let Wondershare Dr.Fone download additional resources if it’s your first time using this feature. Don’t worry. It will only take a few minutes to complete.
- Step 4: Once the downloading process has concluded, Wondershare Dr.Fone - Virtual Location will immediately open on a separate window. From there, locate and click Teleport Mode at the top-right menu bar. It’s the first icon in the row.
- Step 5: Go back to the top-left corner of your screen and then hit the search bar. Type in your preferred location and choose one among the suggested results. After that, click the Enter icon.
- Step 6: The full details about your chosen location will be then displayed on the screen. Review the information provided and make sure that it’s what exactly you’re looking for. Once confirmed, click Move Here.
- Step 7: Your inputs will be immediately applied to the location settings on your Apple iPhone 12. From then on, you may now browse the internet without worrying about location privacy. If you wish to restore the original location settings on your Apple iPhone 12, simply close the Wondershare Dr.Fone application on your computer and restart your device.

NOTE: Resort to this option if your actual location information is not required in the transaction or procedure. For example, you may change your location if you wish to use a dating app or play GPS-based games on your mobile device.
Conclusion
Location services are there for a reason. It generally helps mobile devices deliver smooth performance and provide convenience to the users. However, we cannot deny that online frauds are everywhere nowadays. That’s why most of us feel uncomfortable sharing our whereabouts and other sensitive information with anyone or anything online. Don’t worry. There’s nothing wrong with that. If you opt to protect your privacy, the tutorials above on how to hide location on your Apple iPhone 12 can surely help you. Meanwhile, Wondershare Dr.Fone is a great alternative if you wish to mask your location details with different coordinates. It has a powerful Virtual Location feature capable of modifying your location settings and simulating GPS movements. All you have to do is connect your Apple iPhone 12 to the computer and set it up from there. In a minute or two, your location settings will be instantly modified according to your preferences.
Also read:
- [New] 2024 Approved Capturing Attention Striking Shots for YouTube Success
- [Updated] 2024 Approved Perfect Video Gear Starting with Beginner Cameras
- [Updated] Essential Tech Skills Record on Hangouts for 2024
- [Updated] In 2024, Analyze YouTube Data Efficiently with Social Blade Tools
- [Updated] Windows Speed Dial for Swift Inspection for 2024
- 2024 Approved Knockout Kings Vs. Viewership Titans
- 3 Smart and Simple Ways to Change Home Address on Apple iPhone 8 | Dr.fone
- Cutting-Edge Instagram Analysis Platforms for Smarter Metrics Management
- Does PokeGo++ still work on Apple iPhone 6 Plus/iPad? | Dr.fone
- Find My App Troubleshooting No Location Found vs. Location Not Available & How to Fix Them On Apple iPhone 11 Pro Max | Dr.fone
- How to Fix the Apple iPhone 7 Plus GPS not Working Issue | Dr.fone
- How to See Someones Location on Apple iPhone 13 Pro | Dr.fone
- In 2024, 7 Fixes to No GPS - Showing Approximate Location on Apple iPhone 13 mini Waze | Dr.fone
- In 2024, Find My App Troubleshooting No Location Found vs. Location Not Available & How to Fix Them On Apple iPhone 15 | Dr.fone
- In 2024, How to Fix the Apple iPhone 6s GPS not Working Issue | Dr.fone
- In 2024, How to View GPX Files Online and Offline Solutions Of Apple iPhone 15 | Dr.fone
- Top Rated DVD Crackers for macOS : Your Guide to Bypassing Disc Encryption
- Troubleshooting Guide: Resolving 'Content Warning' Issues in Voice Chats
- Unlock Nonstop Powerful Bass Performance with the ION Tailgater Plus - In Depth Review
- Title: In 2024, How to Change Your Location on Apple iPhone 12 | Dr.fone
- Author: Isabella
- Created at : 2025-01-17 17:09:03
- Updated at : 2025-01-21 17:01:58
- Link: https://iphone-location.techidaily.com/in-2024-how-to-change-your-location-on-apple-iphone-12-drfone-by-drfone-virtual-ios/
- License: This work is licensed under CC BY-NC-SA 4.0.