
In 2024, How to Fix the Apple iPhone 13 Pro GPS not Working Issue | Dr.fone
How to Fix the Apple iPhone 13 Pro GPS not Working Issue
GPS (Global Positioning System) is an important utility in this modern age. After all, it tracks an individual’s or object’s live location, making route navigation easier. Henceforth, this feature is incorporated in all modern smartphones. However, most Apple iPhone 13 Pro users these days complain about the Apple iPhone 13 Pro GPS problem.
As a user with daily traveling, you want to avoid such issues. This article will make things easier because you will find ways and solutions to overcome this issue.
Part 1: What Happens If Your Apple iPhone 13 Pro GPS Does Not Work on Apple iPhone 13 Pro?
Apple iPhone 13 Pro is among the most popular gadget devices in current times. Meanwhile, its GPS function allows users to stay active on the real-time map technology. However, GPS not working on Apple iPhone 13 Pros is a common problem. When this happens, you cannot track pinpoint locations.
This means you will find difficulty in locating your destination. Moreover, you will not be able to use those applications that rely on GPS technology. For example, a fitness app needs to track your distance and route. Not to forget, a malfunctioning GPS may also drain more battery.
Part 2: What Are the Potential Reasons for Apple iPhone 13 Pro GPS Not Working?
With GPS, you can track the live locations of your destination in seconds. In fact, you can also track any human depending on their live location. But as an iOS user, it’s normal to face Apple iPhone 13 Pro GPS not working. Why does this happen? Here are the following reasons behind this error:
- Glitches and Bugs: A most common reason for GPS not working is due to glitches and bugs. Hence, this may happen because of underlying iOS or GPS app issues. Either there was a bug in the version update, or the app is facing malfunctions.
- Airplane Mode: When airplane mode is enabled on your Apple iPhone 13 Pro, this may cause a GPS issue. You may have forgotten to turn off your airplane mode after air travel. Not to forget, turning off GPS is necessary during flight as per regulations.
- Incorrect Settings: It’s possible that GPS settings are not properly configured on your Apple iPhone 13 Pro. Like, you may have accidentally turned off location services. While using your Apple iPhone 13 Pro, turning on and off certain features is common.
- Hardware Issue: If your phone is exposed to water or physical damage, this may affect GPS. There may be a hardware issue caused due to this situation. Thus, the GPS antenna or chip may have been damaged.
Part 3: How To Fix Apple iPhone 13 Pro GPS Not Working?
Having an erroneous Apple iPhone 13 Pro GPS is not a new thing. But it does bring many inconveniences for the users. After all, you are deprived of live location tracking and positioning. To fix such Apple iPhone 13 Pro GPS not working issues, these ways are ideal solutions:
Way 1: Make Sure GPS Service is Enabled on Apple iPhone 13 Pro
A majority of people forget to turn on GPS services on their respective Apple iPhone 13 Pros. Thus, most times, users don’t know how to turn on GPS back. Henceforth, GPS not working issues become evident. To enable GPS service on Apple iPhone 13 Pro, follow these steps:
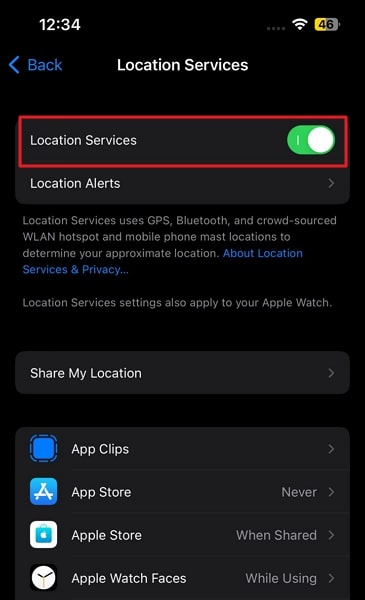
- Step 1: Launch your Apple iPhone 13 Pro Settings, scroll down, and find “Privacy & Security” from the menu.
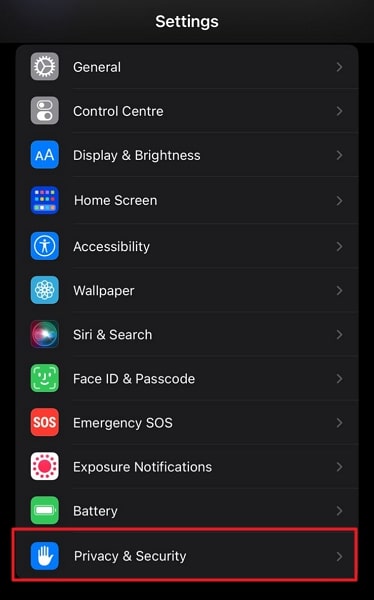
- Step 2: Press “Privacy & Security” and turn on “Location Services” to enable GPS. You can also enable location for other apps from the same settings.
Way 2: Simple Restart Apple iPhone 13 Pro
Restarting an Apple iPhone 13 Pro is the ultimate way to rectify underlying problems. Sometimes GPS is not working because of cache or network problems, and restarting Apple iPhone 13 Pro can help. For restarting an Apple iPhone 13 Pro, these steps will help you:
- Step 1: From the Apple iPhone 13 Pro settings, move into the “General” category, scroll down, and press “Shut Down.” Now slide right to power off your Apple iPhone 13 Pro.
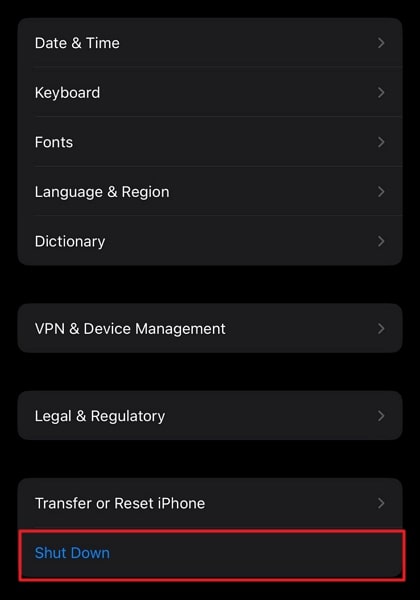
- Step 2: Wait for some time till your device gets powered off. After this, hold the “Power” button until the Apple logo appears to restart your device.
Way 3: Force Restart Apple iPhone 13 Pro
Sometimes your Apple iPhone 13 Pro may get hung up due to an underlying issue. So, when your device is not responding, you cannot restart it from settings. In this scenario, you need to force restart Apple iPhone 13 Pro. To do this, perform these simple instructions:
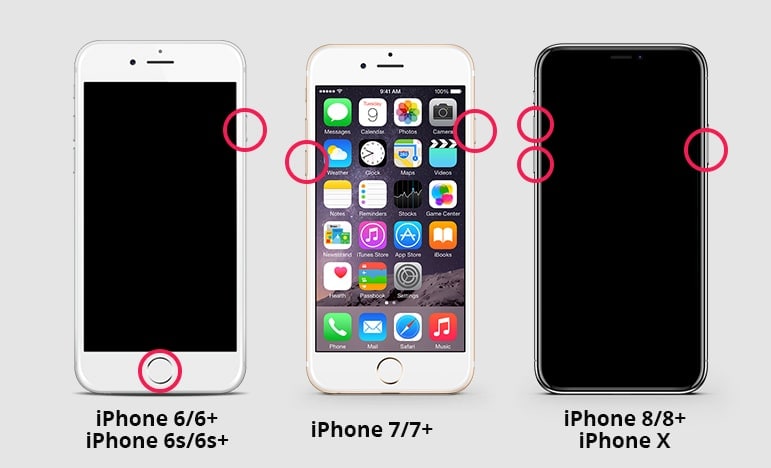
- Apple iPhone 13 Pro 6, 6S Plus, and Older: Simultaneously press and hold the “Home” and “Sleep/Wake” buttons. Make sure to keep holding both buttons until you see the Apple logo. Finally, release the buttons when the logo appears.
- Apple iPhone 13 Pro 7 or 7 Plus: Start by holding the “Sleep/Wake” button and “Volume Down” button at the same time. Afterward, stop holding the buttons and release them when you see the Apple logo.
- Apple iPhone 13 Pro 8 and Later: Initially, quickly press and release the “Volume Up” button, then perform the same with the “Volume Down” button. After this, press and hold the “Sleep/Wake” button, and release the button once the Apple logo appears.
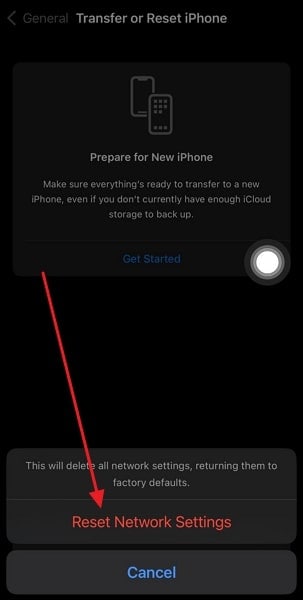
Way 4: Reset Network Settings
A network connection error is also the reason for Apple iPhone 13 Pro GPS not working. This happens when your Apple iPhone 13 Pro isn’t connected to a Wi-Fi network or facing problems in connection. For resetting the network settings, these steps are your trusted solution.
- Step 1: From your Apple iPhone 13 Pro, launch “Settings,” scroll down, and move into “General” from the settings menu.

- Step 2: Access the “Transfer or Reset Apple iPhone 13 Pro” options, tap the “Reset” option, and select “Reset Network Settings.” Now reset your Apple iPhone 13 Pro network settings to default by tapping “Reset Network Settings.”
Way 5: Reset Location and Privacy Settings
In most scenarios, your location is used on many apps that risk GPS optimal functioning. For this purpose, you need to reset the location to the default factory settings. Thinking about how to do it? Get along with these steps:
- Step 1: Move into the settings of your Apple iPhone 13 Pro, scroll down, and tap “General” from the available options.
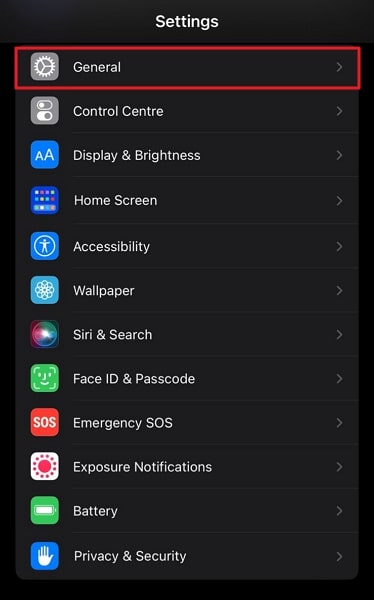
- Step 2: Now press the “Transfer or Reset Apple iPhone 13 Pro” option from General. From the next screen, choose the “Reset” option, and select “Reset Location & Privacy.” After pressing “Reset Settings,” your device location settings will reset to default.

Way 6: Use Wondershare Dr.Fone to Fix Apple iPhone 13 Pro GPS Problems
Fixing persistent GPS problems on iOS is now easier with Wondershare Dr.Fone. This system repair tool has solutions to repair issues in over 50+ iOS systems. Interestingly, you can update or downgrade the iOS version without jailbreaking with Wondershare Dr.Fone.
So, if you have consistent problems with your Apple iPhone 13 Pro GPS system, this tool can rectify the iOS version. Moreover, you don’t need special expertise or knowledge to use Wondershare Dr.Fone to fix your Apple iPhone 13 Pro. Meanwhile, you enter or exit DFU/Recovery mode with a single click.
Dr.Fone - Virtual Location
1-Click Location Changer for both iOS and Android
- Teleport from one location to another across the world from the comfort of your home.
- With just a few selections on your computer, you can make members of your circle believe you’re anywhere you want.
- Stimulate and imitate movement and set the speed and stops you take along the way.
- Compatible with both iOS and Android systems.
- Work with location-based apps, like Pokemon Go , Snapchat , Instagram , Facebook , etc.
3981454 people have downloaded it
Key Features of Wondershare Dr.Fone
- Efficiently solves issues like black screen or white screen of death from Apple iPhone 13 Pro. So if you are facing such an issue, Wondershare Dr.Fone can help.
- In most scenarios, Wondershare Dr.Fone will repair your Apple iPhone 13 Pro without damaging or losing data. Meanwhile, the recovery will be completed in a few minutes.
- With Wondershare Dr.Fone, you can upgrade your iOS version to the latest beta version. This way, you can enjoy new features for free.
Step-by-Step Instructions for Wondershare Dr.Fone To Fix Apple iPhone 13 Pro GPS Problems
Wondershare Dr.Fone is the most reliable tool for fixing Apple iPhone 13 Pro GPS not working problems. Are you also looking to use this amazing platform? These straightforward instructions will help you move forward:
- Step 1: Connect Apple iPhone 13 Pro with Computer
Download and launch Wondershare Dr.Fone’s latest version on your computer. Next, select “System Repair” from the “Toolbox” tab and connect your Apple iPhone 13 Pro using a USB cable. Select your device type as Apple iPhone 13 Pro to proceed further.

- Step 2: Choose Desired Repair Mode
Here choose “iOS Repair,” and on the next screen, select the desired repair mode. Proceed with the “Standard Repair,” as it will not affect your data. Now follow the on-screen instructions to activate Recovery Mode.

- Step 3: Repair the GPS Issue
After recovery mode is enabled, the platform will automatically detect the Apple iPhone 13 Pro device and provide firmware accordingly. Press “Download” against the required firmware to start downloading it. Once the firmware is downloaded, click “Repair Now” to repair GPS not working issue on Apple iPhone 13 Pro.

Conclusion
GPS is an important feature to have in this modern world. After all, it keeps a person’s or object’s location active in live mapping technology. This way, tracking people in an emergency or finding destinations is easier. Meanwhile, the Apple iPhone 13 Pro GPS problem is a common issue in most devices. Thus, users have to face a lot of difficulties while navigating GPS locations.
Apparently, this article provides step-by-step procedures to solve Apple iPhone 13 Pro GPS issues in different ways. Among the different ways shared, Wondershare Dr.Fone is the most trusted solution for your device. So, if you don’t get reliable solutions from other ways, Wondershare Dr.Fone is available. If you want to explore further solutions, such as fake GPS location , Dr.Fone Virtual Location is also available now.
How to Enable, Disable, and Change Safari Location on Apple iPhone 13 Pro
It is quite a common experience where everyone would have gone through “Annoying pop-ups during your serious search’. It is a natural phenomenon but it becomes a distracting one at the time of emergency works.
Simone was surfing through job opportunities in the online job portal and the unrelated pop-ups direct her to different platform displaying false information. She was completely lost and frustrated. This situation occurs due to the sharing of your data with websites you log in. You can protect your private data like location, values entered in the website, time spent on each web page etc by modifying certain settings in the Apple iPhone 13 Pro device’s privacy portfolio.
Explore the techniques in how to change safari location on the Apple iPhone 13 Pro.
Tips: Enhance your Apple iPhone 13 Pro privacy with Dr.Fone - Virtual Location! Change your location to protect your privacy, and prevent your Apple iPhone 13 Pro from being tracked. Get it now!
Part 1: How to enable/disable Safari Location on Apple iPhone 13 Pro
What is the need to enable or disable the Safari location on the Apple iPhone 13 Pro?
The concept is simple if you expose the location details on the cyber world you can find out all sorts of ‘Near me’ searches accurately. For example, if you are caught in a strange place and looking for any restaurants, then immediately you will make a search by just adding keywords like ‘ restaurants near me’. The results will direct you with the hotels closer to your current location. This type of search holds good for all facilities like hospitals, theatres, malls etc. By enabling the location settings you can make the search ease and precise.
The other side of exposing your location details on the internet space is that you are under threat by strangers. When you step into any websites, the built-in programs can sense your location data and flashes pop-ups related to your location. The pop-ups are not reliable mostly it contains false information. Thereby leading you into unwanted issues and therefore it would be a better practice to disable location details on Apple iPhone 13 Pro to overcome further problems in future.
A stepwise guide to learn how to enable /disable Safari location on Apple iPhone 13 Pro
Step 1: Reach for the ‘Privacy’ options
Go to the ‘Settings’ in the home screen of your Apple iPhone 13 Pro and proceed with the ‘Privacy’ option.

Step 2: Choose Safari to modify the settings
In the ‘Privacy’ window, you have to select ‘Location Services’ option and tap ‘Safari Websites’ from the list

Step 3: Alter the Safari location services
You have to tap the ‘Safari Websites’ option to select from the expanded list. If you want to enable/disable the location services in Safari websites then you have to choose ‘While using’ option. This feature enables location service of the Safari websites when it is active and the location service becomes inactive if the Safari is not in use.

Part 2: How to prevent Safari from asking for your location on Apple iPhone 13 Pro
Why do Apple iPhone 13 Pro users want to stop the Safari from asking the location?
The foremost reason for many Apple iPhone 13 Pro users is that they want to manage their privacy. They do not want to risk their privacy by sharing their location details with apps and Safari websites. It is a safe practice to step into the internet platform concealing your identity to avoid cybercrimes.
Follow the below steps to stop iOS Safari Location Services
Step 1: Reach the ‘Privacy’ screen
In your Apple iPhone 13 Pro, tap ‘Settings’ then select the ‘Privacy’ option.

Step 2: Modify the options in Location Services
In the ‘Privacy’ window, choose ‘Location Services’ and tap ‘Safari Websites’ from the displayed list.

Step 3: Stop the location services
In the pop-up screen, tick the ‘Never’ option to completely stop the ‘Location Services’ for Safari. This modification will prevent Safari from requesting to share the location details of the Apple iPhone 13 Pro device.

Part 3: How to change Safari location on Apple iPhone 13 Pro
It would be great fun with your friends when you change the Safari Location on Apple iPhone 13 Pro. You can bring jealous amidst your colleagues by registering your location details at holiday spots. By changing the location details, you can skip from unwanted false advertisements related to your real location while surfing through the internet space for your needs.
Track the steps to bring changes in the Safari Location on Apple iPhone 13 Pro below
Step 1: Go for an eminent program
Change the location details of your Apple iPhone 13 Pro using the incredible software Dr.Fone. Download this app at its official web address ‘https://drfone.wondershare.com/virtual-location-changer.html ’ or click the Download button below directly. Install it on your computer by following the wizard carefully. Tap the icon to explore the functionalities on the home screen.
Step 2: Establish a Virtual location
In the home page of this program, select the ‘Virtual Location’ option. In the next screen, tap the ‘Get Started’ button to trigger the procedure.

Step 3: Quick look at the map view
The next window displays the current virtual location details of the Apple iPhone 13 Pro device.

Step 4: Enter your favourite spot
Select the ‘Teleport mode’ in the map view. You can find this icon at the top right of the screen. Choose the first image from the horizontal list of symbols. Then enter your favourite spot worldwide in the text box near the ‘Go’ button. It is high time to press the ‘Go’ button and fix your admirable spots as your default device location.

Step 5: Authenticate the changes
The next map view shifts to the new location with a pop-up message ‘Move Here’. You must authenticate the changes by tapping this ‘Move here’ button.

Step 6: Check the default location
Open the current location in your Apple iPhone 13 Pro and verify it displays your favourite spot.

Conclusion
Thus, concealing the location details of your device protects you from unwanted cyber issues. Instead of turning on and off the iOS Safari location services, you can straightaway modify it into a fake zone. This approach would greatly help when you install any apps or enter into websites at this online platform. You can make use of the cyberspace efficiently if you make such modification in your Apple iPhone 13 Pro. Choose Dr.Fone - Virtual Location to make desired changes in your default location of your Apple iPhone 13 Pro.
3 Smart and Simple Ways to Change Home Address on Apple iPhone 13 Pro
Have you recently been relocated to somewhere else or are tired of entering your Home address on Maps every day? Well, to save your time, why not add or change your home address on Apple iPhone 13 Pro. In this way, you can easily start your commute and share your address with others on the go. The good thing is that the provision to change home address in Apple iPhone 13 Pro is available for both Apple and Google Maps. Let’s get started and learn how to change home address on Apple iPhone 13 Pro like a pro!

Part 1: How to Change Home Address in Apple Maps on Apple iPhone 13 Pro
Apple has developed a native navigation application that comes inbuilt in every Apple iPhone 13 Pro model. A lot of users take the assistance of Apple Maps to navigate, share their location, and do so much more. If you want, you can add or change your home address on Apple Maps and even mark certain locations as favorite. To learn how to change home address on Apple iPhone 13 Pro 11, X, XR, 8, and other models, follow these steps:
Step 1. Since Apple Maps doesn’t have a native option to change home address, you need to make changes to your Contacts card. For this, you can just launch the Contacts app and tap on your own profile from the top.
Step 2. This will list out detailed information about you. You can review the fields and to make any changes, tap on the “Edit” button from the top.

Step 3. This will further list various fields and would give you an option to edit them. You can scroll down and tap on the Edit button nearby the home address to change it.

Step 4. In case you haven’t added any address, then just tap on the “Add address” button. This will let you enter your address and locate it on the map. Later, you can label it as Home, Work, and so on.
Step 5. Alternatively, if you want, you can also mark any location as your favorite on Apple Maps for a quick access. Just open Apple Maps and select any location of your choice.

Step 6. After selecting the location, swipe up to get more options related to the location and tap on the “Favorites” feature to save it.

Part 2: How to Change Home Address in Apple iPhone 13 Pro Autofill?
Sometimes, changing the home address on Apple Maps is not enough. For instance, if you use Safari, then you might be familiar with the autofill feature. While filling a form in Safari, it would automatically detect the fields and will enter the relevant information on its own. Therefore, if you have changed your home address on Maps, then it is recommended to reflect that on Safari as well. In this way, the application can enter your changed address while autofilling a form. Here’s a simple tweak that you can do to change home address in Apple iPhone 13 Pro autofill.
Step 1. Firstly, you need to follow the above-mentioned drill and go to your own contact card to change your home address.
Step 2. Once you have changed your home address in contacts, just go to your Apple iPhone 13 Pro’s Settings > Safari and tap on the “Autofill” option under the General section.
Step 3. Here, you can view details related to the automatic filling of contacts, names, passwords, credit cards, etc. Firstly, make sure that the option to autofill contacts info is enabled.
Step 4. Now, tap on the “My Info” option to view your details like name, email, address, and so on. Just go to the “Address” field and manually enter your new address to change it.

Part 3: How to Change Home Address in Google Maps on Apple iPhone 13 Pro?
While Apple Maps is the native navigation application in Apple iPhone 13 Pro, a lot of people also prefer using Google Maps. Already used by over a billion people worldwide, Google Maps is the most popular and reliable navigation app in the world that runs on Android and Apple iPhone 13 Pro alike. Though, unlike Apple Maps, Google Maps lets us save our home, work, or any other addresses in the app itself. In this way, you can easily share your address with others and select your home address for commuting. To learn how to change home address on Apple iPhone 13 Pro’s Google Maps app, just follow these steps:
Step 1. To start with, just unlock your Apple iPhone 13 Pro and launch the Google Maps application on it. Beforehand, make sure that you are connected to a stable internet connection.
Step 2. Once Google Maps is launched, tap on the hamburger icon at the top-left corner to get more options (like your places, timeline, and more). From here, just tap on the “Your Places” feature.

Step 3. This will list out all the saved addresses on the screen like your home, work, etc. To add or change your home address, you can just tap on the “Home” field here.
Step 4. Now, all you got to do is tap on the search bar and enter your home address so that Google Maps would automatically load it. You can also tap on the “Choose on Map” field to find the home address easily on Google Maps.

Step 5. That’s it! You can now save the changes you have made and review them whenever you want. To make any changes to it, you can just tap on the three-dot icon adjacent to the Home button. This will let you edit your home address, remove it, and add directions.

That’s a wrap, everyone! I’m sure that after reading this guide you would be able to change home address on Apple iPhone 13 Pro like a pro. To make things easier for you, I have come up with a step-by-step tutorial on how to change home address on Apple iPhone 13 Pro via Apple Maps as well as Google Maps. Furthermore, I have also listed a smart solution to change your address in Safari’s autofill to save your time. Well, this is what I did when I wanted to know how do I change my home address on Apple iPhone 13 Pro a while back. You can follow this drill and share this guide with others to teach them the same.
Dr.Fone - Virtual Location
1-Click Location Changer for both iOS and Android
- Teleport from one location to another across the world from the comfort of your home.
- With just a few selections on your computer, you can make members of your circle believe you’re anywhere you want.
- Stimulate and imitate movement and set the speed and stops you take along the way.
- Compatible with both iOS and Android systems.
- Work with location-based apps, like Pokemon Go , Snapchat , Instagram , Facebook , etc.
3981454 people have downloaded it
Also read:
- [Updated] 2024 Approved Best Hidden Downloaders - #1-8 Unveiled
- [Updated] Premiere Pro Speed Blackouts
- [Updated] ToonTown Full Analysis & Tutorial '24 Edition for 2024
- Effortless Conversion of FLV to AVI Files – Your Step-by-Step Guide
- How to Cast Samsung Galaxy A15 5G to Computer for iPhone and Android? | Dr.fone
- How to Enable, Disable, and Change Safari Location on Apple iPhone 11 | Dr.fone
- How to See Someones Location on Apple iPhone XS | Dr.fone
- In 2024, Double Location Dongle All to Know About Apple iPhone 6s Plus/iPad GPS Spoofing | Dr.fone
- In 2024, How to See Someones Location on Apple iPhone 13 | Dr.fone
- Unable to Access Printer Driver in Windows
- Title: In 2024, How to Fix the Apple iPhone 13 Pro GPS not Working Issue | Dr.fone
- Author: Isabella
- Created at : 2025-01-19 16:48:53
- Updated at : 2025-01-21 16:15:39
- Link: https://iphone-location.techidaily.com/in-2024-how-to-fix-the-apple-iphone-13-pro-gps-not-working-issue-drfone-by-drfone-virtual-ios/
- License: This work is licensed under CC BY-NC-SA 4.0.