
In 2024, How to Fix the Apple iPhone 7 Plus GPS not Working Issue | Dr.fone
How to Fix the Apple iPhone 7 Plus GPS not Working Issue
GPS (Global Positioning System) is an important utility in this modern age. After all, it tracks an individual’s or object’s live location, making route navigation easier. Henceforth, this feature is incorporated in all modern smartphones. However, most Apple iPhone 7 Plus users these days complain about the Apple iPhone 7 Plus GPS problem.
As a user with daily traveling, you want to avoid such issues. This article will make things easier because you will find ways and solutions to overcome this issue.
Part 1: What Happens If Your Apple iPhone 7 Plus GPS Does Not Work on Apple iPhone 7 Plus?
Apple iPhone 7 Plus is among the most popular gadget devices in current times. Meanwhile, its GPS function allows users to stay active on the real-time map technology. However, GPS not working on Apple iPhone 7 Pluss is a common problem. When this happens, you cannot track pinpoint locations.
This means you will find difficulty in locating your destination. Moreover, you will not be able to use those applications that rely on GPS technology. For example, a fitness app needs to track your distance and route. Not to forget, a malfunctioning GPS may also drain more battery.
Part 2: What Are the Potential Reasons for Apple iPhone 7 Plus GPS Not Working?
With GPS, you can track the live locations of your destination in seconds. In fact, you can also track any human depending on their live location. But as an iOS user, it’s normal to face Apple iPhone 7 Plus GPS not working. Why does this happen? Here are the following reasons behind this error:
- Glitches and Bugs: A most common reason for GPS not working is due to glitches and bugs. Hence, this may happen because of underlying iOS or GPS app issues. Either there was a bug in the version update, or the app is facing malfunctions.
- Airplane Mode: When airplane mode is enabled on your Apple iPhone 7 Plus, this may cause a GPS issue. You may have forgotten to turn off your airplane mode after air travel. Not to forget, turning off GPS is necessary during flight as per regulations.
- Incorrect Settings: It’s possible that GPS settings are not properly configured on your Apple iPhone 7 Plus. Like, you may have accidentally turned off location services. While using your Apple iPhone 7 Plus, turning on and off certain features is common.
- Hardware Issue: If your phone is exposed to water or physical damage, this may affect GPS. There may be a hardware issue caused due to this situation. Thus, the GPS antenna or chip may have been damaged.
Part 3: How To Fix Apple iPhone 7 Plus GPS Not Working?
Having an erroneous Apple iPhone 7 Plus GPS is not a new thing. But it does bring many inconveniences for the users. After all, you are deprived of live location tracking and positioning. To fix such Apple iPhone 7 Plus GPS not working issues, these ways are ideal solutions:
Way 1: Make Sure GPS Service is Enabled on Apple iPhone 7 Plus
A majority of people forget to turn on GPS services on their respective Apple iPhone 7 Pluss. Thus, most times, users don’t know how to turn on GPS back. Henceforth, GPS not working issues become evident. To enable GPS service on Apple iPhone 7 Plus, follow these steps:
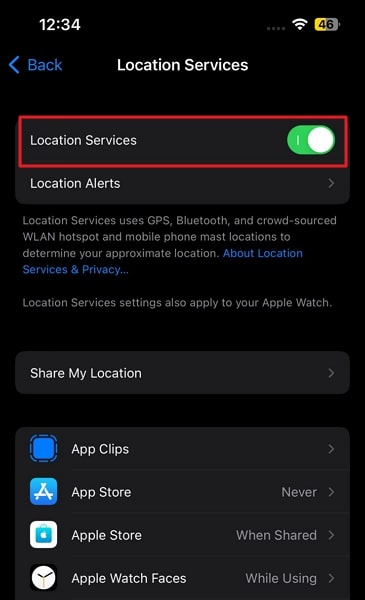
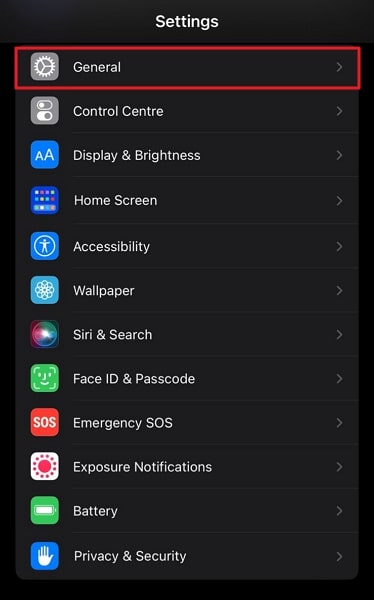
- Step 1: Launch your Apple iPhone 7 Plus Settings, scroll down, and find “Privacy & Security” from the menu.
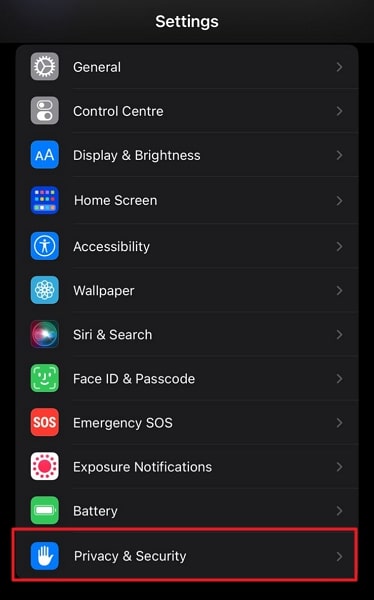
- Step 2: Press “Privacy & Security” and turn on “Location Services” to enable GPS. You can also enable location for other apps from the same settings.
Way 2: Simple Restart Apple iPhone 7 Plus
Restarting an Apple iPhone 7 Plus is the ultimate way to rectify underlying problems. Sometimes GPS is not working because of cache or network problems, and restarting Apple iPhone 7 Plus can help. For restarting an Apple iPhone 7 Plus, these steps will help you:
- Step 1: From the Apple iPhone 7 Plus settings, move into the “General” category, scroll down, and press “Shut Down.” Now slide right to power off your Apple iPhone 7 Plus.
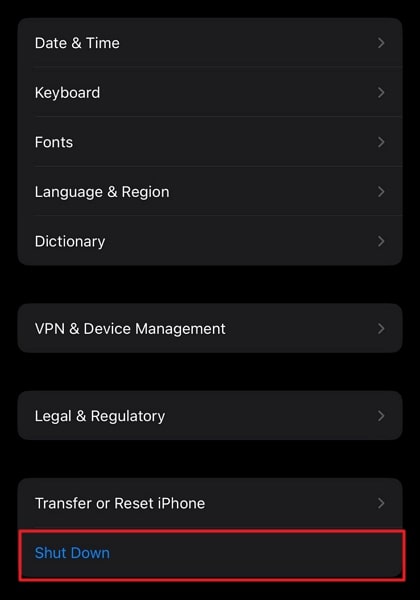
- Step 2: Wait for some time till your device gets powered off. After this, hold the “Power” button until the Apple logo appears to restart your device.
Way 3: Force Restart Apple iPhone 7 Plus
Sometimes your Apple iPhone 7 Plus may get hung up due to an underlying issue. So, when your device is not responding, you cannot restart it from settings. In this scenario, you need to force restart Apple iPhone 7 Plus. To do this, perform these simple instructions:
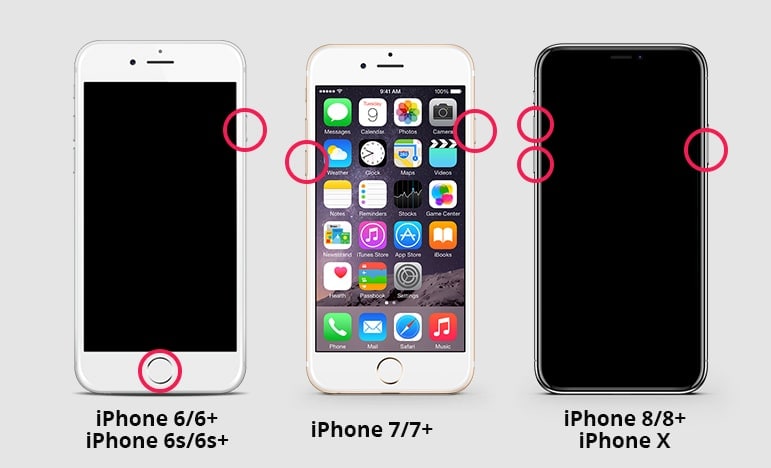
- Apple iPhone 7 Plus 6, 6S Plus, and Older: Simultaneously press and hold the “Home” and “Sleep/Wake” buttons. Make sure to keep holding both buttons until you see the Apple logo. Finally, release the buttons when the logo appears.
- Apple iPhone 7 Plus 7 or 7 Plus: Start by holding the “Sleep/Wake” button and “Volume Down” button at the same time. Afterward, stop holding the buttons and release them when you see the Apple logo.
- Apple iPhone 7 Plus 8 and Later: Initially, quickly press and release the “Volume Up” button, then perform the same with the “Volume Down” button. After this, press and hold the “Sleep/Wake” button, and release the button once the Apple logo appears.
Way 4: Reset Network Settings
A network connection error is also the reason for Apple iPhone 7 Plus GPS not working. This happens when your Apple iPhone 7 Plus isn’t connected to a Wi-Fi network or facing problems in connection. For resetting the network settings, these steps are your trusted solution.
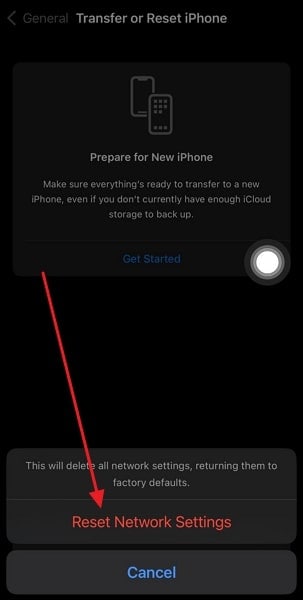
- Step 1: From your Apple iPhone 7 Plus, launch “Settings,” scroll down, and move into “General” from the settings menu.

- Step 2: Access the “Transfer or Reset Apple iPhone 7 Plus” options, tap the “Reset” option, and select “Reset Network Settings.” Now reset your Apple iPhone 7 Plus network settings to default by tapping “Reset Network Settings.”
Way 5: Reset Location and Privacy Settings
In most scenarios, your location is used on many apps that risk GPS optimal functioning. For this purpose, you need to reset the location to the default factory settings. Thinking about how to do it? Get along with these steps:
- Step 1: Move into the settings of your Apple iPhone 7 Plus, scroll down, and tap “General” from the available options.
- Step 2: Now press the “Transfer or Reset Apple iPhone 7 Plus” option from General. From the next screen, choose the “Reset” option, and select “Reset Location & Privacy.” After pressing “Reset Settings,” your device location settings will reset to default.

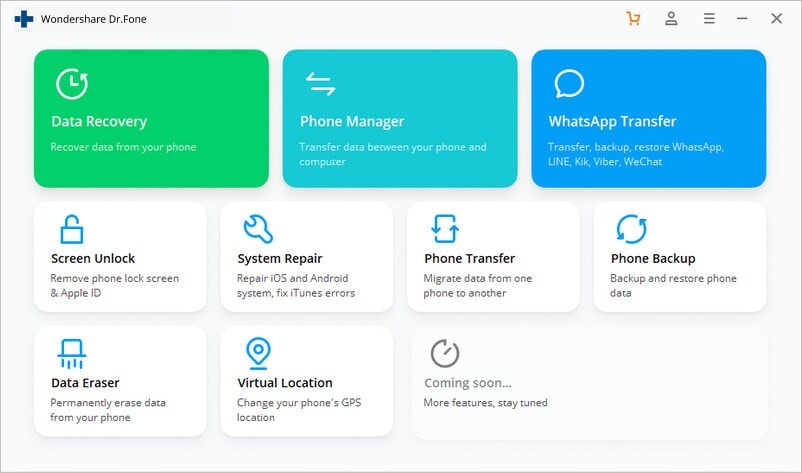
Way 6: Use Wondershare Dr.Fone to Fix Apple iPhone 7 Plus GPS Problems
Fixing persistent GPS problems on iOS is now easier with Wondershare Dr.Fone. This system repair tool has solutions to repair issues in over 50+ iOS systems. Interestingly, you can update or downgrade the iOS version without jailbreaking with Wondershare Dr.Fone.
So, if you have consistent problems with your Apple iPhone 7 Plus GPS system, this tool can rectify the iOS version. Moreover, you don’t need special expertise or knowledge to use Wondershare Dr.Fone to fix your Apple iPhone 7 Plus. Meanwhile, you enter or exit DFU/Recovery mode with a single click.
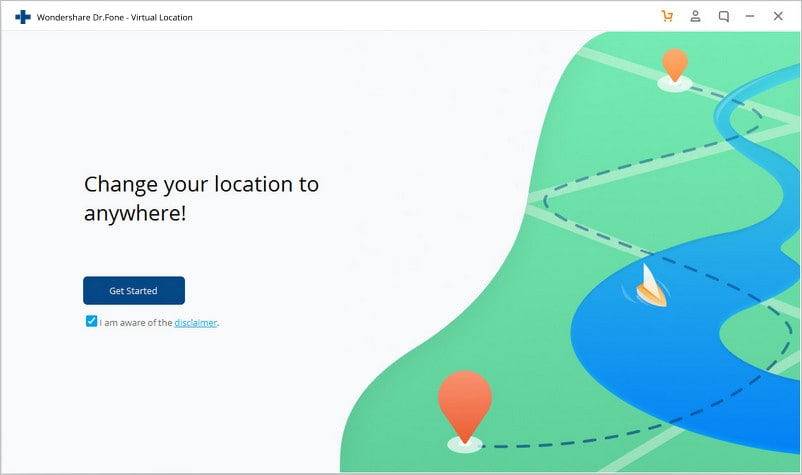
Dr.Fone - Virtual Location
1-Click Location Changer for both iOS and Android
- Teleport from one location to another across the world from the comfort of your home.
- With just a few selections on your computer, you can make members of your circle believe you’re anywhere you want.
- Stimulate and imitate movement and set the speed and stops you take along the way.
- Compatible with both iOS and Android systems.
- Work with location-based apps, like Pokemon Go , Snapchat , Instagram , Facebook , etc.
3981454 people have downloaded it
Key Features of Wondershare Dr.Fone
- Efficiently solves issues like black screen or white screen of death from Apple iPhone 7 Plus. So if you are facing such an issue, Wondershare Dr.Fone can help.
- In most scenarios, Wondershare Dr.Fone will repair your Apple iPhone 7 Plus without damaging or losing data. Meanwhile, the recovery will be completed in a few minutes.
- With Wondershare Dr.Fone, you can upgrade your iOS version to the latest beta version. This way, you can enjoy new features for free.
Step-by-Step Instructions for Wondershare Dr.Fone To Fix Apple iPhone 7 Plus GPS Problems
Wondershare Dr.Fone is the most reliable tool for fixing Apple iPhone 7 Plus GPS not working problems. Are you also looking to use this amazing platform? These straightforward instructions will help you move forward:
- Step 1: Connect Apple iPhone 7 Plus with Computer
Download and launch Wondershare Dr.Fone’s latest version on your computer. Next, select “System Repair” from the “Toolbox” tab and connect your Apple iPhone 7 Plus using a USB cable. Select your device type as Apple iPhone 7 Plus to proceed further.

- Step 2: Choose Desired Repair Mode
Here choose “iOS Repair,” and on the next screen, select the desired repair mode. Proceed with the “Standard Repair,” as it will not affect your data. Now follow the on-screen instructions to activate Recovery Mode.

- Step 3: Repair the GPS Issue
After recovery mode is enabled, the platform will automatically detect the Apple iPhone 7 Plus device and provide firmware accordingly. Press “Download” against the required firmware to start downloading it. Once the firmware is downloaded, click “Repair Now” to repair GPS not working issue on Apple iPhone 7 Plus.

Conclusion
GPS is an important feature to have in this modern world. After all, it keeps a person’s or object’s location active in live mapping technology. This way, tracking people in an emergency or finding destinations is easier. Meanwhile, the Apple iPhone 7 Plus GPS problem is a common issue in most devices. Thus, users have to face a lot of difficulties while navigating GPS locations.
Apparently, this article provides step-by-step procedures to solve Apple iPhone 7 Plus GPS issues in different ways. Among the different ways shared, Wondershare Dr.Fone is the most trusted solution for your device. So, if you don’t get reliable solutions from other ways, Wondershare Dr.Fone is available. If you want to explore further solutions, such as fake GPS location , Dr.Fone Virtual Location is also available now.
3 Smart and Simple Ways to Change Home Address on Apple iPhone 7 Plus
Have you recently been relocated to somewhere else or are tired of entering your Home address on Maps every day? Well, to save your time, why not add or change your home address on Apple iPhone 7 Plus. In this way, you can easily start your commute and share your address with others on the go. The good thing is that the provision to change home address in Apple iPhone 7 Plus is available for both Apple and Google Maps. Let’s get started and learn how to change home address on Apple iPhone 7 Plus like a pro!

Part 1: How to Change Home Address in Apple Maps on Apple iPhone 7 Plus
Apple has developed a native navigation application that comes inbuilt in every Apple iPhone 7 Plus model. A lot of users take the assistance of Apple Maps to navigate, share their location, and do so much more. If you want, you can add or change your home address on Apple Maps and even mark certain locations as favorite. To learn how to change home address on Apple iPhone 7 Plus 11, X, XR, 8, and other models, follow these steps:
Step 1. Since Apple Maps doesn’t have a native option to change home address, you need to make changes to your Contacts card. For this, you can just launch the Contacts app and tap on your own profile from the top.
Step 2. This will list out detailed information about you. You can review the fields and to make any changes, tap on the “Edit” button from the top.

Step 3. This will further list various fields and would give you an option to edit them. You can scroll down and tap on the Edit button nearby the home address to change it.

Step 4. In case you haven’t added any address, then just tap on the “Add address” button. This will let you enter your address and locate it on the map. Later, you can label it as Home, Work, and so on.
Step 5. Alternatively, if you want, you can also mark any location as your favorite on Apple Maps for a quick access. Just open Apple Maps and select any location of your choice.

Step 6. After selecting the location, swipe up to get more options related to the location and tap on the “Favorites” feature to save it.

Part 2: How to Change Home Address in Apple iPhone 7 Plus Autofill?
Sometimes, changing the home address on Apple Maps is not enough. For instance, if you use Safari, then you might be familiar with the autofill feature. While filling a form in Safari, it would automatically detect the fields and will enter the relevant information on its own. Therefore, if you have changed your home address on Maps, then it is recommended to reflect that on Safari as well. In this way, the application can enter your changed address while autofilling a form. Here’s a simple tweak that you can do to change home address in Apple iPhone 7 Plus autofill.
Step 1. Firstly, you need to follow the above-mentioned drill and go to your own contact card to change your home address.
Step 2. Once you have changed your home address in contacts, just go to your Apple iPhone 7 Plus’s Settings > Safari and tap on the “Autofill” option under the General section.
Step 3. Here, you can view details related to the automatic filling of contacts, names, passwords, credit cards, etc. Firstly, make sure that the option to autofill contacts info is enabled.
Step 4. Now, tap on the “My Info” option to view your details like name, email, address, and so on. Just go to the “Address” field and manually enter your new address to change it.

Part 3: How to Change Home Address in Google Maps on Apple iPhone 7 Plus?
While Apple Maps is the native navigation application in Apple iPhone 7 Plus, a lot of people also prefer using Google Maps. Already used by over a billion people worldwide, Google Maps is the most popular and reliable navigation app in the world that runs on Android and Apple iPhone 7 Plus alike. Though, unlike Apple Maps, Google Maps lets us save our home, work, or any other addresses in the app itself. In this way, you can easily share your address with others and select your home address for commuting. To learn how to change home address on Apple iPhone 7 Plus’s Google Maps app, just follow these steps:
Step 1. To start with, just unlock your Apple iPhone 7 Plus and launch the Google Maps application on it. Beforehand, make sure that you are connected to a stable internet connection.
Step 2. Once Google Maps is launched, tap on the hamburger icon at the top-left corner to get more options (like your places, timeline, and more). From here, just tap on the “Your Places” feature.

Step 3. This will list out all the saved addresses on the screen like your home, work, etc. To add or change your home address, you can just tap on the “Home” field here.
Step 4. Now, all you got to do is tap on the search bar and enter your home address so that Google Maps would automatically load it. You can also tap on the “Choose on Map” field to find the home address easily on Google Maps.

Step 5. That’s it! You can now save the changes you have made and review them whenever you want. To make any changes to it, you can just tap on the three-dot icon adjacent to the Home button. This will let you edit your home address, remove it, and add directions.

That’s a wrap, everyone! I’m sure that after reading this guide you would be able to change home address on Apple iPhone 7 Plus like a pro. To make things easier for you, I have come up with a step-by-step tutorial on how to change home address on Apple iPhone 7 Plus via Apple Maps as well as Google Maps. Furthermore, I have also listed a smart solution to change your address in Safari’s autofill to save your time. Well, this is what I did when I wanted to know how do I change my home address on Apple iPhone 7 Plus a while back. You can follow this drill and share this guide with others to teach them the same.
Dr.Fone - Virtual Location
1-Click Location Changer for both iOS and Android
- Teleport from one location to another across the world from the comfort of your home.
- With just a few selections on your computer, you can make members of your circle believe you’re anywhere you want.
- Stimulate and imitate movement and set the speed and stops you take along the way.
- Compatible with both iOS and Android systems.
- Work with location-based apps, like Pokemon Go , Snapchat , Instagram , Facebook , etc.
3981454 people have downloaded it
Does iTools virtual location not work On Apple iPhone 7 Plus/iPad?
You must know that iTools virtual location is used worldwide, and it has been reported that there have been many problems. This effective iTools virtual location is a geo-spoofing tool that is mainly for iOS. With this tool, you could easily mock the GPS location, and it also works in an effective manner to access geo-restricted content.
Part 1: Why does my itools not work on Apple iPhone 7 Plus/iPad?
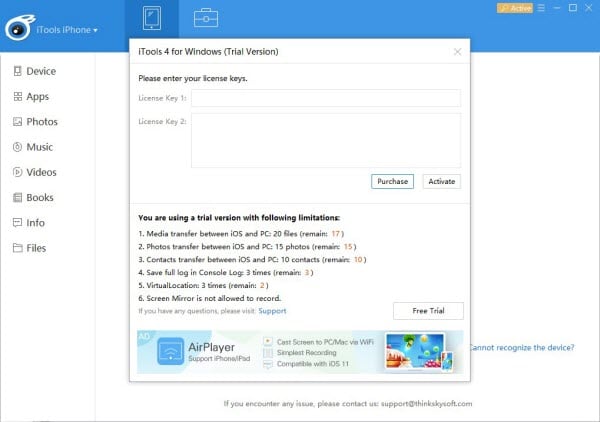
There may be many reasons due to which the iTools virtual location does not work on Apple iPhone 7 Plus/iPad. You must know that iOS 14 is the massive iOS update, but it is the amazing new features that offer a completely new look to your iOS. But iTools not working on Apple iPhone 7 Plus/iPad could make it difficult for the user to use this tool.
With the introduction of the iTools virtual location, many people have been complaining about the issues they are facing using this tool. Some of the common issues are getting stuck in the developer mode, iTools not downloading, Map crash, iTools fail to work, location won’t move, image load failed, and much more. All these issues are making the use of iTools more difficult for the user to use.
Usually the reasons lie with bad internet, Wi-Fi or outdated version of the tool. Let us know in the following section how you can deal with various issues that lead to iTools not working on Apple iPhone 7 Plus/iPad.
Part 2: Ways to fix the iTools not work on Apple iPhone 7 Plus/iPad
iTools Virtual Location is the perfect tool that helps you to spoof location effectively. But there are many iTools not working problems that you may encounter in these tools some of them are like as mentioned below:
1. Stuck in developer mode
This problem is the most common issue that people mainly face with the iTools virtual Location. When you are stuck in the developer mode, you may notice that the application won’t initiate, and it also stops your navigation to the next step. This can be triggered if your iTools is not in the updated version. And hence, in order to resolve this problem, you may update the latest version of iTools on the official website.
2. iTools map not showing
Many of the people are also facing a problem like they cannot see the map while using a particular tool. This problem may be due to an unstable internet connection. Hence you must check with the internet connection to resolve the problem. Or you may also restart the tool and initiate the geo spoofing process.
There are also different ways or you can say some basic ways to go along with whenever iTools doesn’t work. You must know these basic tips when you stuck with such issue with your iOS 14. These are mentioned below:
Step 1: iTools download ios 14 must be of the latest iTools virtual location from the official website.
Step 2: Get a stable internet connection for running the geo spoofing.
Step 3: Restart the tool if you are stuck in any step or the application crash.
Step 4: Keep the tool updated for effective use.
The above mentioned are some of the steps you must follow to avoid any problem while using the iTools on Apple iPhone 7 Plus/iPad.
Part 3: Better alternative for iTools virtual location
Dr.Fone Virtual Location (iOS) is an effective and popular tool that could be easily used to change your GPS location to any place you want to change. With this popular tool, you could set any location anywhere in the world by creating a virtual location on iOS. It is the perfect tool that helps you to fake or spoof your location. The best thing about this software is that it is free and safe to use. And with its attractive features, you would love to browse and fake your Apple iPhone 7 Plus’s real-time location.
Key Features
Some of the key features of Dr.Fone – Virtual Location (iOS) that is making is popular all over the globe are mentioned below:
- It helps you to teleport iPhone GPS to anywhere in the world easily and quickly.
- It is the perfect solution to simulate GPS movement along real roads or paths you draw.
- With the help of the joystick, you could easily make the movement of the GPS freely.
- It is the best tool that supports five devices of location management that too in a perfect manner.
Step by Step Tutorial
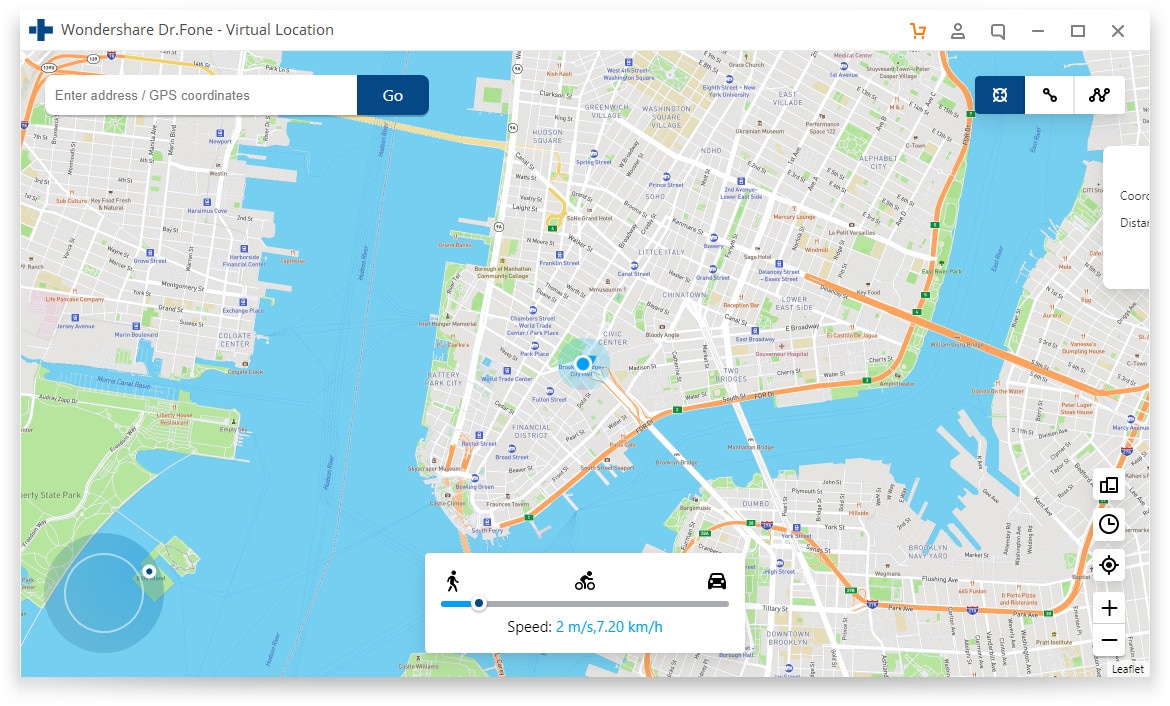
If you want to know how to use the Dr.Fone – Virtual Location (iOS) to fake Location, then do not worry. Here you could get some of the simple tips to use Dr.Fone – Virtual Location (iOS) to fake your location using “Teleport” mode. With only three steps, you could easily change the GPS location on your Apple iPhone 7 Plus. The simple steps are mentioned below:
Step 1: Launch the program on your computer
The first step you need to do to use the program is to download and install it from the official website. You must click on the “Virtual Location” from all the options.
Now, have your phone connected to your computer. Then click on the “Get Started” option.
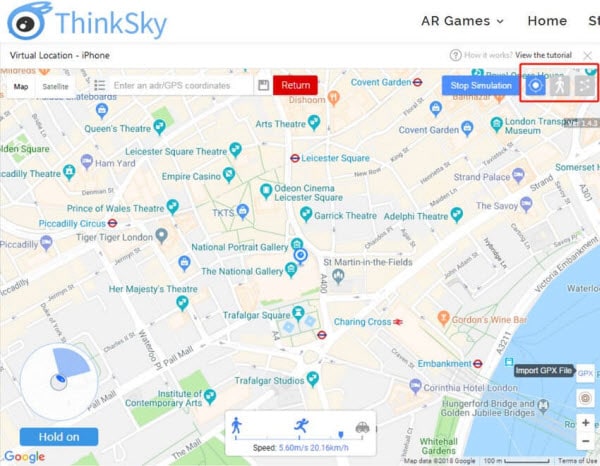
Step 2: Find your actual location on your map
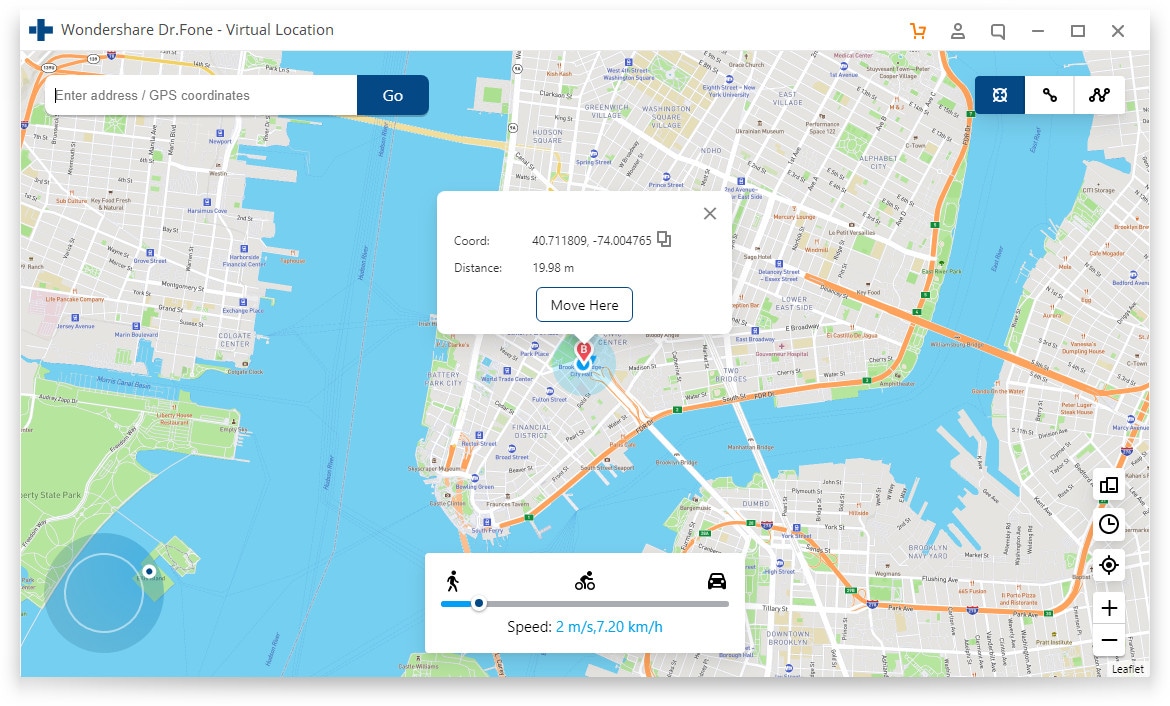
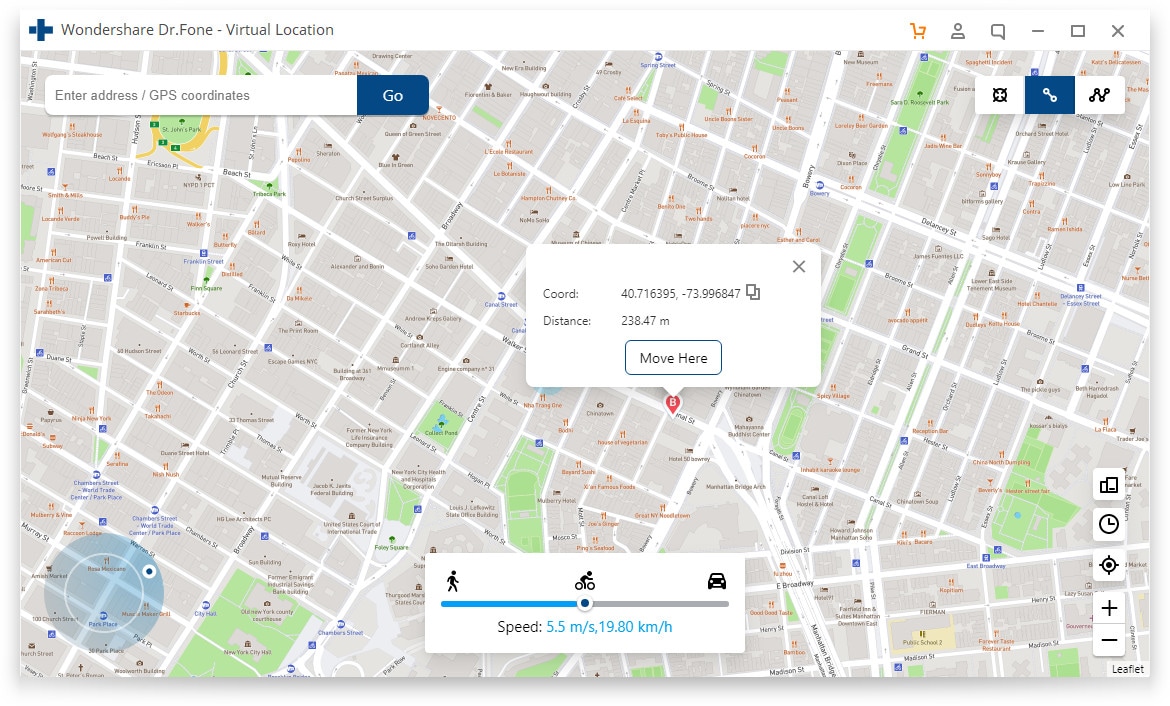
In the second step, you need to find your actual location on your map in the new window. Check that the location is accurately displayed or not. If in case the location is not accurately displayed, then click the Centre On icon. You may find the Centre On icon in the lower right part to show the accurate location.
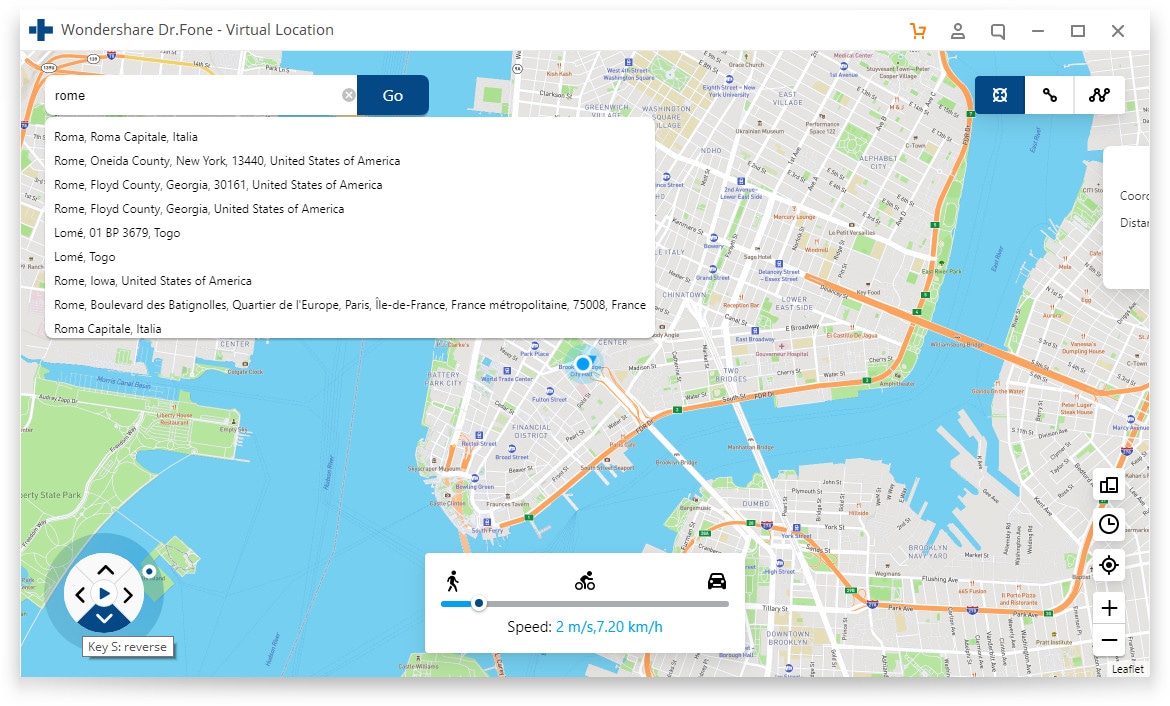
Step 3: Activate the teleport mode
Now, you need to activate the teleport mode by clicking the corresponding icon. You may find the corresponding icon in the upper right corner, and then you need to enter the place that you want to teleport in the upper left field and then click on the “Go” option.
Step 4: Click on the Move Here option
Now you may notice that the system would be able to understand your desired location. Hence click on the popup box of “Move Here.”
Step 5: The location will display on the program and app
In the last step, click the Centre On option. You will find that your location changes and is displaying on the program and app.
Conclusion
iTools ios 14 is designed as a powerful file management tool for all iPhones. Also, it is a greta choice to get your location spoofed on your Apple iPhone 7 Plus. But still, there are many virtual location issues that can break your comfort and lead you to disappointment. However, the problem can be effectively resolved with the help of Dr.Fone – Virtual Location (iOS) as it is the best alternative to iTools. Hence, use this perfect tool to resolve your iTools not work with ios 14 in the best possible manner.
Also read:
- A Full Review for iTools Virtual Location and Top 5 Alternatives For Apple iPhone 6s/iPad | Dr.fone
- Get the Latest Samsung 960 EVO Drive Software for Windows Systems
- How to Track Oppo Reno 11F 5G Location without Installing Software? | Dr.fone
- In 2024, Double Location Dongle All to Know About Apple iPhone 11/iPad GPS Spoofing | Dr.fone
- In 2024, How to Fix the Apple iPhone 13 Pro Max GPS not Working Issue | Dr.fone
- Regaining Composure Post-High Living Days, for Windows Users
- Schritt-Für-Schritt-Guide Zum Kopieren Einer IDE-Hard Drive Auf Eine Neue Festplatte Unter Windows (Versionen 11, 10, 8 Und 7)
- Three Solutions to Hard Reset Vivo V29 Pro? | Dr.fone
- Why Does iTools Virtual Location Not Work For Apple iPhone 14 Pro/iPad? Solved | Dr.fone
- Title: In 2024, How to Fix the Apple iPhone 7 Plus GPS not Working Issue | Dr.fone
- Author: Isabella
- Created at : 2025-01-14 16:00:50
- Updated at : 2025-01-21 16:59:53
- Link: https://iphone-location.techidaily.com/in-2024-how-to-fix-the-apple-iphone-7-plus-gps-not-working-issue-drfone-by-drfone-virtual-ios/
- License: This work is licensed under CC BY-NC-SA 4.0.