
Why Does iTools Virtual Location Not Work For Apple iPhone 8 Plus/iPad? Solved | Dr.fone
Why Does iTools Virtual Location Not Work For Apple iPhone 8 Plus/iPad? Solved
It is no secret that a multiplicity of users across the globe have reported a bunch of problems using iTools Virtual Location. These problems vary in magnitude and make iTools Virtual Location not work. In this article, we are going to dig into probable causes and solutions for iTools Virtual Location that fails to work.
Common Issues That iTools Virtual Location Not Working
Although iTools can be of great help in mocking your GPS location, the tool is marred by a plethora of shortcomings. Lots of users have been perennially complaining about some flaws of iTools Virtual Location. Some of the common issues are:
- Developer mode- There are myriads of cases reported by users where iTools crash on developer mode and get stuck here. This mode prevents users from going on to faking GPS location.
- Not downloading- Sometimes, you can follow all necessary processes or satisfy all the requirements, but iTools fails to download to your device. There is no way you can install iTools without downloading it.
- Map crash- Plenty of iTools users have launched over map crash. The program gets stuck loading the map but fails to display the map. Even when the internet connection is established, the map still fails to load in some cases.
- Stop working- ITools failure to work is one of the common issues fronted by scores of users. When you try to change the location, iTools Virtual Location does not respond.
- Not working on iOS 17- If there is an iOS version that hasn’t gone well with ITools is iOS 17. Although iTools has given a temporary solution for this, it still fails to work on some phones.
- Location won’t move- When using iTools Virtual Location, you always provide the desired GPS location data and click “Go.” After that, you are asked to click the “Move here” button to move to the chosen place. However, users have complained that at times the location fails to move from the previous to the currently selected location on apps like Facebook, and you end up finding yourself in a fake location.
- Image load failed- Image loading failure is a common problem amongst iOS 17 users. Droves of users complain they continually get a developer image load failed. The program fails to load various location images, and thus users cannot see the respective location images. The screen is stuck in loading without displaying any image.
Tips: iTools Virtual Location not working? Switch to Dr.Fone - Virtual Location for flawless GPS control. Try it now and never lose your way!
How to Solve These Issues?
With the significant problems mentioned, it’s prudent for someone to ask now what the solution is. Of course, these issues are triggered differently, but there are respective common fixes. However, some can successfully fix the problem while other solutions may hit the blank. Let’s see some of the probable solutions to the issues mentioned above.
- Developer mode- The solution is to check for the iTools updates for your device.
- Not downloading- if the program fails to download, check that your device meets the system requirements. Also, make sure your payments are settled and that the internet connection is established.
- Map crash- If the map crashes, it might be because of a problem with the google map API or unestablished communication with iTools. If Google Maps fails, click the three horizontal lines located at the right of the menu bar and switch to Mapbox. Also, check that your internet connection is working fine. If not, try to refresh your internet connection and ensure the connection is established.
- Stop working- When the iTools Virtual Location stops working, it might be due to unexpected technical issues. Try restarting the program, and if it persists, restart your device.
- Not working on iOS 17- As aforementioned, iOS 17 has had issues with iTools. One of the best ways to ensure a smooth click with iTools is to downgrade your iOS 17 to say iOS 16. The temporary solution offered for iOS 17 seems to work on some devices only.
- Location won’t move- when you change your current location and fail to move on your apps say google maps or Facebook, you will find yourself in fake location. Simply restart your device, and the problem will disappear.
- Image load failed- This issue is often related to compatibility issues. Check if you downloaded the program after the forced PoGo updates. You can try downgrading your device if you are doing iOS 17.
Dr.Fone - Virtual Location: Safer and Stable Tool To Change Location (iOS 17 Supported)
As you have seen above, iTools Virtual Location software is faced with a pile of problems that make it difficult to safely and efficiently fake GPS locations. So no one should teach you that you need a better tool. Yes, a stable and safe tool for changing location as you desire.

There are several tools out there claiming to offer such, but none comes close to Dr.Fone - Virtual Location (iOS/Android) . The powerful iOS location changer has all it takes to make location changing easy and full of fun. This program has a simple and straightforward interface that eases every user’s navigation. With the three simple steps to change GPS location on your device, Dr.Fone is no doubt the location changer you have been looking for. The program is available for all versions of windows including Windows 11/10/8.1/8/7. Some of the features of Dr.Fone - Virtual Location (iOS/Android) include:
- Teleport your Apple iPhone 8 Plus/Android GPS worldwide- if you are using GPS-based gaming applications, you can track and change your current GPS location via a single click. So every app on your device that uses GPS location data will believe you are there when you are mocking your location.
- Adjust the speed to transition from static to dynamic GPS mocking. You can mimic the cycling, walking, or driving speed on real roads or on a user- defined route established by choosing two points. To make your movements more natural, you can add relevant pauses along the journey as per your needs.
- Use Joystick to simulate GPS movement- the use of Joystick will save up to 90% of the labor involved in GPS movement control. Whichever mode you are in as either one-stop, multi-stop, or teleport mode.
- Automatic marching- with one click, you can make GPS spot the move automatically. You can change the directions in real time.
- Change directions up to 360 degrees- use the direction arrows to set the desired movement direction.
- Works with all GPS- based AR games or apps.
Dr.Fone - Virtual Location
1-Click Location Changer for both iOS and Android
- Teleport from one location to another across the world from the comfort of your home.
- With just a few selections on your computer, you can make members of your circle believe you’re anywhere you want.
- Stimulate and imitate movement and set the speed and stops you take along the way.
- Compatible with both iOS and Android systems.
- Work with location-based apps, like Pokemon Go , Snapchat , Instagram , Facebook , etc.
3981454 people have downloaded it
Quick Steps to Change Weather Location on Apple iPhone 8 Plus
It’s no secret that Weather is not everyone’s go-to app on a daily basis. People only open it when the atmospheric conditions around their area suddenly take an unexpected turn. More often than not, the Weather app remains untouched for a long period of time. But don’t worry. That’s completely understandable. Just remember that if you need to know the latest local forecast, Weather can certainly provide it to you.
You can be sure that the Apple iPhone 8 Plus’s Weather app is a reliable source of meteorological information. It can help you dodge weather disturbances and plan your future activities very well. However, the Weather app may sometimes dispense inaccurate reports if the location settings on your Apple iPhone 8 Plus are misconfigured. Is it a big deal? Actually, not. The internet provides tons of tutorials on how to change the weather location on Apple iPhone 8 Plus. For sure, you can easily restore your preferred location settings in no time.
In this article, we will delve into the main benefits that Apple iPhone 8 Plus’s Weather app offers to users. We will also provide some solutions on how to change weather location on Apple iPhone 8 Plus. Lastly, we will discuss how the Weather app can exactly help us in our daily routine. Continue reading below to learn more.
Part 1. Useful Features of Apple iPhone 8 Plus’s Weather App
In most basic explanation, the Weather app is a tool that helps you determine the weather conditions in certain locations. You can view from there how the weather on a particular day will unfold around the area. It is forecasted at least every hour. If there is a significant development, the report is promptly updated to ensure you receive the latest weather news. Yes. The Apple iPhone 8 Plus’s Weather app continues to serve its purpose even though most users don’t use it that often.
Apart from its well-circulated weather updates, the Apple iPhone 8 Plus’s Weather app has a lot more to offer. Check out the list provided below.
Ten-Day Forecast

Are you planning a particular activity in the coming days? If so, the Ten-Day Forecast feature of Apple iPhone 8 Plus’s Weather app can surely help you in this regard. Basically, it provides estimated predictions on atmospheric conditions, precipitations, and temperature for the next ten days.
Severe Weather Alerts

If an extreme weather disturbance is detected in your area, the Weather app will send you an alert straight away. It can be a weather advisory issued by the state meteorological bureau or a flash report from a credible source. That’s why you should ensure the location settings on your Apple iPhone 8 Plus are well-calibrated. If not, take a moment to reconfigure it. There are lots of tutorials out there on how to change weather location on Apple iPhone 8 Plus. One of them can certainly assist you.
Maps

The Apple iPhone 8 Plus’s Weather app has a map feature that exclusively displays the weather conditions in a specific location. From there, you can view certain atmospheric information, including temperature, precipitation, air quality, and wind conditions. Just make sure that your location is set properly. If you want to replace it, just follow the guide on how to change the weather location on your Apple iPhone 8 Plus.
Air Quality

If information regarding air quality is widely available in your country, it will also show up on the Apple iPhone 8 Plus’s Weather app. You can view from there the recorded air quality index in your area together with a rating if it is good or not. At present, we cannot deny that being aware of the air quality around us is indeed essential. It somehow helps us lessen our exposure to harmful pollutants in the atmosphere. That’s why you should take advantage of this feature. Read the tutorial on how to change the weather location on your Apple iPhone 8 Plus and configure your settings. This way, you’ll stay updated on the air quality of the places you will visit going forward.
Part 2. How to Change Weather Location on Apple iPhone 8 Plus?
We have previously learned that location services play a key role in the accuracy and precision of Apple iPhone 8 Plus’s weather reports. That’s why you need to ensure the location settings on your Apple iPhone 8 Plus are well-configured. Don’t worry. In case it needs a few adjustments, there are lots of techniques on how to change weather location on Apple iPhone 8 Plus. Just choose the best one that perfectly suits your situation. Do you want to try it now? Check out the list of methods provided below.
Method 1: Enter the location into the Weather app’s search bar
Let’s say you just need to check the weather conditions in another location. Can you do it without actually going there? The short answer is yes. The Apple iPhone 8 Plus’s Weather app lets you view meteorological updates from various places by simply searching the location on the platform. Here’s how to do it in easy steps.
- Step 1: Launch the Weather app on your Apple iPhone 8 Plus. If you cannot find the application on your Apple iPhone 8 Plus, try to update your iOS first to the latest version.
- Step 2: Click the Menu icon at the top-left corner of your screen.

- Step 3: Enter your preferred location into the search bar. Find and click it from the suggested results.

- Step 4: Then, click Add. The new location will be then added to the list. If you wish to reorder the list based on your preference, just click the More icon at the top-right corner of the left-side panel screen and then click Edit List. From there, drag the locations up and down to reorganize them to your desired order.

Method 2: Change the Weather app’s primary location on the widget
Do you have a Weather widget on your Apple iPhone 8 Plus’s home screen? If so, you can directly modify the location settings from there. Don’t worry. It’s as easy as shooting fish in a barrel. Here’s how to change the weather location on Apple iPhone 8 Plus from the home screen widget.
- Step 1: Find the weather widget on the home screen of your Apple iPhone 8 Plus. Touch and hold it for a few seconds until the hidden menus appear.
- Step 2: Click Edit Weather.

- Step 3: Click Location. From there, enter your desired location into the search bar and choose one from the suggested results.

- Step 4: The location will be then changed immediately on the widget. If the Edit Weather option is unavailable on your end, try to update your iOS first. The Weather app has just been released recently on Apple iPhone 8 Plus. Therefore, Apple is making changes from time to time.
Method 3: Change weather location on Apple iPhone 8 Plus with Wondershare Dr.Fone.
Is there any other way in case the first two techniques do not bring positive results? Luckily, there is. Wondershare Dr.Fone can absolutely help you with that. It has a potent Virtual Location feature capable of modifying your whereabouts without going outdoors and visiting the actual location. Do you want to try it now? That’s great. Here’s a short guide on how to change weather location on Apple iPhone 8 Plus with the aid of Wondershare Dr.Fone.
- Step 1: Download Wondershare Dr.Fone from its official website. Afterwards, install it on your computer.
- Step 2: Launch the newly installed software on your desktop. Once it fully loads up, connect your Apple iPhone 8 Plus using a data cable. Follow the on-screen instructions to grant the necessary access and ensure the connection between the two devices is stable and reliable.
- Step 3: After that, navigate to the left-side panel and then click Toolbox. Head over to the main dashboard and then click Virtual Location. If it’s your first time using this feature, let Wondeshare Dr.Fone download the additional resources first. Don’t worry. It will not take a long time to complete. Just wait as patiently as you can.
- Step 4: Once the downloading process has concluded, Wondershare Dr.Fone - Virtual Location will immediately open on a separate window. From there, go to the top-right menu bar and then click Teleport Mode. It’s the first icon in the row.

- Step 5: Enter your desired location into the search bar and choose one from the list of suggestions. Right after, click the Enter icon to proceed.

- Step 6: The details pertaining to your selected location will be displayed on the screen. Check them very carefully and confirm that it is the exact location you’re looking for. Once you’re done verifying the details, click the Move Here button below to continue.

- Step 7: In no time, the current location registered on your Apple iPhone 8 Plus will be changed along with your weather location. See? It’s just as simple as that. Therefore, it’s best to use Wondershare Dr.Fone if you wish to change the weather location on your Apple iPhone 8 Plus.
NOTE: If you wish to restore the original location settings of your Apple iPhone 8 Plus, simply disconnect it from the computer and restart it.
Part 3. Is the Weather App on Apple iPhone 8 Plus Really Helpful?
It’s fair to say that Weather is not a primary iOS application. You can continue with your usual routine even without it. However, we cannot deny the fact that it’s there for a reason. All we know for now is that the Weather app helps us stay updated with the latest meteorological forecast. But we don’t know what’s waiting ahead. Maybe the Weather app would soon become a paramount component of an upcoming iOS feature. Is it possible to happen in the future? We’re not sure yet. But one way or another, it’s best to keep Weather up and running on our Apple iPhone 8 Plus.

It doesn’t take much to follow the tutorials above on how to change weather location on Apple iPhone 8 Plus. Most of them can instantly be conducted and finished with just the snap of a finger. That’s why you should regularly calibrate its location settings and make sure that it’s showing appropriate weather reports. Who knows? Keeping tabs on the atmospheric conditions around your local area can help you in a specific way you don’t actually expect. For instance, severe weather alerts are definitely capable of preventing you from running or driving toward a bad storm. Another thing is that the Weather’s Ten-Day Forecast feature can help you organize your weekly schedules accordingly. For sure, Weather has a lot more to offer. Thus, try to explore it once in a while and take advantage of the benefits.
Conclusion
By default, the Apple iPhone 8 Plus’s Weather app uses your current location for updates and reports. You don’t have to do anything if your location settings are configured properly. But just in case you need to change your location for various reasons, you can do it very easily. The tutorials above on how to change weather location on Apple iPhone 8 Plus can surely help you with that. Follow the steps indicated and finish the instructions accordingly. For a more convenient and extremely effective approach, try to download Wondershare Dr.Fone. It offers a powerful Virtual Location feature capable of modifying your whereabouts and simulating GPS movements. Don’t worry. It’s very easy to use. You just have to connect your Apple iPhone 8 Plus to the computer and calibrate the location settings from there. In a minute or two, the location on your device will be then changed according to your choice.
How to Fix the Apple iPhone 8 Plus GPS not Working Issue
GPS (Global Positioning System) is an important utility in this modern age. After all, it tracks an individual’s or object’s live location, making route navigation easier. Henceforth, this feature is incorporated in all modern smartphones. However, most Apple iPhone 8 Plus users these days complain about the Apple iPhone 8 Plus GPS problem.
As a user with daily traveling, you want to avoid such issues. This article will make things easier because you will find ways and solutions to overcome this issue.
Part 1: What Happens If Your Apple iPhone 8 Plus GPS Does Not Work on Apple iPhone 8 Plus?
Apple iPhone 8 Plus is among the most popular gadget devices in current times. Meanwhile, its GPS function allows users to stay active on the real-time map technology. However, GPS not working on Apple iPhone 8 Pluss is a common problem. When this happens, you cannot track pinpoint locations.
This means you will find difficulty in locating your destination. Moreover, you will not be able to use those applications that rely on GPS technology. For example, a fitness app needs to track your distance and route. Not to forget, a malfunctioning GPS may also drain more battery.
Part 2: What Are the Potential Reasons for Apple iPhone 8 Plus GPS Not Working?
With GPS, you can track the live locations of your destination in seconds. In fact, you can also track any human depending on their live location. But as an iOS user, it’s normal to face Apple iPhone 8 Plus GPS not working. Why does this happen? Here are the following reasons behind this error:
- Glitches and Bugs: A most common reason for GPS not working is due to glitches and bugs. Hence, this may happen because of underlying iOS or GPS app issues. Either there was a bug in the version update, or the app is facing malfunctions.
- Airplane Mode: When airplane mode is enabled on your Apple iPhone 8 Plus, this may cause a GPS issue. You may have forgotten to turn off your airplane mode after air travel. Not to forget, turning off GPS is necessary during flight as per regulations.
- Incorrect Settings: It’s possible that GPS settings are not properly configured on your Apple iPhone 8 Plus. Like, you may have accidentally turned off location services. While using your Apple iPhone 8 Plus, turning on and off certain features is common.
- Hardware Issue: If your phone is exposed to water or physical damage, this may affect GPS. There may be a hardware issue caused due to this situation. Thus, the GPS antenna or chip may have been damaged.
Part 3: How To Fix Apple iPhone 8 Plus GPS Not Working?
Having an erroneous Apple iPhone 8 Plus GPS is not a new thing. But it does bring many inconveniences for the users. After all, you are deprived of live location tracking and positioning. To fix such Apple iPhone 8 Plus GPS not working issues, these ways are ideal solutions:
Way 1: Make Sure GPS Service is Enabled on Apple iPhone 8 Plus
A majority of people forget to turn on GPS services on their respective Apple iPhone 8 Pluss. Thus, most times, users don’t know how to turn on GPS back. Henceforth, GPS not working issues become evident. To enable GPS service on Apple iPhone 8 Plus, follow these steps:
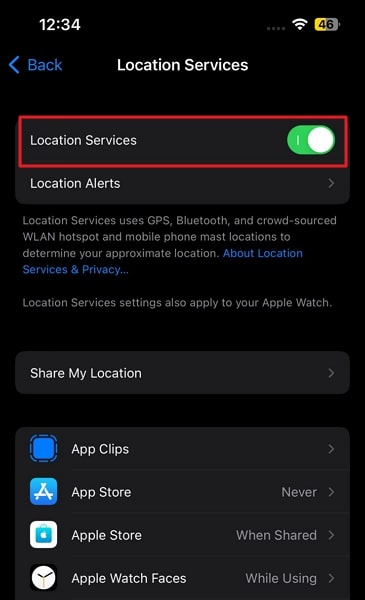
- Step 1: Launch your Apple iPhone 8 Plus Settings, scroll down, and find “Privacy & Security” from the menu.
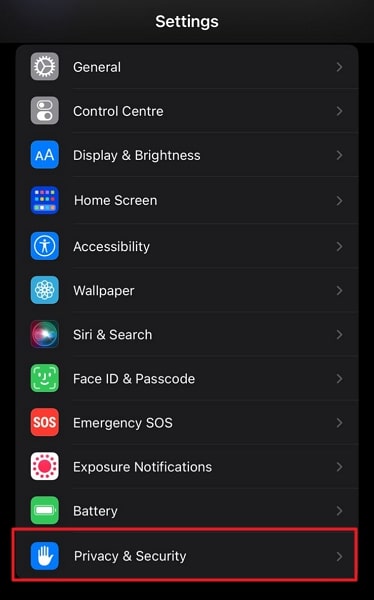
- Step 2: Press “Privacy & Security” and turn on “Location Services” to enable GPS. You can also enable location for other apps from the same settings.
Way 2: Simple Restart Apple iPhone 8 Plus
Restarting an Apple iPhone 8 Plus is the ultimate way to rectify underlying problems. Sometimes GPS is not working because of cache or network problems, and restarting Apple iPhone 8 Plus can help. For restarting an Apple iPhone 8 Plus, these steps will help you:
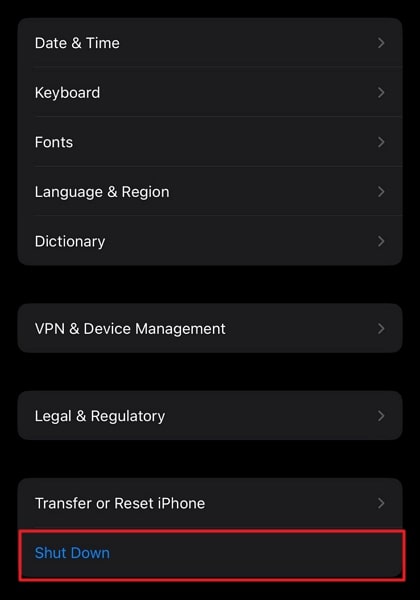
- Step 1: From the Apple iPhone 8 Plus settings, move into the “General” category, scroll down, and press “Shut Down.” Now slide right to power off your Apple iPhone 8 Plus.
- Step 2: Wait for some time till your device gets powered off. After this, hold the “Power” button until the Apple logo appears to restart your device.
Way 3: Force Restart Apple iPhone 8 Plus
Sometimes your Apple iPhone 8 Plus may get hung up due to an underlying issue. So, when your device is not responding, you cannot restart it from settings. In this scenario, you need to force restart Apple iPhone 8 Plus. To do this, perform these simple instructions:
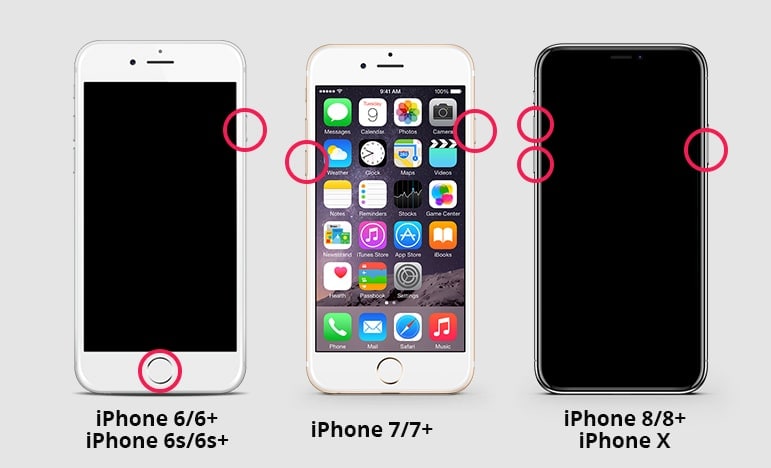
- Apple iPhone 8 Plus 6, 6S Plus, and Older: Simultaneously press and hold the “Home” and “Sleep/Wake” buttons. Make sure to keep holding both buttons until you see the Apple logo. Finally, release the buttons when the logo appears.
- Apple iPhone 8 Plus 7 or 7 Plus: Start by holding the “Sleep/Wake” button and “Volume Down” button at the same time. Afterward, stop holding the buttons and release them when you see the Apple logo.
- Apple iPhone 8 Plus 8 and Later: Initially, quickly press and release the “Volume Up” button, then perform the same with the “Volume Down” button. After this, press and hold the “Sleep/Wake” button, and release the button once the Apple logo appears.
Way 4: Reset Network Settings
A network connection error is also the reason for Apple iPhone 8 Plus GPS not working. This happens when your Apple iPhone 8 Plus isn’t connected to a Wi-Fi network or facing problems in connection. For resetting the network settings, these steps are your trusted solution.
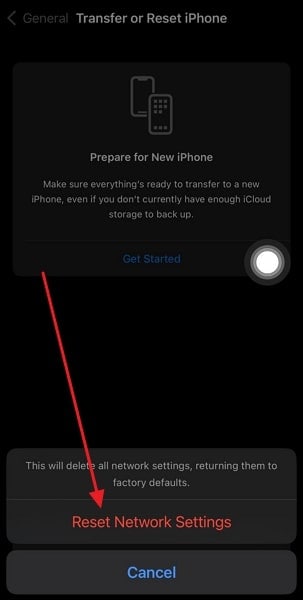
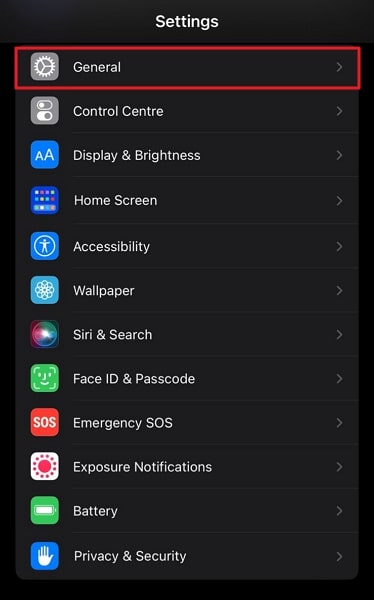
- Step 1: From your Apple iPhone 8 Plus, launch “Settings,” scroll down, and move into “General” from the settings menu.

- Step 2: Access the “Transfer or Reset Apple iPhone 8 Plus” options, tap the “Reset” option, and select “Reset Network Settings.” Now reset your Apple iPhone 8 Plus network settings to default by tapping “Reset Network Settings.”
Way 5: Reset Location and Privacy Settings
In most scenarios, your location is used on many apps that risk GPS optimal functioning. For this purpose, you need to reset the location to the default factory settings. Thinking about how to do it? Get along with these steps:
- Step 1: Move into the settings of your Apple iPhone 8 Plus, scroll down, and tap “General” from the available options.
- Step 2: Now press the “Transfer or Reset Apple iPhone 8 Plus” option from General. From the next screen, choose the “Reset” option, and select “Reset Location & Privacy.” After pressing “Reset Settings,” your device location settings will reset to default.

Way 6: Use Wondershare Dr.Fone to Fix Apple iPhone 8 Plus GPS Problems
Fixing persistent GPS problems on iOS is now easier with Wondershare Dr.Fone. This system repair tool has solutions to repair issues in over 50+ iOS systems. Interestingly, you can update or downgrade the iOS version without jailbreaking with Wondershare Dr.Fone.
So, if you have consistent problems with your Apple iPhone 8 Plus GPS system, this tool can rectify the iOS version. Moreover, you don’t need special expertise or knowledge to use Wondershare Dr.Fone to fix your Apple iPhone 8 Plus. Meanwhile, you enter or exit DFU/Recovery mode with a single click.
Dr.Fone - Virtual Location
1-Click Location Changer for both iOS and Android
- Teleport from one location to another across the world from the comfort of your home.
- With just a few selections on your computer, you can make members of your circle believe you’re anywhere you want.
- Stimulate and imitate movement and set the speed and stops you take along the way.
- Compatible with both iOS and Android systems.
- Work with location-based apps, like Pokemon Go , Snapchat , Instagram , Facebook , etc.
3981454 people have downloaded it
Key Features of Wondershare Dr.Fone
- Efficiently solves issues like black screen or white screen of death from Apple iPhone 8 Plus. So if you are facing such an issue, Wondershare Dr.Fone can help.
- In most scenarios, Wondershare Dr.Fone will repair your Apple iPhone 8 Plus without damaging or losing data. Meanwhile, the recovery will be completed in a few minutes.
- With Wondershare Dr.Fone, you can upgrade your iOS version to the latest beta version. This way, you can enjoy new features for free.
Step-by-Step Instructions for Wondershare Dr.Fone To Fix Apple iPhone 8 Plus GPS Problems
Wondershare Dr.Fone is the most reliable tool for fixing Apple iPhone 8 Plus GPS not working problems. Are you also looking to use this amazing platform? These straightforward instructions will help you move forward:
- Step 1: Connect Apple iPhone 8 Plus with Computer
Download and launch Wondershare Dr.Fone’s latest version on your computer. Next, select “System Repair” from the “Toolbox” tab and connect your Apple iPhone 8 Plus using a USB cable. Select your device type as Apple iPhone 8 Plus to proceed further.

- Step 2: Choose Desired Repair Mode
Here choose “iOS Repair,” and on the next screen, select the desired repair mode. Proceed with the “Standard Repair,” as it will not affect your data. Now follow the on-screen instructions to activate Recovery Mode.

- Step 3: Repair the GPS Issue
After recovery mode is enabled, the platform will automatically detect the Apple iPhone 8 Plus device and provide firmware accordingly. Press “Download” against the required firmware to start downloading it. Once the firmware is downloaded, click “Repair Now” to repair GPS not working issue on Apple iPhone 8 Plus.

Conclusion
GPS is an important feature to have in this modern world. After all, it keeps a person’s or object’s location active in live mapping technology. This way, tracking people in an emergency or finding destinations is easier. Meanwhile, the Apple iPhone 8 Plus GPS problem is a common issue in most devices. Thus, users have to face a lot of difficulties while navigating GPS locations.
Apparently, this article provides step-by-step procedures to solve Apple iPhone 8 Plus GPS issues in different ways. Among the different ways shared, Wondershare Dr.Fone is the most trusted solution for your device. So, if you don’t get reliable solutions from other ways, Wondershare Dr.Fone is available. If you want to explore further solutions, such as fake GPS location , Dr.Fone Virtual Location is also available now.
Also read:
- [Updated] Revealing the Top 6 Affordable, Web-Accessible TikTok to MP3 Apps
- [Updated] Tailoring Your Content YouTube Video Length Reduction Guide
- 2024 Approved Free NBA Action at Home The Best 15 Ways to Watch Games Online
- 2024 Approved From Bland to Brilliant Transform Your YouTube Channels' Image
- Comando Essencial ESXCLI Para Gestão Eficaz De Virtual Machines Em VMWare CLI
- Does iTools virtual location not work On Apple iPhone 12/iPad? | Dr.fone
- FRP Hijacker by Hagard Download and Bypass your Samsung Galaxy S23+ FRP Locks
- How to View GPX Files Online and Offline Solutions Of Apple iPhone 12 Pro | Dr.fone
- In 2024, 5 Ways Change Your Home Address in Google/Apple Map on Apple iPhone 14 Plus/iPad | Dr.fone
- In 2024, 7 Fixes to No GPS - Showing Approximate Location on Apple iPhone 11 Pro Max Waze | Dr.fone
- In 2024, How to Spy on Text Messages from Computer & Samsung Galaxy M34 5G | Dr.fone
- In 2024, How to View GPX Files Online and Offline Solutions Of Apple iPhone 13 Pro | Dr.fone
- In 2024, Quick Steps to Change Weather Location on Apple iPhone 15 Plus | Dr.fone
- Title: Why Does iTools Virtual Location Not Work For Apple iPhone 8 Plus/iPad? Solved | Dr.fone
- Author: Isabella
- Created at : 2025-02-17 16:34:22
- Updated at : 2025-02-19 17:14:32
- Link: https://iphone-location.techidaily.com/why-does-itools-virtual-location-not-work-for-apple-iphone-8-plusipad-solved-drfone-by-drfone-virtual-ios/
- License: This work is licensed under CC BY-NC-SA 4.0.