
5 Ways Change Your Home Address in Google/Apple Map on Apple iPhone 7/iPad | Dr.fone
5 Ways:Change Your Home Address in Google/Apple Map on Apple iPhone 7/iPad
Nothing feels more convenient than identifying the direction to your home with just a few clicks. Likewise, your Apple iPhone 7 can take you home with just a few clicks on the address registered on the maps app. But what if your home address changes? How would you update your new address on your Apple iPhone 7? Read further to know the details about changing your home address on your Apple iPhone 7**!**
You can use dual maps apps on an iPhone, i.e., Google Maps and Apple Maps. Both the apps use the address registered on your contact card on your Apple iPhone 7. But the question arises of how to update the home address on iPhone. Although your phone can detect your location, it can’t set it as your home address on its own. In this article, we will discuss some of the most common ways of setting a home address on an iPhone. So, let’s get started!
You can watch the video below to change your location on Google/Apple Map
Part 1: How to Change Your Home Address in Google Maps on iPhone
You can easily set your home address in Google maps on your Apple iPhone 7. It helps easily get the correct directions to your destination from and to your home. But when you shift to a new place, you need to update your new home address on Google maps.
Follow the steps given below to know how to change your home address in Google maps on your Apple iPhone 7:
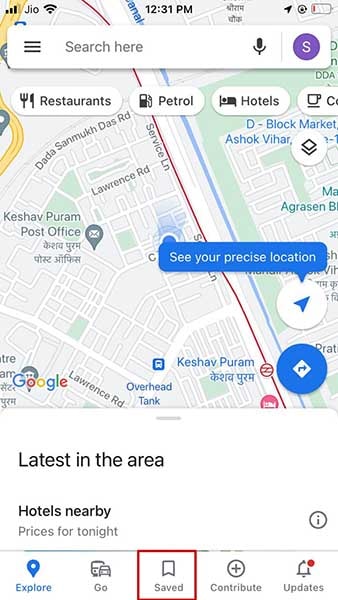
- Step1: Open Google Maps on your Apple iPhone 7 and tap on the “Saved” icon at the bottom of the home screen.
- Step2: Under this section, you will see another section named “Your Lists”.
- Step3: In this section, tap on the option named “Labelled”.
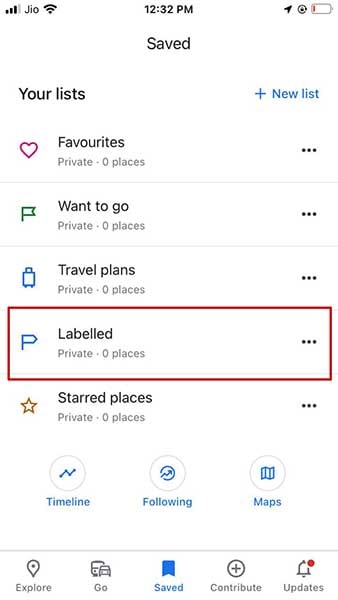
- Step4: The “Labelled” section shows the list of your labeled places such as home, office, etc.
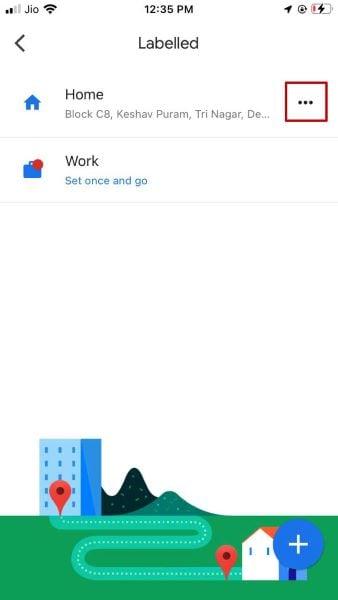
- Step5: You will find the three dots next to each place. For example, tap on the one next to “Home”.
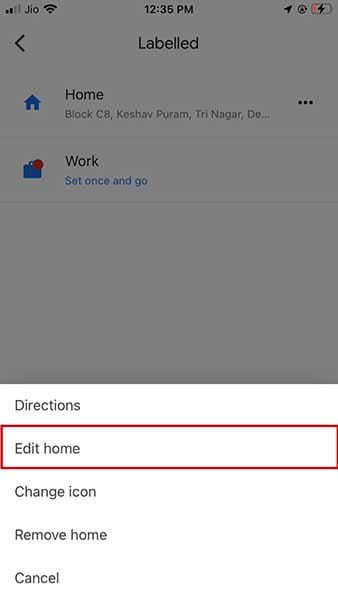
- Step6: When you click on these three dots, you will find different options. For example, select “Edit home”.
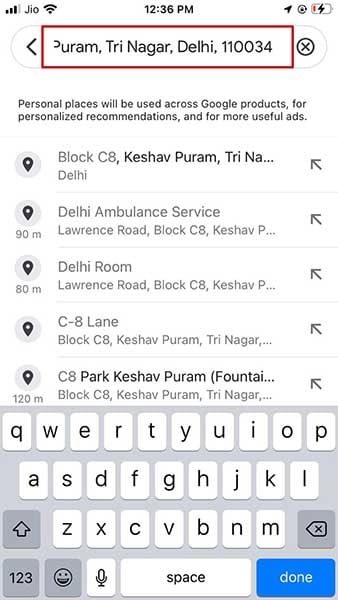
- Step7: A new screen will open. Here, you can remove your old address and type the new one. Else you can locate your current home address on the map.
- Step8: Click on the “Save” option available at the bottom of the screen to save your new address.

Part 2: How to Change Your Home Address in Apple Maps on iPhone
Unlike Google Maps, Apple Map doesn’t allow you to change the home address directly in the app, nor does it automatically detect your new home location. To update your home address, you need to change it in your contact card saved on your Apple iPhone 7.
Here’s how to update your home address in Apple Maps via contact card:
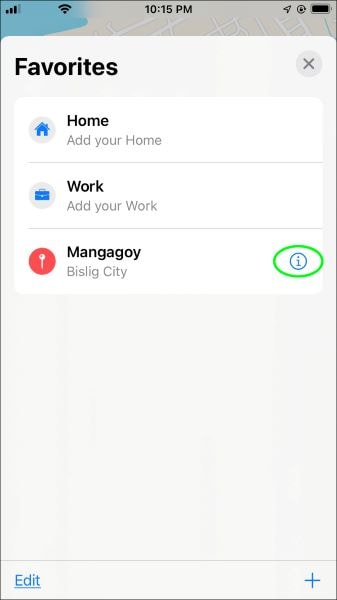
- Step1: Open the “Favorites” section in Apple maps and swipe it up.

- Step2: Tap on the “i” button available beside your home address.
- Step3: Here, you will find an option to open your Contact Card.
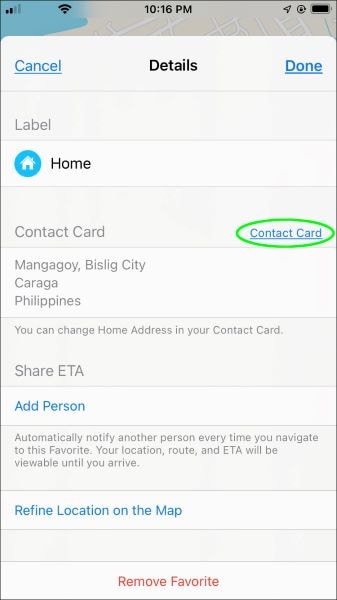
- Step4: Tap on the “Edit” option to add or remove your home address from the contact card.
- Step5: Click on the “Done” button when you are done with the modification.
Part 3: Change iPhone Home Location by Modifying Apple ID Address
Are you moving to a new country or a new region? Do you want to update your new home location on your Apple iPhone 7? You can change your home location by modifying your Apple ID address. Following simple steps will help you to do it with a few clicks:
- Step1: Open the “Settings” of your Apple iPhone 7.
- Step2: Tap on the “iTunes and App Store”.
- Step3: After this, you need to tap on the “View Apple ID” option available on the screen.
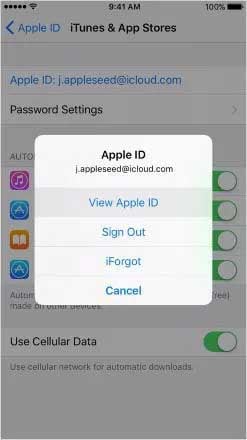
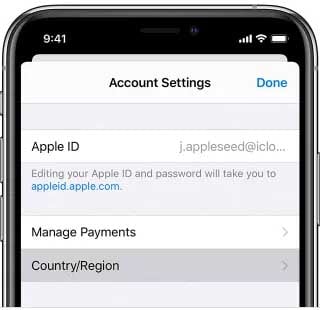
- Step4: Change your location by clicking on “Country/Region” in the “Accounts” section.
- Step5: Accept the terms and conditions before escaping the window.
Note: Make sure that all your Apple ID subscriptions are used and finished because changing the Appl ID address might make them unusable.
Part 4: Changing My Card to Change Home Address on iPhone
Alternatively, you can try to change “My Card” from your contact list to update your new address on your Apple iPhone 7. First, you need to follow the simple steps given below to change your home address in Apple on iPhone via contact cards:
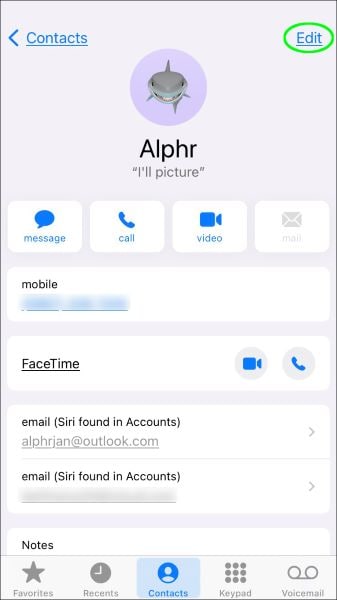
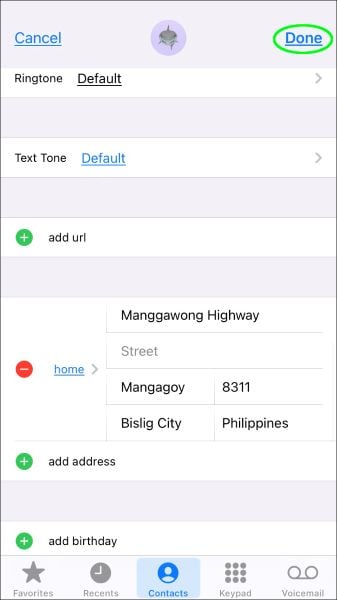
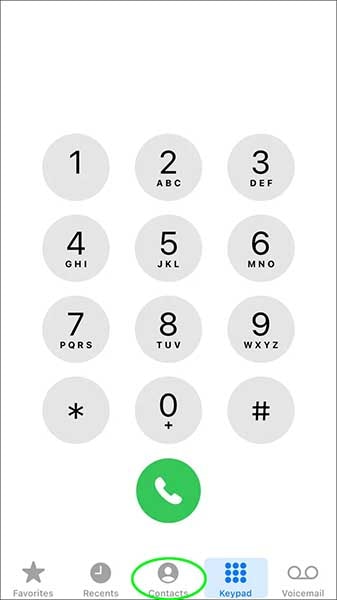
- Step1: Open the contacts in your Apple iPhone 7 and tap on “My Card” to edit your home address.
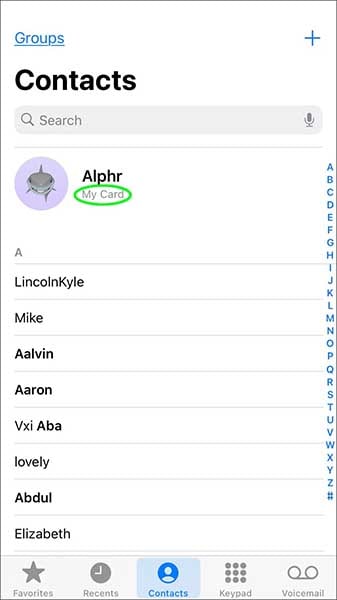
- Step2: You will find the “Edit” option at the top-right corner of the screen. Tap on it.

- Step3: You can easily add your new address here by clicking the “add address” option and deleting the old one.
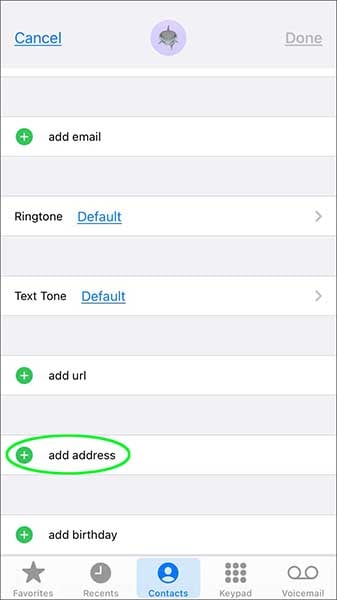
- Step4: Click on the “Done” tab after modifying the address.

Part 5: Spoof Location on iPhone to Change Home Address
Dr.Fone – Virtual Location is a fantastic application from one of the most trusted software companies – Wondershare. You can easily use Dr.Fone for simulating and teleporting the iPhone GPS location anywhere in the world with just one click. This location faker allows you to travel worldwide without even leaving your home.
Dr. Fone comes with the following benefits:
Dr.Fone - Virtual Location
1-Click Location Changer for both iOS and Android
- It works perfectly with all location-based apps, including Pokemon Go, Snapchat, Tinder, etc.
- Compatibility with iOS and Android without jailbreak.
- It is primarily known for its stability. Hence there is no risk of app crashes.
- Change or fake your location to travel worldwide in one click.
3981454 people have downloaded it
Here, we have mentioned some easy steps of location spoofing using Dr.Fone:
- Step 1: First, you need to install and launch Dr.Fone – Virtual Location on the computer. Then, select the “Virtual Location” module.

- Step 2: Connect your cell phone with your system and click on the “Get Started” option.

- Step 3: Now, you will see your current location on the screen. Activate the teleport mode by clicking on the first icon in the screen’s upper-right corner.

- Step 4: Enter the desired location on the search bar and click on the “Go” button.

- Step 5: The system will now show the entered location, and a pop-up will appear for the confirmation. Click on “Move Here”.

- Step 6: Now, your location is changed.
Note: You can go back to your default location by clicking on the “Reset Location” option.
Conclusion
Updating your home address on your Apple iPhone 7 can sometimes be tricky. Some people face issues while doing so. So, we have tried to summarize all the possible methods of changing home addresses in Google and Apple maps on iPhone. Dr.Fone is one of the best and most effective methods for either changing or spoofing location on an iPhone. We hope that you have got all the answers on how to change your home address on your Apple iPhone 7.
How to View GPX Files: Online and Offline Solutions Of Apple iPhone 7
Also known as GPS Exchange Format, GPX is one of the most resourceful file types that is used to store and import/export map-related data. Ideally, a lot of people use GPX files to access a particular route offline when they are off the grid. Though, there are times when users find it hard to view GPX on a map. Don’t worry, there are plenty of ways to view GPX online or offline. In this post, I will let you know how to view GPX in Google Maps and other resourceful desktop applications in detail.
Part 1: What Can you Do with GPX Files?
Before we discuss how to utilize a GPX view online or offline tool, let’s quickly consider how these files work. It stands for GPS Exchange format and stores map-related data in an XML format. Apart from XML, KML and KMZ are other common file formats to store GPX data.
From the exact coordinates of places to their routes, a GPX file would contain the following information:
- Coordinates: Also know as waypoints, a GPX file would contain details about longitude and latitude that are needed to be covered on the map.
- Routes: The main reason for using GPX files is that they store detailed routing information (the path that we need to take to reach from one point to another).
- Tracks: A track consists of various points that we are merged to form the route or the path.

Let’s suppose you have devised a route between two points that you would need later on. You can now export the GPX file from the application and even import it to the same or another application. When you use the GPX viewer, it will let you access the route offline without an active internet connection. That’s why GPX files are used to view a route offline while hiking, trekking, cycling, and do other offline activities.
Part 2: How to View GPX Files Online in Google Maps?
The good thing is that there are tons of options to view GPX online on desktop, Android, or iOS platforms. Some of these freely available solutions to view GPX on Map are Google Earth, Google Maps, Bing Maps, Garmin BaseCamp, GPX Viewer, and so on.
Out of them, Google Maps is one of the most used solutions to view GPX online on smartphones and desktops alike. As of now, you can import GPX files in the KML format or even load CSV files of exact coordinates on Google Maps. To learn how to view GPX in Google Maps, follow these steps:
Step 1: Go to Your Places in Google Maps
To view GPX on the map, you can first head to the official website of Google Maps on your computer. Now, just click on the hamburger (three-line) icon from the top-left corner to access its options.

This will display various options related to your Google Maps account. From here, you can just click on the “Your Places” feature.

Step 2: Choose to Create a New Map
As a dedicated section of “Your Places” would be launched, you can view all the saved places for your Google Maps account. Here, you can go to the “Maps” tab to view the existing saved route and spots. Since you have to view GPX in Google Maps, you can click on the “Create Map” option from the bottom to load a new map.

Step 3: Import and View the GPX File Online
This will make Google Maps load a new page that will let you create a fresh map as per your preferences. Here, you can just click on the “Import” button to load a browser window from where you can directly load a GPX file on Google Maps and make it available offline as well.

Part 3: How to View a GPX File Offline with Dr.Fone – Virtual Location?
Besides Google Maps, you can also take the assistance of Dr.Fone – Virtual Location to view GPX files on your computers offline. Since it is a desktop tool, it would let you load any GPX file without being connected to an active internet connection. Besides that, the application can also be used to spoof the location of your iOS device or simulate its movement in a route without jailbreaking it.
Therefore, if you want, you can first simulate the movement of your device and export the GPX file. Later, you can import the saved GPX file and simulate your Apple iPhone 7 movement in the same route without any trouble.
Step 1: Launch Dr.Fone – Virtual Location and connect your Apple iPhone 7
At first, you can just connect your Apple iPhone 7 using a working lightning cable and launch the Dr.Fone – Virtual Location application. Once your device is detected, just click on the “Get Started” and agree to its terms and conditions.
Step 2: Simulate the Movement of your Apple iPhone 7
The application would automatically detect your Apple iPhone 7 on the interface with its present location. To simulate its movement, you can click on the Multi-stop or One-stop Mode icons from the top.

You can now drop the pin in a route on the map and click on the “Move Here” Button to start simulating the movement.

Subsequently, you can select the number of times you want to cover the route and click on the “March” button. The application will even let you select a preferred speed for the movement.

Step 3: Export or Import the GPX Files
Once you have loaded the map on the interface, you can easily save it offline as a GPX file. To do that, just click on the Export icon from the floating menu on the side.

Similarly, you can also import a GPX file directly to the Dr.Fone application. To do this, you just have to click on the “Import” icon from the sidebar. This will open a browser window, letting you go to a location on your computer where the GPX file is saved.

Once the GPX file is loaded, you can simply wait for a while and let the application process it without closing it in between.

As you can see, it is pretty easy to view GPX online or offline using the right tools. In this post, I have included a detailed guide on how to view GPX in Google Maps. Besides that, I have also included another solution to view GPX on a map using Dr.Fone - Virtual Location (iOS). Apart from importing/exporting GPX files, the application can also be used to spoof your Apple iPhone 7’s location or simulate its movement virtually from anywhere you want.
Does PokeGo++ still work on Apple iPhone 7/iPad?
Pokemon Go players always look forward to cheats and hacks that can help them catch more Pokemon in the game. While the majority of cheats available on the Internet no longer work, there are a few tricks that might help you expand your collection with unique Pokemon characters.
One such cheat/hack, that has helped many iOS users collect Pokemon in the past, is PokeGo++. If you’ve been planning to use PokeGo++ to catch rare Pokemon, continue reading; this guide will provide you a deep insight into PokeGo++ and whether you can use it in 2021 or not.
Part 1: What is Pokego++?
If you’re new to the Pokemon Go world and haven’t heard about PokeGo++, here’s what you need to know. It’s basically a hacked IPA version of the original Pokemon Go that comes with a built-in joystick feature. You can use this feature to teleport your location to anywhere in the world and catch a wide variety of Pokemon without even walking a single step.

PokeGo++ was developed by the developers at Global++ to give users leverage and help them catch their favorite Pokemon characters easily. These developers reverse-engineered the original Pokemon Go code released by Niantic and designed their own version of the game, i.e., Poke Go++. With PokeGo++, you can set your smartphone’s GPS location instantly and find some of the rarest Pokemon characters to increase your XP.
It’s worth noting that PokeGo++ was released for both Android and iOS. Apple iPhone 7/iPad users could use PokeGo++ via Cydia Impactor. On the other hand, PokeGo++ Android could be installed using Fly GPS. For users who don’t know, Cydia Impactor is a dedicated iOS tool that lets users install and run sideload apps on the iDevice without having to jailbreak it.
Part 2: Where Can I get PokeGo ++
So, let’s get to the real question, i.e., does PokeGo++ still work. Unfortunately, the answer is “No”, PokeGo++ is neither available for iOS nor Android. Back in 2019, when the majority of users started switching to PokeGo++, Niantic filed a lawsuit against Global++. They claimed that the hacked version of Pokemon Go gives an unfair advantage to some users. In addition to this, Niantic also stated that PokeGo++ was developed by infringing on Niantic’s intellectual property rights.
Due to this lawsuit, Global++ had to immediately stop the release of PokeGo++ to its users, take down their official website, and delete all their discord servers as well. In fact, Niantic even secured all their future projects with this lawsuit. It was believed that Global++ was secretly working on a hacked version of Harry Potter: Wizards Unite, Niantic’s next big project. But, due to the lawsuit, they had to stop working on this as well. So, as shocking as it may sound, but you can no longer use PokeGo++ Apple iPhone 7 or Android to fake GPS location and catch new Pokemon.
Part 3: Any better alternative for PokeGo ++
Even though PokeGo++ is no longer available, people still look forward to using other hacks/tricks to manipulate their GPS location to collect more Pokemon. So, if PokeGo++ doesn’t work anymore, what’s an alternative that can help you use a fake GPS location in Pokemon Go.
The answer is Dr.Fone - Virtual Location (iOS) . It’s a dedicated geo-spoofing tool for iOS that comes with a built-in “Teleport Mode” feature. Thanks to this feature, you can change your smartphone’s location to anywhere in the world with a single click.
Dr.Fone - Virtual Location also comes with a dedicated GPS Joystick. This means apart from changing your smartphone’s location, you can also fake your movement on the map and virtually collect different Pokemon. One of the best features of Virtual Location is that it lets you customize your movement speed. So, even if you are faking your location in the game, you can stay assured that Niantic won’t ban your account.
Here are a few key features of Dr.Fone - Virtual Location (iOS) that makes it the best geo spoofing tool to fake GPS location in Pokemon Go.
- Use Teleport Mode to Choose Any Location Across the Globe
- Use GPS Joystick to virtually collect all your favorite Pokemon GO characters
- Customize the movement speed using a simple slider
- Automatic marching to configure your character to move in one direction automatically
- Control GPS location for up to 5 iOS devices simultaneously
- Compatible with the latest iOS version
So, if you are also ready to use the best PokeGo++ alternative, here’s the detailed step-by-step process to use Dr.Fone - Virtual Location.
That’s it; when you’ll launch Pokemon Go, you’ll automatically notice different streets. At this point, you can enable “GPS Joystick” and easily control your movement without walking at all.
Conclusion
Despite being a pretty useful tweaked version of Pokemon Go, PokeGO++ is not available anymore. However, if you still want to catch different types of Pokemon in the game, you can use Dr.Fone - Virtual Location (iOS) to set a fake GPS location in the game. And, if you are an Android user, you can directly download any of the GPS Joystick apps on your smartphone and use it to manipulate the smartphone’s GPS location easily.
Also read:
- [New] Access Exclusive Video Artwork – Free, Flawless, and Fast
- [New] In 2024, Comprehensive Guide to iOS Screenshotting
- [Updated] Future Insight Alternate Pathways
- 3 Smart and Simple Ways to Change Home Address on Apple iPhone XS | Dr.fone
- 制限なしロゴ無し:Video Downloadhelperライセンスを完全に活用する手順
- How to Change Your Location on Apple iPhone 13 Pro | Dr.fone
- How to Enable, Disable, and Change Safari Location on Apple iPhone 6 | Dr.fone
- How to play HEVC H.265 video on Galaxy Z Fold 5?
- In 2024, 10 Easy-to-Use FRP Bypass Tools for Unlocking Google Accounts On Infinix Note 30i
- In 2024, Does iTools virtual location not work On Apple iPhone SE/iPad? | Dr.fone
- In 2024, Forgot Pattern Lock? Heres How You Can Unlock Oppo A59 5G Pattern Lock Screen
- In 2024, How to Easily and Quickly Draw on Photos App in Windows 10
- In 2024, How To Fake GPS On Infinix Hot 40i For Mobile Legends? | Dr.fone
- In 2024, How to See Someones Location on Apple iPhone 12 Pro Max | Dr.fone
- Quick Steps to Change Weather Location on Apple iPhone 15 Pro | Dr.fone
- Quick Steps to Change Weather Location on Apple iPhone SE (2020) | Dr.fone
- Title: 5 Ways Change Your Home Address in Google/Apple Map on Apple iPhone 7/iPad | Dr.fone
- Author: Isabella
- Created at : 2024-10-04 16:28:13
- Updated at : 2024-10-11 17:54:07
- Link: https://iphone-location.techidaily.com/5-ways-change-your-home-address-in-googleapple-map-on-apple-iphone-7ipad-drfone-by-drfone-virtual-ios/
- License: This work is licensed under CC BY-NC-SA 4.0.